Performance Monitor counters Exchange 2010

Performance counters are very important to determine the performance of the server. As an administrator/Consultant/architect you should aware of the basis performance counter which are important for both exchange and administrator prospective.

Microsoft TechNet article (http://technet.microsoft.com/en-us/library/dd335215) talks in-depth of the performance counters for each of the exchange role and we will touch base some of the important ones on server role basis

You also find the spreadsheet which talk about the Exchange 2010 performance and threshold counters  from the below location

http://gallery.technet.microsoft.com/Performance-and-Threshold-d32ff5a6

Microsoft Exchange 2003 to Exchange 2010 Cross Forest migration in Brief

I wanted to write this article from a very long time and unfortunately I could not make it up. Today I decided to write this in just few lines and come back with in-depth details. Migration from One platform to other is not easy and it needs lots of planning , efforts and times. Things can go wrong at every step but just don’t give up, don’t give up, don’t give up…

  • Prepare new AD forest and Install exchange 2010 in the new forest. Exchange 2010 can also be a different organization due to merger and acquisition. 
  • Migration cannot happen over night and its important that we make necessary configuration that users from both the forest are able to send and receive emails and they are able to see Global Address book of each other and more importantly free busy information is synchronized.  
  • Configure mail flow between exchange 2003 and exchange 2010 using SMTP connectors for exchange 2003 and Send and receive connectors for exchange 2010

  • Configure FIM 2010 or ILM 2007 for GAL synchronization between exchange 2003 and exchange 2010

  • Configure Inter org replication tool to share free busy information between exchange 2003 to Exchange 2010

  • GAL sync will create Mail Enabled contacts(MEU) in the target forest,  for each mailboxes in the source forest. With Custom code, FIM/ILM can also create mail enabled users(MEU) in the target forest instead of mail enabled user

  • If only Mail enabled users are created using FIM/ILM then you can use Prepare- MoveRequest.ps1

  • Prepare-MoveRequest.ps1 will convert the mail enabled contacts to mail enabled users and it will also disable the user and it will copy the follow attributes to the destination mail enabled user – legacyExchangeDN, mail, mailnickname, msExchmailboxGuid, proxyAddresses, X500, targetAddress, userAccountControl, userprincipalName

  • Prepare a server for installation of ADMT(Active directory migration tool).  This tool will help to get the SID History and export the password of source account to destination

  • SID History is to maintain the access of users resources on the target domain and Password export server will help in exporting the password form source account to the destination account

  • I think you are all set now to move the mailbox from the exchange 2003 to exchange 2010 using the Powershell cmdlet

I think this the quick summary process of migration from exchange 2003 to exchange 2010. I am very eager to write this complete article in details. I will come back soon on this soon 🙂


Exchange 2010 SP1/SP2 – Deleting email sent to Wrong DL

As an Exchange Admin, how many times have you got a request to delete email, from your senior management, for deleting specific emails from specific mailboxes? I am sure most of you would say, ”Its Crazy Man”. I personally have seen very important emails being sent to a wrong DL and management coming to us for help. Users may even try to recall the message, with only some being successful. This would add a new set of emails in the mailbox. There can also be situations like, where Spam emails are sent to the DL users’ mailbox, or there is a requirement to delete emails between specific dates. These are the various possible requirements from users, and it does not come as a surprise to me.

In Exchange 2000 and 2003, this can be achieved by using Exmerge.

In Exchange 2007, this can be achieved by using export-mailbox and this cmdlet has enhanced in Exchange 2010 to New-MailboxExportrequest. The cmdlet does not comes with the option to delete the contents. MS also have added couple new cmdlets to export and import the content of the mailbox

In Exchange 2010, this can be achieved using search-Mailbox

Here are simple steps for the Exchange Admins, who can get this task done real quick in Exchange 2010 SP1/SP2 using search-mailbox. But, keep in mind that, these steps suggest permanent deletion, which removes emails from dumpster as well. So only option to recover is go back to backup.

  1. In Exchange 2010, if you want to Import and Export mailbox content and delete unwanted email from the mailbox then, you need to have Mailbox Import Export management role assigned.
  2. Below Powershell cmdlet, New-ManagmentRoleAssignment helps us to assign the right management role “mailbox Import Export” to a particular user.
New-managementRoleAssignment –Role “Mailbox Import Export” –User administrator

Figure 1.  Assigning a new Management role for a user Administrator

3. Similarly if you want to have the permission assigned to a group of users, then you can use the below cmdlet. Make sure you assign the permission to the universal security group.

New-ManagementRoleAssignment -Name "Import-Export Admins" -SecurityGroup "Security group name" -Role "Mailbox Import Export"

4. Once you have the necessary permission to run the search-mailbox then, we are good to start. Lets start with search and on logging mode, so that we have the search result logged in the target mailbox

5.  Below is the Powershell cmdlet search-mailbox, which goes through each mailbox in distribution group OrgVIP, in log only mode. It will generate the report on the log, in the Target mailbox temp, under the folder the Search result. Figure 2. shows the details of the execution.

get-DistributiongroupMember Orgvip | Search-Mailbox -SearchQuery subject:"Organization Financial Report" -TargetMailbox Temp -TargetFolder SearchResult -LogLevel Full

Figure 2. Execution details of the Search-mailbox cmdlet with logonly mode

6. With loglevel Full option the cmdlet will generate the CSV in the target mailbox. Figure 3. shows the details of the CSV result file.

Figure 3. Details after execution of search-mailbox in log only mode.

6. It’s always recommended to have a copy of these emails, which are being searched for, as a back-up reference. To get a copy of all the reference email, just remove the -logonly option

get-DistributiongroupMember Orgvip | Search-Mailbox -SearchQuery subject:"Organization Financial Report" -TargetMailbox Temp -TargetFolder SearchResult -LogLevel Full

7. Figure 4. Shows the details of the searched emails in the target mailbox. It has the copy of the emails with the detail location. If an email is deleted/moved, it will show the current location folder, and if it is moved to the dumpster, then the result would also show the dumpster folder details.

Figure 4. Copy the searched email to the target mailbox.

8. Finally we have the copy of the emails. Now, It is time to delete the emails. Below is the Powershell cmdlet, which searches each mailbox from the DL and deletes the contents. To delete the content we need to use the option Deletecontent. You really don’t have to provide the target mailbox parameter for deleting the emails.

get-DistributiongroupMember Orgvip | Search-Mailbox -SearchQuery subject:"Organization Financial Report" -DeleteContent

9. The search query is the important attribute of the cmdlet. It can be passed with various options, to get more accurate search results. TechNet Reference

PropertyExample
Attachmentsattachment:annualreport.pptx
Cccc:paul shencc:paulscc:pauls@contoso.com
Fromfrom:bharat sunejafrom:bsunejafrom:bsuneja@contoso.com
Sentsent:yesterday
SubjectSubject:”patent filing”
Toto:”ben Smith” “to:bsmithto:besmith@contoso.com”
BodyFinancial Report

10. Couples of various situation to use search-mailbox with delete content

A. Searching and deleting email containing attachment spam.csv in all the mailbox in the organization

get-mailbox -resultsize unlimited | Search-Mailbox -SearchQuery attachment:"spam.csv" -DeleteContent

D. Searching and deleting emails containing attachment spam.csv and subject is hi against all the mailbox in the organization

get-mailbox -resultsize unlimited | Search-Mailbox -SearchQuery 'attachment:"spam.csv" and subject:Hi' -DeleteContent

C. If you wanted to display the details of the search result on the shell then you need to use the option Estimateresultonly

get-mailbox -server <Servername> | Search-Mailbox -SearchQuery 'attachment:"spam.csv" and subject:Hi' -Estimateresultonly

D. Delete all the email from all the mailbox of a before the specific date. In the below example I am deleting all the email before the date 18th Sep 2011(“dd/mm/yyy’)

get-mailbox -database <Databasename> -resultsize unlimited | Search-Mailbox -SearchQuery Received:<$("09/18/201") -deletecontent

E. Delete all the email from all the mailbox of a database between the specific dates. In the below example I am deleting all the email before the date 18th Sep 2011(“dd/mm/yyy’) – 1st Jan 2012

get-mailbox -database <Databasename> -resultsize unlimited | Search-Mailbox -SearchQuery Received:<$("09/18/2011") –deletecontent

F. Delete all the email from the mailbox between the specific date

Search-Mailbox -Identity <mailboxname> -SearchQuery 'Received:>$("09/18/2011") and Received:<$("01/27/2012")` -deletecontent

G. Delete all the email from yesterday against the member of the distribution group.

get-DistributiongroupMember Orgvip | Search-Mailbox -SearchQuery Received:today -deletecontent -confirm:false   

H. Delete all the email on a specific date from a specific mailbox.

Search-Mailbox <usermailbox> -SearchQuery Received:01/27/2012 -deletecontent

Search-mailbox is a cool and nice cmdlet with some good options to get the required result. I think this is make life of the exchange administrator easier on a tough situations. Hope this helps you to face a real time scenarios

Configuring Exchange 2010 clients Outlook and Outlook Web App as Lync 2010 end points(IM and presence Integration with Exchange 2010 clients) using PowerShell

One of the main purposes of Lync is IM and presence in the organization. The main idea is to initiate IM conversation on whichever the client you are and also to know the presence status if user is available for chat and kick the chat conversation. The main and cool idea of Microsoft is to integrate all its application and that’s been one of the key successes with Lync and Exchange.

Lync 2010 IM and Presence Integration with Outlook

Prerequisites:

1. Deployed Microsoft Exchange Server 2010 and Lync Server 2010.
2. Lync Frontend pool where user is located and client Access server can connect
3. Lync and mailbox enabled users

Lync 2010 IM and presence integration with outlook is automatically performed when you install Lync client on the work satiation. Lync client installs all the necessary add-ins for the outlook to pick up the presence details and also allows to chat directly from the outlook. This feature is only available in outlook 2007 and outlook 2010 clients. Below Figure 1 is reference snap.

Figure 1. Lync user presence on outlook client

You can configure the bunch of settings on the Lync client to integrate with Microsoft Exchange or Microsoft Outlook. Some of the settings like below Figure 2.

1. Update the presence based on my calendar information.
2. Save instance message conversations in my email conversations history folder etc..

Figure 2. Lync client integration with Microsoft Exchange and Microsoft outlook

Lync 2010 IM and Presence Integration with Outlook Web App

Lync 2010 IM and presence with outlook Web App is not automatically integrated. Specific configuration has to be performed.

Prerequisites:

1. Deployed Microsoft Exchange Server 2010 and Lync Server 2010.
2. Lync Frontend pool where user is located and client Access server can connect
3. Lync and mailbox enabled users
4. Exchange Certificate to be configured with Lync for integration (Make sure CA is trusted by both Exchange 2010 and Lync 2010)

Preparing the CAS servers for the integration

1. Download CWAOWASSPMain.msi from Microsoft Office Communications Server 2010 R2 Web Service Provider and extract the file  “c:\Web Service provider Installer Package” and it will extract below mentioned files. Execute and install “CWAOWAASSP.msi”

1. CWAOWAASSP.msi
2. Donnetfx35setup.exe
3. UcamRedist.msi
4. Vcredist_x64.exe

2. Download and Install the hotfix for OCS 2007 R2 web service provider from OCS 2007 R2 Web Service Provider Hotfix

3. Update Unified Communications Managed API 2.0 Redist (64 Bit) from Hotfix KB 2282949

Configuring Exchange 2010

1. Get the exchange certificate using the below PowerShell command

$Excert = (Get-ExchangeCertificate | Where {$_.Services -like “*IIS*”}).Thumbprint
$Excert

2. Using the above exchange certificate configure the OWA virtual directory.  Need to make sure to provide appropriate parameter “Instantmessagingservername” with front end pool name. In the below example I have given as lynccst.abc.com which is the front end pool name in my lab.

Get-ExchangeServer | Get-OWAVirtualDirectory | Set-OWAVirtualDirectory -InstantMessagingType OCS -InstantMessagingEnabled:$true -InstantMessagingCertificateThumbprint $Excert -InstantMessagingServerName lyncst.abc.com

Configure the Lync 2010

1. Access Lync Server management shell and execute the PowerShell cmdlet Get-Cssite to get the Site ID. In our lab the site ID is 1. Below is reference snap

2. Next we need to configure the Trusted application pool and Add ExchangeOutlookWebAccess as Trusted application

3. To configure Trusted application pool use the below mentioned PowerShell command on Lync management shell with the below parameter. You can ignore the warning message as its refering to the computer object which does not exists in the AD

  • Identity = CAS server or CAS Server Arrayname or any SAN name defined in the certificate
  • Registrar = Lync Frontend pool
  • SiteID = site id which we picked above
  • RequiresReplication = $false

New-CsTrustedApplicationPool -Identity mail.abc.com -Registrar lyncst.abc.com -Site 1 -RequiresReplication $false

4. Add Exchangeoutlookwebapp to the Trusted application using the PowerShell cmdlet and parameter as defined below

  • ApplicationId = ExchangeOutlookWebApp
  • TrustedApplicationPoolFqdn = CAS server or CAS Server Array name or any SAN name defined in the certificate
  • pool = Any free port (You can check the unused port using netstat -a | findstr 5060)

New-CsTrustedApplication -ApplicationId ExchangeOutlookWebApp -TrustedApplicationPoolFqdn mail.abc.com -Port 5060

5. Finally its time to publish the topology using the PowerShell cmdlet Enable-CStopology

6. login to the OWA and you should be able to view the status of the users.

I think every organization should use this feature to integrate between Lync 2010 and Exchange 2010. This makes life easier where users can initiate chat from any client they are in. In the above example I have defined only the integration with one front end pool from a specific CAS server. If you have multiple front end pool then the connected pool will proxy the request to the other pool. In a bigger organization where you have multiple AD site and frontend pool for each site then you may follow the same progress and configure the CAS server and the frontend pool on the specific site. Its also a best practice to configure in this fashion but there is definitely a additional load on the CAS server.

Reference link : Microsoft TechNet

I hope you can use this in your organization as well

Director role in Lync 2010

Microsoft has introduced a new dedicated role in Lync 2010 and its known as Directory role. In OCS 2007 and R2 this role existed but was not a explicit role. it was just a frontend server with out any users homed on it.

It’s server which is generally placed before the front end pool. Its purely a optional server and it can be a single Directory role server or pool of servers behind a hardware load balancer or DNS load balancing. It can disadvantage if you have a single directory role server when it goes down. So its recommended to have multiple servers into the directory pool to avoid single point of failure. One more way of avoiding single point of failure is add multiple SRV records. One SRV record for Directory pool and other one for the Front end pool with different preference.

This role can only be deployed on the sever running Lync server2010 Enterprise edition and it cannot clubbed with any other role.

figure 1. Directory server/pool placement.

Director role acts has a mediator between Lync 2010 client and front end pool. Lync 2010 client can be coming form the Internal or Internet and service offered by the director server varies depending on the client source(Internal or Internet)

Director role service for Internal client

During deployment SRV record should be pointing to the director pool. So when the client issues a request on the SRV _sipinternaltls._tcp.<domain>.com record , then the service is handled by the director pool and it determine the front end pool where the users are located from its local database and and redirect to the correct pool. Its one more useful when you have a multiple front end pool.

Once the client determines its front end pool then director role server will not be communicated any more.

Director role service for Internet client

The main purpose of director role is for the users/client coming from the internet. Though its optional, its recommended to implement for security reasons and it allows and authenticates  clients are connecting from Internet. When users from the internet tries to connect the Lync server, it talks to the edge server and it will be forwards to director for the authentication. Once client is authenticated then it proxies the client request to the appropriate front end pool. It also maintains the communication path between the client and the user’s home pool as well as the Edge Server.

Refence link from DR Rez

DNS Requirement for Remote Access and local access of Lync 2010 client users

DNS configuration varies depending the current DNS settings in the organization. You need get check if the current DNS is configured with DNS split brain syndrome or not. DNS split brain syndrome  is a beautiful concept as such and its very useful in a organization where you have same domain name space is followed in internal and external DNS.

Eg.

Internal DNS name space : abc.com
External DNS name space : abc.com

DNS with out split brain syndrome is where internal and external name space is different.

Eg.

Internal DNS name space : abc.local
External DNS name space : abc.com

Most organization follow this for security reasons.

Lets understand how the Lync Client 2010 will connect when you have two different name space. Before we get into this, lets understand what lync 2010 client needs to connect to its frontend server

When user enters the email address Eg. Krishna@abc.com in the lync client and click on connect then the client will take the user email domain eg abc.com and try to locate the sip server  using srv record in the DNS. SRV record will be in this format eg. “_sipinternaltls._tcp.abc.com” where abc.com is the domain name. With this SRV record lync client connects and access the front-end pool on port 5061.

lync client tries to query the SRV record in the following order and connects using the best available SRV record

_sipinternaltls._tcp.abc.com
_sipinternal._tcp.abc.com
_sip._tls.abc.com

With this information lets focus on the configuration required for the internal access of lync 2010 clients

Create a zone in the internal DNS that matches the external DNS zone (for example, abc.com) and create DNS A records corresponding to the Lync Server 2010 pool used for automatic configuration. For example, if a user is homed on pool01.abc.local but signs into Lync as user@abc.com, create an internal DNS zone called abc.com and inside it, create a DNS A record for pool01.abc.com or you can create a pin point zone which matching the external DNS zone. pin point zone can only be created using dnscmd.exe. below is the example to create pin point zone in the internal dns for the domain abc.com and front-end pool name pool01.abc.com

dnscmd . /zoneadd _sipinternaltls._tcp.abc.com. /dsprimary
dnscmd . /recordadd _sipinternaltls._tcp.abc.com. @ SRV 0 0 5061 pool01.abc.com.
dnscmd . /zoneadd pool01.abc.com. /dsprimary
dnscmd . /recordadd pool01.contoso.com. @ A 192.168.1.10
dnscmd . /recordadd pool01.contoso.com. @ A 192.168.1.11

We are good from the internal, similar configuration needs to be done from the Internet DNS as well.

Create a SRV record in Internet DNS “_sip._tls.abc.com” where abc.com is the domain name

Eg.
dnscmd . /recordadd _sip._tls.abc.com. @ SRV 0 0 443

As discussed earlier, lync client uses specific order to query the SRV records. When the lync client is accessing from the internet then the first two SRV request will fail as its not available in the Internet DNS zone and it would connect using the last SRV record “_sip._tls.abc.com” which is defined in the DNS zone

I hope this information helps you to have better understanding the DNS requirement

Creating and Configuring Custom Offline Address book with Web-Based Distribution in Exchange 2010 using PowerShell

What is offline address book? Its a copy of address book that allow us to download via outlook client. The main use of offline address book is to allow access address book when the users are disconnected from the network or when they are working offline/cached mode.

OAB has evolved thought various versions like OAB Version2, OAB Version 3 and now its OAB Version4. OAB Version 4 was introduced in Exchange 2003 sp2 and same is still continued in Exchange 2007 and Exchange 2010.

Microsoft Introduced the concept of Web-based distribution point from Exchange 2007, it has various advantages over legacy public folder distribution, thought its still supported. Web-based distribution is the most effective and stable way to create, configure and download OAB. Web-based distribution supports more clients, consumes less bandwidth. The OAB is virtual directory in the client access server. This virtual directory is created on default website in IIS and configured for Internal Access.

Before we configure Multiple OAB lets try to understand how OAB generation and web-distribution works together and how outlook downloads the OAB to its client machine.

1. First Mailbox Server in the Organization is identified as OAB Generation Server. (generally moved to different server later point)

2. OABGen service running on the mailbox server helps to generate, creates and updates OAB files. OABGen service is part of the System Attendant Service. All OAB Generated file by default will be located at path “\Program Files\Microsoft\Exchange Server\V14\ExchangeOAB”.

3. OABGen communicates with the active directory and generates the address book for all the mailboxes, contacts and other exchange resources in the Exchange organization.

4. OAB files in the mailbox server are compressed file with the extension .LZX format.

5. OAB files are generated in Exchange 2010 Mailbox servers and outlook do not connect directory to the mailbox servers. The solution approach is to use Client Access Server role with web based distribution.

6. On every Client Access Role server, a virtual directory called OAB runs within the default web site. This virtual directory helps in distributing the OAB

7. Do you think we got the complete answer ? No. How does the OAB virtual directory gets the OAB data files from the mailbox server.

8. The answer is, Microsoft Exchange File Distribution Service running on the Client access Server.

9. Microsoft Exchange File Distribution Servers polls the OABGen Server and copies the OAB data from the mailbox servers to CAS server.  Once the complete OAB data is copied then if there is any update then only that data is synchronized with CAS server. The synchronization or poll frequency is 8 hours by default and you can change it if required using PowerShell cmdlets or Exchange console

10. Outlook clients uses the web https URL of the web distribution point and it downloads the OAB into the local computer.

Lets create and configure a new OAB for Particular region and the same configuration steps can be replicated in various region based on the requirement(to create multiple OAB). The main idea is to avoid having mutiple CAS (Multiple web-distribution point) servers in each region pinting to one OAB generating server. Each of the web-distribution server from different region will have to contact the centralized OAB generation server to get the updates. To avoid this scenario we can create additional OAB generating server in each region and configure web-distribution servers pointing to OAB generating server in the local region.

In the below configuration we have a AD site “India” and will be creating a new OAB and will point all the web distribution points to it

Sl.Server nameRoleAD site
1.KEXCHDCDomain ControllerIndia
2.KEXCHHCHub transport server and Client access serverIndia
3.KEXCHMHC01Mailbox ServerIndia

Below is the following activities we will be performing

1. Creating new Offline Address book and configuring web distribution point

2. Updating the address book

3. Configuring mailbox Databases with new OAB

4. Downloading OAB and verification from outlook client

1. Creating Address book and configuring web distribution point


We can create and manage offline address book (OAB) using PowerShell cmdlets. To create a new Offline address book , use the cmdlet New-offlineaddressbook. Below cmdlet creates a new OAB “India – OAB” on a Mailbox server “KEXCHMHC01” and it also adds default global address list into the OAB. Figure 1. show the execution result of new-offlineaddresbook cmdlet. Its throws the warning “OAB needs further configuration and users will not be able to download offline address book”. At the moment OAB not configured for web distribution or public folder distribution, this can be ignored at the moment.

New-offlineAddressbook -name “India-OAB” -addresslist “\default global address list” -server “KEXCHMHC01”

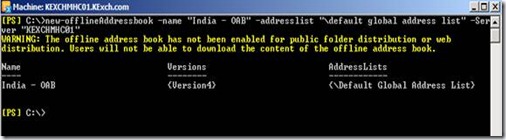
Figure 1. Create new OAB “India – OAB

We created new OAB “India – OAB” and now lets configure it with web-distribution points. Before we configure it we need to get the list of all web distribution servers for India region. Below cmdlet queries all the Client Access(web distribution servers) in the India AD site and assigns to the variable $IndiaCasServers. Figure 2 has the execution summary of the same


$IndiaCasservers = Get-Exchangeserver | ?{($_.admindisplayversion -like “*14*”) -and ($_.site -like “*India”) -and ($_.serverrole -like “*clientaccess*”)} | %{$_.name}

$IndiaCasservers

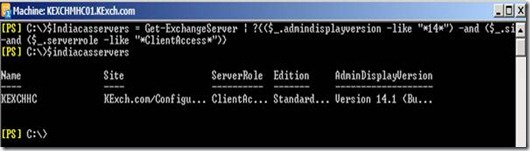
Figure 2. Get the list of all the Web distribution servers in India AD site

Now we create the list of OAB virtual directory from the CAS server list $IndiaCasservers into the array $result

$default = “\OAB (Default web site)”

$result = @()

foreach($server in $IndiaCasservers)

{

      $value = $server + $default

      $result = $result + $value

}


Figure 3. Get the list of OAB Virtual directory for all the CAS Servers

Its time to configure CAS server OAB Virtual directories with the Offline address book. This will also enable to OAB for web distribution. Below is the reference cmdlet and Figure 4 show the execution result.


Set-offlineAddressbook -Identity “India-OAB” -Virtualdirectories $result

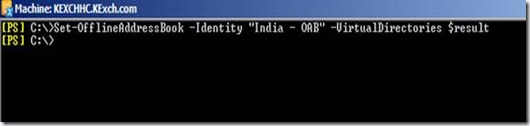
Figure 4. Configures offline address book with the CAS OAB virtual directories

Lets check out the properties of the new offline address book and you should be able to see WebdistributionEnabled is set to True and Virtualdirectories is also configured with the CAS server OAB virtual directories. Figure 5. Marked with red shows the same.

Figure 5. OAB “India-OAB” Properties details

2. Updating the address book

Updating offline address book is the process to force update the offline address book immediately. As we just create a new OAB, it has to be updated with all the recipients in the organization. Update process communicates with the Active directory and get all the recipient like mailbox, contacts etc. and updates itself. Its normally scheduled to run once a day and you can change the schedule depending on the size of the OAB and organization requirement.

Below is the PowerShell cmdlet to update “India – OAB” immediately and figure 6. shows the execution details of the same.


Update-OfflineAddressbook -Identity “India-OAB”

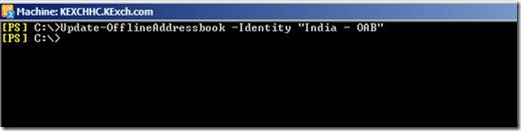
Figure 6. Updating offline address book

The new OAB “India-OAB” has updated itself with the latest information and this information has to be replicated to all the CAS Server. To force update of the CAS server we need to use the below cmdlet which executes update-file distribution service on all the CAS server in the India region and figure 7. shows the execution result of the same.


Get-ExchangeServer | ?{$_.admindisplayversion -like “*14*”) -and ($_.Serverrole -like “*Client*”) -and ($_.site -like “*India*”)} | %{

Update-FileDistributionService $_

}

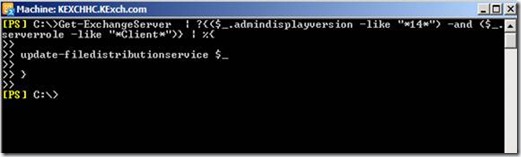
Figure 7. updating File distribution service

3. Configure mailbox Database with new OAB

As we have successfully created, configured and updated the new OAB. Its time to configure the mailbox databases with the new OAB. With the below cmdlet we get all the Exchange database in the India region and configure with the new OAB “India – OAB” and figure 8. shows the execution summary


Get-Exchangeserver | ?{($_.serverrole -like “*Mailbox*”) -and ($_.site -like “*India*”)} | get-mailboxdatabase | set-mailboxdatabase -offlineaddressbook “India – OAB”

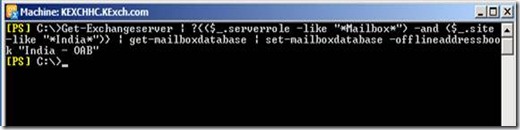
Figure 8. Updating Exchange database with new mailbox database.

4. Downloading OAB and verification


Lets verify using outlook to see if we can download the new OAB and we can also verify the OAB Distribution point URL

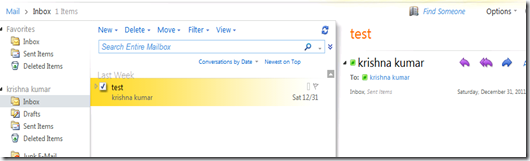
Access user mailbox using outlook and click on send/receive from the menu and click on Download Address book. Make sure you are accessing mailbox which is located in the database which are configured with OAB(above). Figure 9. shows the snap of the same.

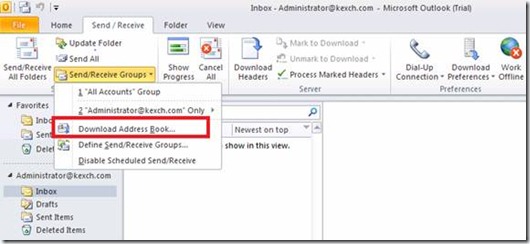
Figure 9. Process to download OAB using Outlook

You should be able to see outlook downloading the OAB into the local computer.

Figure 10. Downloading OAB files into local computer

Outlook OAB file are stored in the default location “\Users\<username>\AppData\Local\Microsoft\Outlook\Offline Address Books” with the extension .oab.


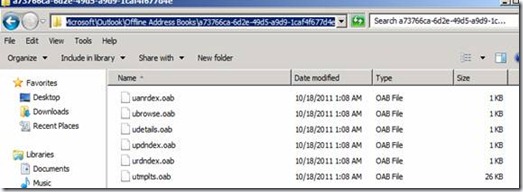
Figure 11. OAB file in the user computer

 We can always find outlook connecting CAS and OAB URL path. Right-click the Outlook icon in the System Tray and select Test E-mail AutoConfiguration and then click on “Test” button on the Test E-mail Auto Configuration as shown in the figure 12. OAB URL is the path OAB distribution point details.

Figure 12. Test E-mail Auto configuration execution result

With this we have successfully created and configured new OAB for a particular region. If you need for multiple region then the same configuration can be replicated. Some times OAB may trouble you some times and it may not update itself. Some of the basic troubleshooting step is rerun the update-offlineaddressbook powershell cmdlet, restart file distribution service and may try force the AD replication. I hope you like to article and you can use this in a real time scenarios

Exchange 2010 – Reseeding failed Database with multithreading

Reseeding is a process of fixing the failed passive copy of the database which basically mean is, the passive database copy is out of sync with active database. Passive copies can be a failed database or failed Index. When Database goes in failed state or failed and suspended state or database Index goes in to failed state then it needs administrator intervension and force the database reseed.  

There can be various reason for database to fail. Replication service running on the host machine is responsible for keeping the database in healthy state. It tries to take corrective action if the database goes out of sync else administrator may have to fix failed database manually.

Below is the nice piece of code which will request you to enter the DAG Name and it will determine the list of failed database and perform full reseed on each of the failed database. In the normal process, reseeding happends on the single database at a time and you can’t limit how many database you can reseed at a time. Eg

Get-MailboxDatabaseCopyStatus $strResponse  |?{$_.status -like “Failed*”} | update-mailboxdatabasecopystatus -deleteexistingfiles -confirm:$false

In the above example cmdlet will get all the failed database and it pipes to update-mailboxdatabase cmdlet. Update-Mailboxdatabasecopy performs the full reseed of the failed database one by one and brings the database into healthy state. If we have very bigger database like 100 GB and it has to update to different site then you know how long it may take. With this senarion you dont want to fix one failed database at a time.

Below script helps you to address the above defined issue. It can reseed the failed database up to max of 10 database in 10 different window at a time and if one database reseeding completes then new failed database will reseed if there is any. This count can be reduced or increased based on the performance of the local server and the network available.

function Createfolders(){ remove-item -path "C:\DBs\bt" -force  -Recurse -confirm:$false -ErrorAction SilentlyContinue | out-null remove-item -path "C:\DBs\ps" -force  -Recurse -confirm:$false -ErrorAction SilentlyContinue| out-null remove-item -path "C:\DBs" -force  -Recurse -confirm:$false -ErrorAction SilentlyContinue| out-null new-item -path "C:\DBs" -ItemType Directory -force | out-null new-item -path "C:\DBs\bt" -ItemType Directory -force | out-null new-item -path "C:\DBs\ps" -ItemType Directory -force | out-null}$strResponse = Read-Host  "`nPlease enter DAG Name to reseed the failed Databases"write-host -f Magenta "Checking for Failed Database copies in the DAG : $strResponse"$databases = Get-MailboxDatabaseCopyStatus $strResponse  |?{$_.status -like "Failed*"}if($databases -ne $null){ write-host -f red "Following Databases are in failed state" $databases Write-host "`n" foreach($database in $databases) { $filename = $database.name $dbname = $database.name $filename = $filename.Replace("\", "_") $DBcopyReport1 = "C:\DBs\bt\$filename.bat" $DBcopyReport2 = "C:\DBs\ps\$filename.ps1" New-item -ItemType file -path $DBcopyReport1 -force | out-null New-item -ItemType file -path $DBcopyReport2 -force | out-null "Powershell.exe `"C:\DBs\bt\$filename.ps1`"" |  Out-File -filepath $DBcopyReport1 -encoding ASCII -append "Add-PSSnapin Microsoft.Exchange.Management.PowerShell.E2010 -ErrorAction SilentlyContinue"| Out-file $DBcopyReport2 -encoding ASCII -append "Suspend-MailboxDatabaseCopy -Identity `"$dbname`" -confirm:" + "$" + "false"| Out-file $DBcopyReport2 -encoding ASCII -append "Update-MailboxDatabaseCopy -Identity `"$dbname`"  -DeleteExistingFiles -confirm:" + "$" + "false -ErrorAction:Stop -WarningAction:SilentlyContinue" | Out-file $DBcopyReport2 -encoding ASCII -append&nbsp; $files = [IO.Directory]::GetFiles("C:\DBs\bt\") $cmdprocess = @() Write-host -f yellow "`nReseeding the following databases" for ($i=0; $i -lt $files.count; $i++) {  $DBDName = $files[$i]  $DBDName =$DBDName.split("\")[3]  $DBDName =$DBDName.split(".")[0]  $DBDName = $DBDName.Replace("_","\")  Write-host -f yellow "$DBDName"  $cmdprocess =$cmdprocess+ [diagnostics.process]::Start($files[$i])  do  {    $cmdp = @()   $continue = 0   foreach($cmdproces in $cmdprocess)   {    $cmdp = $cmdp + $cmdproces.id   }   $processid = Get-Process | %{$_.id}   foreach($cmd in $cmdp)   {    if($processid -contains $cmd)    {       $continue = $continue + 1    }   }   start-sleep(10)   }until($continue -lt 10) } do {  $processid = Get-Process | %{$_.id}  $Loopexit = 0  foreach($cmd in $cmdp)  {    if($processid -contains $cmd)   {   $Loopexit = 1   start-sleep(10)   }  } } until($Loopexit -eq 0) Write-host -f Green "`nReseeding of Failed DB's has been completed"}Else{ Write-host -f Green "All the mailbox Database copy are in Healthy state"}CreatefoldersWrite-host -f Magenta "`nChecking for failed Catalog or Content Index in the DAG :$strResponse"$databases = Get-MailboxDatabaseCopyStatus $strResponse  |?{$_.ContentIndexState -match "Fail" }if($databases -ne $null){write-host -f red "Following Databases are in failed state" $databases Write-host "`n" foreach($database in $databases) { $filename = $database.name $dbname = $database.name $filename = $filename.Replace("\", "_") $DBcopyReport1 = "C:\DBs\bt\$filename.bat" $DBcopyReport2 = "C:\DBs\ps\$filename.ps1" New-item -ItemType file -path $DBcopyReport1 -force | out-null New-item -ItemType file -path $DBcopyReport2 -force | out-null "Powershell.exe `"C:\DBs\bt\$filename.ps1`"" |  Out-File -filepath $DBcopyReport1 -encoding ASCII -append "Add-PSSnapin Microsoft.Exchange.Management.PowerShell.E2010 -ErrorAction SilentlyContinue"| Out-file $DBcopyReport2 -encoding ASCII -append "Suspend-MailboxDatabaseCopy -Identity `"$dbname`" -confirm:" + "$" + "false"| Out-file $DBcopyReport2 -encoding ASCII -append "Update-MailboxDatabaseCopy -Identity `"$dbname`"  -DeleteExistingFiles -confirm:" + "$" + "false -ErrorAction:Stop -WarningAction:SilentlyContinue" | Out-file $DBcopyReport2 -encoding ASCII -append&nbsp; $files = [IO.Directory]::GetFiles("C:\DBs\bt\") $cmdprocess = @() Write-host -f yellow "`nReseeding the following databases" for ($i=0; $i -lt $files.count; $i++) {  $DBDName = $files[$i]  $DBDName =$DBDName.split("\")[3]  $DBDName =$DBDName.split(".")[0]  $DBDName = $DBDName.Replace("_","\")  Write-host -f yellow "$DBDName"  $cmdprocess =$cmdprocess+ [diagnostics.process]::Start($files[$i])  do  {    $cmdp = @()   $continue = 0   foreach($cmdproces in $cmdprocess)   {    $cmdp = $cmdp + $cmdproces.id   }   $processid = Get-Process | %{$_.id}   foreach($cmd in $cmdp)   {    if($processid -contains $cmd)    {       $continue = $continue + 1    }   }   start-sleep(10)   }until($continue -lt 10) } do {  $processid = Get-Process | %{$_.id}  $Loopexit = 0  foreach($cmd in $cmdp)  {    if($processid -contains $cmd)   {   $Loopexit = 1   start-sleep(10)   }  } } until($Loopexit -eq 0) Write-host -f Green "`nReseeding of Failed DB's has been completed"}Else{ Write-host -f Green "All the mailbox Database copy Index are in Healthy state"}

Below is the snap of the execution window and we can see how DB reseed is been executed on multiple window. This will save you lot of time and effors in fixing the database. I hope this article will be helpful to you 🙂

Powershell Script to generate report on update rollup installed on all the Exchange Server 2010 Servers

Latest RU available at this point of time is RU5. When you start updating it’s hard to keep track which server is updated and which server is not unless you make note off. If you wanted to query all the exchange 2010 to find what the rollup version is installed then it’s not easy to find one. Exchange management shell and console will not show the version number of the RU, it only show the major version and service pack version. Exchange console and shell gets updated when ever we install server pack. So one of the best ways to find the latest RUs installed is by checking the version number of Exsetup.exe which is available in the Bin director on the Exchange installed servers.

Below is the script which queries all the Exchange 2010 serves for the file version of Exsetup.exe and write to the text file result.txt. It has the data in the format servername, version number and role installed and each is divided by “|” so its easy to format using excel

$installpath = "c$\Program Files\Microsoft\Exchange Server\V14\Bin\ExSetup.exe"Get-ExchangeServer  | ?{$_.admindisplayversion -like  "*14*"} | %{$Servername = $_.Name$role = $_.serverrole$Path = "\\" + $Servername + "\" + $installpath$fileversion = (Get-Command $Path).FileVersionInfo |ForEach {$_.FileVersion}$result = $Servername + "|" +  $fileversion + "|" + $role$result$result >> result.txt}

I hope this helps you some day to pull this report for your team and manager real quick 🙂

Enable and Disabling Circular logging on Exchange 2010 DAG Database on a fly.

In Exchange 2007 and earlier version of Exchange if you wanted to enable or disable circular logging then you should dismount and mount the database to bring this into effect. In Exchange 2010 if you enable or disable circular logging then this chance will come into effect with in 30 seconds. This is done with the help of replication service and you dont have to dismount and mount the active database to get this changes applied. I think this is cool. You can make the changes on the fly without disrupting the mailbox live users.

Enable circular logging on a Particular databaseGet-mailboxdatabase -Identity DBname | set-mailboxdatabase -CircularloggingEnabled $trueDisable circular logging on a Particular databaseGet-mailboxdatabase -Identity DBname | set-mailboxdatabase -CircularloggingEnabled $falseEnable Circular logging on all the Database in a perticular DAGGet-mailboxdatabase -identity DAGname* | set-mailboxdatabase -CircularloggingEnabled $trueDisable Circular logging on all the database in a perticular DAGGet-mailboxdatabase -identity DAGname* | set-mailboxdatabase -CircularloggingEnabled $false

Feeling nice to blog after a long time on a auspecious day 🙂