Microsoft Exchange DR and High Availability features have evolved a long way to reach DAG in Exchange 2010. DAG provides the features to recover Exchange 2010 Database from Database, Server or Network Failures. It is uses asynchronous replication and log reply technology concept from Exchange 2007 CCR and SCR. Exchange 2010 DAG provides more robust, easy and quicker HA and DR Failover faculty. Let’s understand the how to create DAG and how to failover and fail back on a DR scenario within the Site and cross Sites.
Current Infrastructure:
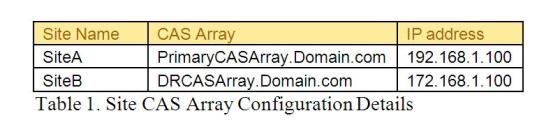
In our lab I have Created Two sites and it has the following Infrastructure in each of the sites Ref. Table 1. Mailbox Role servers has two NICs. Nic with IP address 172.x.x.x is for MAPI connection and Nic with 10.x.x.x is for replication traffic. Router has to be configured between Asite and Bsite for the communication. To be more specific we should be able to reach both the IP address 172.x.x.x and 10.x.x.x.x from other mailbox servers from the same site and from the other site. This link has information on how to configure Windows 2008 machine as router using RRAS
ASite – Primary Site
| Server name | IP Address | Role |
| ADC | 172.168.1.1 | Domain Controller |
| AHC1 | 172.168.1.2 | Hub and CAS |
| AMBX1 | 172.168.1.3(MAPI) | Mailbox Server |
| | 10.0.1.1(Replication) | |
| AMBX1 | 172.168.1.4(MAPI) | Mailbox Server |
| | 10.0.1.1(Replication) | |

10.0.2.10 -NIC2 NIC1 – 172.168.1.10
Router
 10.0.2.10 -NIC2 NIC1 – 172.168.2.10
BSite – Secondary Site
| Server name | IP Address | Role |
| BDC | 172.168.2.1 | Domain Controller |
| BHC1 | 172.168.2.2 | Hub and CAS |
| BMBX1 | 172.168.2.3(MAPI) | Mailbox Server |
| | 10.0.2.1(Replication) | |
Table 1: LAB Infrastructure
Great, now we have the complete LAB Infrastructure created for testing our DAG across the Site. I will just run throw the steps on creating and configuring DAG on the above Infrastructure as we will be more focusing on Failover and fail back settings. If you wanted more In-depth details on DAG configuration then you can always refer TechNet and some nice articles from Neil Hobson, Link 1 and Link 2.
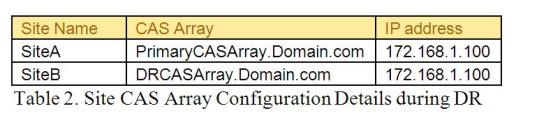
We will begin by creating a DAG to spread across two sites, Site Asite and Bsite. So we need some details from both the Sites and below Table 2 has the all the required details. Lets Create DAG using below details
Create A DAG
We will create a DAG which will spread across both the sites, we need some information from both the sites and below are the details
| DAG Name | DAG01 |
| Witness Server | AHC1 |
| Witness Directory | C:\DAG01Witness |
| Alternate Witness Server | BHC1 |
| Alternate Directory | C:\DAG01Witness |
| IPAddress from both the sites | 172.168.1.9,172.168.2.9 |
Table 2: Details for DAG Creation
Login to the Mailbox Role Server AMBX1 on a Primary Site. Execute the below commands on the PowerShell Console to create a new DAG with name DAG01. File Share Witness will be created on the Hub Transport Server (AHC1) and DAG IP from both the AD sites Figure 1. File share witness is a server outside DAG and it can be any server with the Same AD Site and recommended to be on Hub transport Server it’s one of the important component of the DAG
New-DatabaseAvailabilityGroup -Name DAG01 -WitnessServer AHC1 -WitnessDirectory C:\DAG01Witness -DatabaseAvailabilityGroupIPAddresses 172.168.1.9, 172.168.2.9
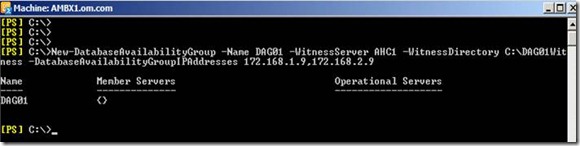
Figure 1. New DAG Creation
Once we have DAG created we also need to configure Alternate file share witness on the DAG. Alternative File Share witness is configured to point to secondary site. If there is DR and if Secondary sites needs to bring up then this file share witness directory will be used
Let’s understand an Example: If there is a DR scenario and we failover to the secondary Site and secondary site is up and running with its exchange servers and File share witness. In the mean while if servers from the Primary Site up then primary Site has the majority of the nodes and it also has File share witness accessible from primary site. This can cause database on the primary Site to mount. This scenario is known as split brain syndrome. To avoid this situation we configure DAG in Database Activation Coordination (DAC) mode.
Database Activation co-ordination
Database Activation co-ordination mode uses the protocol DACP. One of the DAG member will always have the special memory bit set to 1. If any time any server wants to mount the Database it is to find the DAG node which has memory bit set to 1 and then it will mount the Database. If the above split brain syndrome scenario when primary site come up Active manager will try to find if the DAG is the DAC mode or not. If the DAG is running in DAC mode then server will have DACP flag set to 0 and try to query all the DAG members for DACP flag 1. If it finds all the members and member with DACP flag set to 1, then Active manager running on the DAG member will set DACP to 1 and mount the database. If the Active manager could not find the DAC member with DACP with 1 then database will remain unmounted state. This will avoid split brain Syndrome.
Let’s understand DAP with above example :If the network is restored between primary Datacenter and Secondary Datacenter and primary server is also up then these database which are is in unmounted state will remain unmounted. This is because during the process of activation of secondary site exchange servers will evict all the primary DAG servers from the DAG configuration. So, the members on primary Site contain old information which is no longer valid and this will not allow primary site Exchange severs to participate in the DAG.
This is exactly what we are trying to configure and achieve in the article.
Let’s now configure the alternative file share witness using the Powershell cmdlets shown below
Set-DatabaseAvailabilityGroup -Identity DAG01 -AlternateWitnessDirectory C:\DAG01Witness -AlternateWitnessServer BHC1
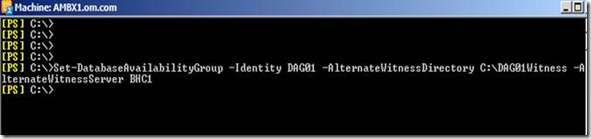
Figure 2. Configuring Alternative File share Witness
Once we have the DAG created we can able to see the properties of the DAG with the PowerShell cmdlets. It has detail information on DAG like IP address, File share witness Ref. Figure 3.
get-DatabaseAvailabilityGroup DAG01 | fl
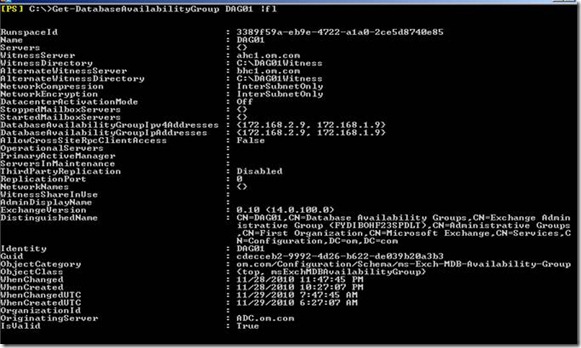
Figure 3. Properties of new DAG Created
Once we have created DAG we need to ADD members to the DAG. Let’s add all the mailbox servers from Asite and Bsite into the DAG. Each mailbox server can participate is only one DAG. All DAG members must be running the same OS (windows 2008 R2 or Windows 2008 Sp2). Below Powershell cmdlets lets us to add the entire mailbox server AMBX1, AMBX2 and BMBX1 into the DAG01. Figure 4 is the execution snap of adding AMBX1 mailbox servers to DAG
Add-DatabaseAvailabilityGroupServer -Identity DAG01 -MailboxServer AMBX1Add-DatabaseAvailabilityGroupServer -Identity DAG01 -MailboxServer AMBX2Add-DatabaseAvailabilityGroupServer -Identity DAG01 -MailboxServer BMBX1
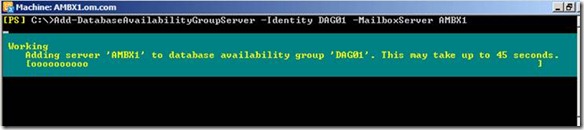
Figure 4. Adding AMBX1 to the DAG01
When any mailbox Server is added to the DAG, it installs Windows failover clustering component on to the server and creates a failover cluster and joins the mailbox server to the newly created cluster.
Now let’s configure the DAG to DAC (Database Activation co-ordination) mode and we have already discussed the importance of DAC with the example
Set-DatabaseAvailabilityGroup -Identity DAG01 -DatacenterActivationMode DagOnly
 Figure 5. Enable DAG into DAG mode
Once we have DAG created with member servers in it then we need configure database copies for the Databases in the DAG. I have created two Database in each of the mailbox server in Asite (Primary) and below is Powershell to get the list of Data from the both the mailbox servers Ambx1 and Ambx2 under Primary Site.
Get-MailboxDatabase |?{$_.Server -like "AMBX*"}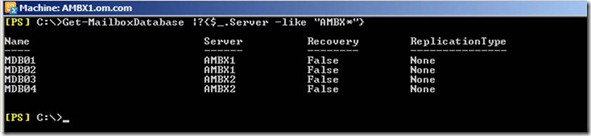
Figure 6. Databases list from Primary Site (Asite) mailbox Servers
Let’s configure each of the Databases from AMBX1 and AMBX2 with one non lagged passive copy on the other server on the same site and one lagged passive copy on the other BSite server BMBX1. Below Table 3 Has defined the list of Database configuration to be configured.
| Source Database | Destination Server | Preference | Lagged/Non Lagged passive copy |
| MDB01 | AMBX2 | 2 | Non Lagged |
| MDB01 | BMBX1 | 3 | Lagged |
| MDB02 | AMBX2 | 2 | Non Lagged |
| MDB02 | BMBX1 | 3 | Lagged |
| MDB03 | AMBX1 | 2 | Non Lagged |
| MDB03 | BMBX1 | 3 | Lagged |
| MDB04 | AMBX1 | 2 | Non Lagged |
| MDB04 | BMBX1 | 3 | Lagged |
Table 3. Database copy configuration table
Let’s configure the each of the Database define in the above Table 3.
Below are the PowerShell cmdlet to add Database MDB01 to Mailboxdatabasecopy. First cmdlet adds MDB01 Mailbox Database Non lagged copy into the mailbox Server AMBX2 with the Activation Preference set to 2. Activation Preference is used by the Active manager for best Database selection process. Lower the preference number higher the priority. Similarly the next command adds MDB01 to the BMBX1 with Lag reply time of 3 days and truncation lag time is set to 0 and activation preference is set to 3. ReplayLagTime parameter specifies the amount of time that the Microsoft Exchange Replication service should wait before replaying log files that are copied to the database copy and TruncationLagTime parameter specifies the amount of time that the Microsoft Exchange Replication service should wait before truncating log files that have replayed into a copy of the database.
Once we have Database are configured with mailbox database copy then automation seeding starts. Seeding is the process of copying of Database from Active to Passive. For non-lagged copy we allow seeding to happen immediately but for lagged copy we configure with seeding postponed. This stops from seeding immediately. This is because we have to configure the mailbox database copy with Activationlyonly. To Configure lagged mailbox database copy as activation only we need to suspend and updated and configure -activationonly. Below PowerShell cmdlets does it for us.
We need to make sure that we configure -Activationonly on the Lagged mailbox database copy. Activation occurs automatically as process of database or server failure. If there is any datacenter failover then his activation has to be manually performed. -Activationonly disables the database to automatically mount in case of Datacenter failures. Figure 7 shows the execution of the below cmdlets
Add-MailboxDatabaseCopy -Identity MDB01 -MailboxServer AMBX2 -ActivationPreference 2 Add-MailboxDatabaseCopy -Identity MDB01 -MailboxServer BMBX1 -ReplayLagTime 3.00:00:00 -SeedingPostponed -ActivationPreference 3 Suspend-MailboxDatabaseCopy -Identity MDB01\BMBX1 -SuspendComment "Seed from AMBX1" -Confirm: $False Update-MailboxDatabaseCopy -Identity MDB01\BMBX1 -SourceServer AMBX1
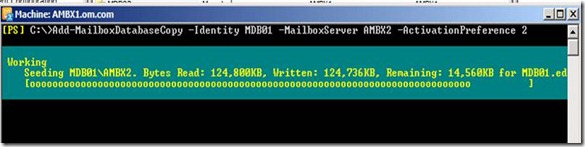
Figure 7. Execution of Powershell cmdlets to configured lagged and non-lagged
Mailbox Database copy
We have configured MDB01 with one lagged copy on BMBX1 and one non lagged copy on AMBX2. Now let’s configure Database MDB02 in the same fashion. Below PowerShell cmdlets configures non-lagged copy on AMBX2 and lagged copy on BMBX1. Lagged database is also configured with -Activationonly settings
Add-MailboxDatabaseCopy -Identity MDB02 -MailboxServer AMBX2 -ActivationPreference 2Add-MailboxDatabaseCopy -Identity MDB02 -MailboxServer BMBX1 -ReplayLagTime 3.00:00:00 -SeedingPostponed -ActivationPreference 3Suspend-MailboxDatabaseCopy -Identity MDB02\BMBX1 -SuspendComment "Seed from AMBX1" -Confirm: $FalseUpdate-MailboxDatabaseCopy -Identity MDB02\BMBX1 -SourceServer AMBX1 -DeleteexistingfilesSuspend-MailboxDatabaseCopy -Identity MDB02\BMBX1 -ActivationOnly
With the above cmdlets we have configured both the database of AMBX1, now let’s configure databases of AMBX2. Below PowerShell adds non-lagged mailbox Database copy to AMBX1 and lagged mailbox Database copy on BMBX1. Lagged database is also configured with -Activationonly configuration
Add-MailboxDatabaseCopy -Identity MDB03 -MailboxServer AMBX1 -ActivationPreference 2Add-MailboxDatabaseCopy -Identity MDB03 -MailboxServer BMBX1 -ReplayLagTime 3.00:00:00 -SeedingPostponed -ActivationPreference 3Suspend-MailboxDatabaseCopy -Identity MDB03\BMBX1 -SuspendComment "Seed from AMBX3" -Confirm: $FalseUpdate-MailboxDatabaseCopy -Identity MDB03\BMBX1 -SourceServer AMBX1 -DeleteexistingfilesSuspend-MailboxDatabaseCopy -Identity MDB03\BMBX1 -ActivationOnly
Below PowerShell cmdlets configures MDB04 with Non-lagged mailbox database copy on AMBX1 and lagged mailbox database copy on BMBX1. Lagged Database is configured with -Activationonly
Add-MailboxDatabaseCopy -Identity MDB04 -MailboxServer AMBX1 -ActivationPreference 2Add-MailboxDatabaseCopy -Identity MDB04 -MailboxServer BMBX1 -ReplayLagTime 3.00:00:00 -SeedingPostponed -ActivationPreference 3Suspend-MailboxDatabaseCopy -Identity MDB04\BMBX1 -SuspendComment "Seed from AMBX3" -Confirm: $FalseUpdate-MailboxDatabaseCopy -Identity MDB04\BMBX1 -SourceServer AMBX1 -DeleteexistingfilesSuspend-MailboxDatabaseCopy -Identity MDB04\BMBX1 -ActivationOnlySuspend-MailboxDatabaseCopy -Identity MDB02\BMBX1 -ActivationOnly
With this we have configured the entire database on Asite with lagged copy and non-lagged copy. Let’s check if they are configured properly and there status with the below PowerShell cmdlets. It looks like all the Database copy is in healthy status which is very god for us. Figure 8 shows the complete mailbox Database copy status
Get-MailboxDatabaseCopyStatus -Identity MDB0* | select name, status, SelectcontentIndexState | sort Status | ft -auto
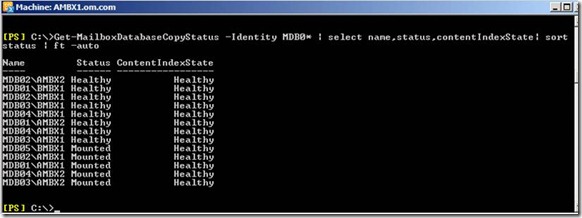
Figure 8. Mailbox Database copy Status
Let’s Discuss couple of failures and try to simulate the same and discuss how to fix the same
Type of Failure
1. Database Failure
2. Server Failure
3. Site/Datacenter Failure
Database Failure
If there is a situation where one of the database is failed and it is in Dismounted state and it’s not able to mount the same then we bring other passive database up, this process is knows a Database switchover. In this example we have one of our Database MBX01 is dismounted. Below Powershell gets us the status of the MDB01 which is in Dismounted and Figure 9. Shows the execution result.
Get-MailboxDatabaseCopyStatus -Identity MDB01 | select name, status, SelectcontentIndexState | sort Status | ft -auto
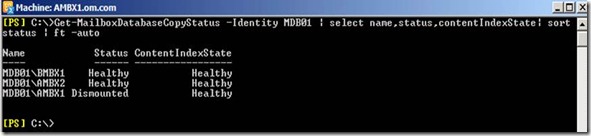
Figure 9. Cmdlet to get Mailbox Database copy Status.
Let’s try to enable to the passive copy of MDB01 on AMBX2. Execute the below PowerShell cmdlet to do the same. Once the PowerShell cmdlet is executed it show the complete result of the status on Figure 10. PowerShell cmdlet parameter MountDailoverride is set not to override the default settings. Below are the MountDailoverride’s options with their details
BestAvailability (default)
Mount the database if the copy queue length ≤12. Those logs are replicated and the database is mounted
GoodAvailability
Mount the database if the copy queue length ≤6. Those logs are replicated and the database is mounted;
Lossless
Only mount the database if the copy queue length is 0, meaning all logs on the original active copy have been replicated. In that case the database is mounted.
Move-ActiveMailboxDatabase MDB01 -ActivateOnServer AMBX2 -MountDialOverride: None
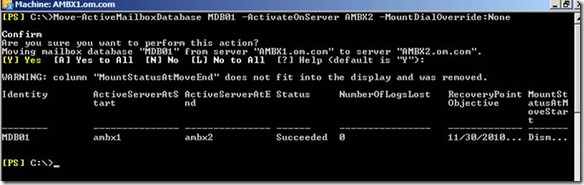
Figure 10. Enabling the passive copy of the MDB01 on AMBX02
Now the active database copy on the AMBX2 may be still Dismounted state. This is because the previous statue of the Database is dismounted. To mount the database uses the PowerShell cmdlet with mount-Database. Once the database is mounted that old database which was failed will reseed with the latest copy and bring the status into healthy state. This may take some time and it depends on the size of the database. Figure11. With red mark show the mounted state of MDB01 on AMBX2
Get-MailboxDatabaseCopyStatus -Identity MDB01 | select name, status, SelectcontentIndexState | sort Status | ft -auto

Figure 11. MDB01 Mailbox Database copy is mounted on AMBX2 server
We have successfully moved the database to new node and you may need to move back the database to the original server then execute the below PowerShell cmdlet. This time database automatically mounts it because we have the Active copy in mounted state and replicated copy is also healthy. Figure 12 also show the mounted status on the result of Move Active Mailbox Database cmdlet execution
Move-ActiveMailboxDatabase MDB01 -ActivateOnServer AMBX1 -MountDialOverride: None
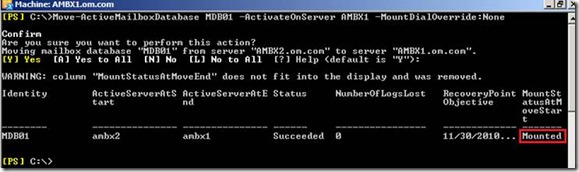
Figure 12. Moving MDB01 back to AMBX1
With this we have successfully tested and completed Database failure and Fail back
Server Failure /Fail back
Let’s assume scenario where we have the server AMBX1 down due to hardware failure or server is reboot accidentally
Let’s check what the Mailbox database copy status is after the server failure with the help of below PowerShell cmdlet. We see from the Figure 13. That all the database of AMBX1 has been mounted on AMBX2 and Database copy of AMBX1 has the status service down.
Primary Active manager running of the DAG use the preference settings and Best copy Selection process by listing the available copies and mounts the Best possible copy. During this process PAM has determine AMBX2 is the Best server to mount the database MDB01 and MDB02.
Get-MailboxDatabaseCopyStatus -Identity MDB0* | select name, status | sort Status | ft -auto
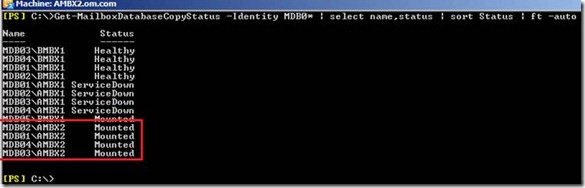
Figure 13. Mailbox Database copy Status after AMBX1 Failure
Let’s bring AMBX1 up and check the Database copy status using the below PowerShell Cmdlet. It shows that database copy on AMBX1 is in healthy state Figure 14.
Get-MailboxDatabaseCopyStatus -Identity MDB0* | select name, status | sort Status | ft -auto
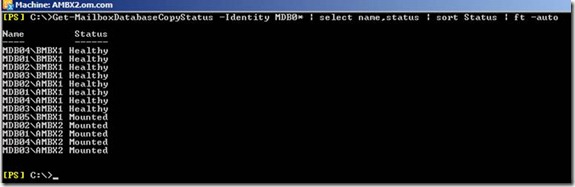
Figure 14. Mailbox Database copy status after AMBX1 server is up.
Now if you think it’s time to move back the database from MDB01 and MBX02 to AMBX1 then let’s do it..
| Move-ActiveMailboxDatabase MDB01 -ActivateOnServer AMBX1 -MountDialOverride: NoneMove-ActiveMailboxDatabase MDB02 -ActivateOnServer AMBX1 -MountDialOverride: None |
|
This is great right, now finally let’s take a scenario that you wanted to patch AMBX2 and you wanted to move the entire database for now to AMBX1. You run a single line below PowerShell cmdlet to mount all the passive Database of AMBX2 on AMBX1. Then if the AMBX2 server is up then you can move/mount back the database using the above cmdlet Move-ActiveMailboxDatabase and using the right parameters.
| Move-ActiveMailboxDatabase -Server AMBX2 -ActivateOnServer AMBX1 |
|
With this we have successfully tested and completed Server failure and Fail back
Site/Datacenter Failure and Fail back
Now this is most Interesting part of the above all. This is because in the above scenario PAM (Primary Active Manager) helps to bring the database up in case of the failure. But here we have defined not to bring the database up in case of failure by setting Activation bit. So, we have to manually execute some PowerShell cmdlets to bring the services up and running…
Before we understand and simulate Datacenter failure and fail back let’s do some post configuration on the DAG network. We know that all the servers which are in the DAG have two NIC, Public and Private. We also know that Private is for replication traffic and public IP is for MAPI traffic but it not defined in the DAG. We need to disable replication traffic happening thought MAPI network and dedicate only replication IP for replication. Let’s see what the current status of DAG network is? Below cmdlet pulls the details. Figure 15. Shows the details of the current DAG network. It has 4 subnets from both the sites and they are 172.168.1.0/24, 172.168.2.0/24, 10.0.1.0/24 and 10.0.2.0.0/24 and Replication is enabled on the entire Network
| Get-DatabaseAvailabilityGroupNework |
|
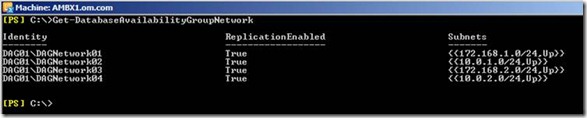
Figure 15. DAG network Status
The current DAG network looks very odd and replication is enabled on the entire DAG Networks. Let’s rework to create two new DAG Network using below PowerShell, one for MAPI with replication disabled and other for replication. Then add only the required subnets into it.
| New-DatabaseAvailabilityGroupNetwork -DatabaseAvailabilityGroup DAG01 -Name MAPI -Subnets 172.168.1.0/24,172.168.2.0/24 -ReplicationEnabled: $falseNew-DatabaseAvailabilityGroupNetwork -DatabaseAvailabilityGroup DAG01 -Name Replication -Subnets 10.0.1.0/24,10.0.2.0/24 |
|

Figure 16. Execution result after creating two new DAG network with required subnets
Now we create two new DAG network and added the subnets into it. It’s time to remove the old subnets. Before that let’s see what the status of the DAG network is? Figure 17 show the details. It has two new DAG network, MAPI with replication set to False and MAPI subnets from both the Sites and Replication network with replication enabled
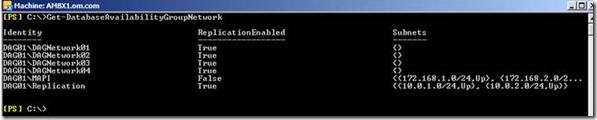
Figure 17. DAG network status after new DAG Network creation
Let’s remove the old DAG network01 – 04 which does not have any subnets in it. lets use below PowerShell cmdlet to do the same. Figure 18. Shows the result of the Powershell execution
| Get-DatabaseAvailabilityGroupNetwork DAG01\DAGNetwork* | Remove-DatabaseAvailabilityGroupNetwork |
|
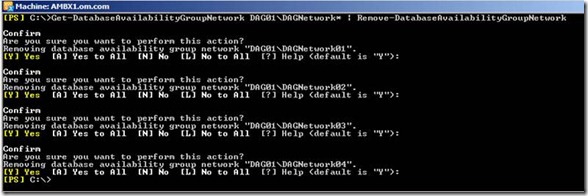
Figure 18. Removing old DAG network
Let’s talk and understand how we can simulate the Datacenter failures and how we can fail back once the Primary datacenter come up. Now I have disconnected the Network between the AD sites and brought down all the Servers in ASites to have complete Datacenter failure. Lets see the status of the DAG01 from the BMBX1 using the below Powershell cmdlet. Figure 19. Show that the entire Database from Primary site is service down and Passive copy is in Disconnected state and healthy. We have also defined not to bring Secondary server Database up in case of Primary Datacenter Failures. This is done using DAC configuration
| Get-MailboxDatabaseCopyStatus -Identity MDB0* | select name, status | sort Status | ft -auto |
|

Figure 19. DAG status after the Primary DC Failure
Let’s understand some more important concept here.
In a our 3 server DAG, cluster quorum is maintained by a node majority – so at this point with two nodes offline the remaining server cannot hold quorum and this is also a reason our secondary server database is dismounted and cannot be re-mounted as well.
In Figure 20. Marked in red has the details about started mailbox servers and Stopped Mailbox Servers. Started mailbox servers are the servers which are available for DAG for bringing the Database online. Stopped mailbox Servers are no longer participating in the DAG. They me be servers which are offline or down because of Datacenter failures. When we are restoring the service on secondary site, ideally all the servers which are in primary should be marked as stopped and they should not use when the services are brought online.
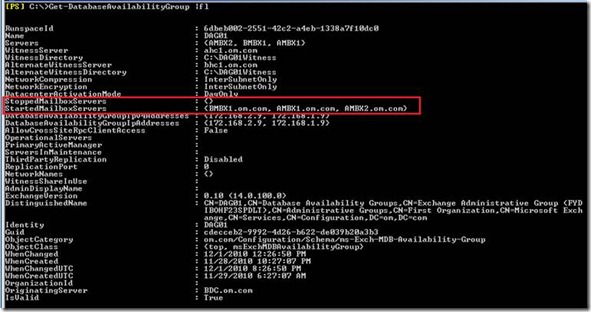
Figure 20. DAG details
To move the Primary Site Servers into stopped state we need use the below PowerShell cmdlet. We also have to use the parameter -Configurationonly. This is because we cannot connect directly to the server as the server is offline. Use these below two PowerShell cmdlet to remove both the servers out to Stopped server state and Figure 21. Show the result of the same. You may see some warning and error message because these servers are not reachable.
| Stop-DatabaseAvailabilityGroup -Identity DAG1 -Mailboxserver AMBX1 -ConfigurationonlyStop-DatabaseAvailabilityGroup -Identity DAG1 -Mailboxserver AMBX2 -Configurationonly |
|

Figure 21. Stopping the DAG server to stopped Server State
Let’s verify again to see if the server has moved to stopped state. Figure 22. Show AMBX1 and AMBX2 has been moved to stopped state. Now these servers are not available for the DAG recovery.

Figure 22. DAG status after moving Asite servers into stopped mailbox Servers
Let’s now work on Recovering the DAG. Next we need to verify and make sure if cluster services are stopped on all the mailbox servers on Secondary Site. In our Secondary site we have only one mailbox servers BMBX1. So, let’s stop the cluster service using the command “Net stop Clussvc” or manually stop the cluster service from services console.
Now we need to restore DAG at the BSite. To restore use the below PowerShell cmdlet. Restore-databaseavailablilitygroup cmdlet does the following
1. Custer Quorum will be formed at the new server BMBX1 as old Quorum is no
Longer reachable
2. AMBX1 and AMBX2 nodes will be marked as stopped state and it will evict servers
One by one leaving only one node BMBX1 into the DAG
3. Switch to use Alternative file share Witness which was defined while creating the DAG
| Restore-DatabaseAvailabilityGroup -Identity DAG01 -ActiveDirectorySite BSite |
|

Figure 23. Execution result of Restore Database availability group
Let’s look at the DAG -status before we continue. Figure 23 should has the new details like Operational Servers is BMBX1 as we have evicted other servers out and also PAM(Primary Active Manager) is operational from BMBX1
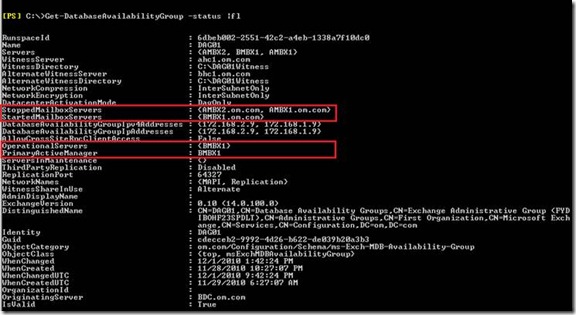
Figure 23. Dag PAM and Operation Server Status
Let’s check out how the Failover cluster manager looks. We should see that there is only one Node BMBX1 and current node hosting cluster is BMBX1 and it’s using the alternative file share witness BHC1 which is good from Figure 24
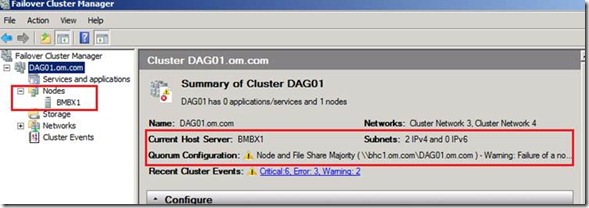
Figure 24. Failover Cluster manager Status
Let’s verify again the Mailbox Database copy status using the powershell cmdlet and Figure 25 shows that we have still Databasecopies on BMBX1 is in Disconnected and Healthy state

Figure 25. Mailbox Database copy Status
During the DAG configuration we had set activation block on database copies on BMBX1. To remove the activation block on all the copies, we need to execute the blow Powershell cmdlets. Figure 26 has the execution result
| Resume-MailboxDatabaseCopy ‘MDB01\BMBX1’Resume-MailboxDatabaseCopy ‘MDB02\BMBX1’Resume-MailboxDatabaseCopy ‘MDB03\BMBX1’ Resume-MailboxDatabaseCopy ‘MDB04\BMBX1’ |
|

Figure 26. Execution result of Resume mailbox Database copy
With this we have resumed all the Mailbox Database copies on BMBX1. Now let’s check the status. Figure 27 show that DAG status with the entire database mounted on BMBX1 and serving the email for the users
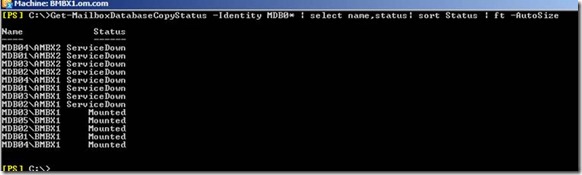
Figure 27. DAG Status with all the Database copies mounted on BMBX1
This cool right… Just to make you remember every day is not Sunday and some times it can also be a Friday evening and things don’t come up. Friday even at office its worst than Monday morning :). If databases are not mounted automatically using above technique then you can use below Powershell command to manually mount. You bunch of options to troubleshoot and mount the database. TechNet has more details description on parameters of Move-Activemailboxdatabase
| Move-ActiveMailboxDatabase –Server FQDNofaServerinPrimarySite –ActivateOnServer FQDNofaServerinDRSite |
|
Thank God lets go home and come back on Monday… Haa haa
Fail back to Primary Site
Lets bring all the servers at primary site up and as these servers are out of DAG configuration, it will have no impact on the DAG. Now the DAG has only one server BMBX1. To fail back to the primary site we need add the Primary Site mailbox servers AMBX1 and AMBX2 into DAG back. To add the server back, below Powershell cmdlet would help us to do the same. You also need to make sure cluster service has been started on the mailbox servers before running this command.
| Start-DatabaseAvailabilitygroup -Identity DAG01 -mailboxServer AMBX1Start-DatabaseAvailabilitygroup -Identity DAG01 -mailboxServer AMBX2 |
|

Figure 28. Execution result of adding AMBX1 and AMBX2 into the DAG
If we see the Database available group status you would find that all the mailbox servers are in started and operation state. Figure 29 has the details of the same.
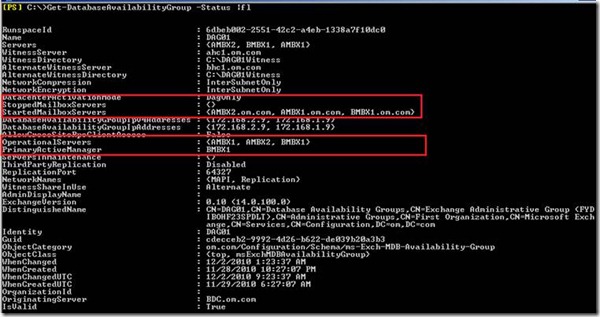
Figure 30. DAG status after adding mailbox servers back
Execute the below PowerShell cmdlet to set the changes. This would seed all the changes from the Active copies and bring the passive copies into the healthy state
| Set-DatabaseAvailabilitygroup -Identity DAG01 |
|
Let’s now verify the Mailbox Database copy to make sure that we have all active copies mounted on BMBX1 and passive copies replicated and also it’s in healthy state both on AMBX1 and AMBX2. Figure 31
| Get-MailboxDatabaseCopyStatus -Identity MDB0* | select name, status | sort Status | ft -auto |
|
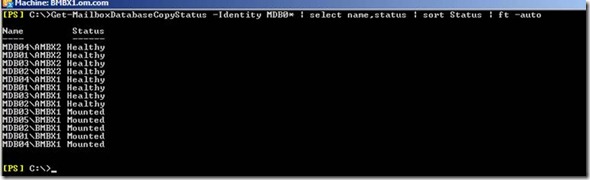
Figure 31. Mailbox Database copy Status
To bring the respective copies of AMBX1 and AMBX2 up, we need to run
Move-Activemailboxdatabase PowerShell cmdlet and other complete set of cmdlets are below. Figure 32 show the result of the same
| Move-ActiveMailboxDatabase MDB01 -ActivateOnServer AMBX1 -MountDialOverride: GoodAvailabilityMove-ActiveMailboxDatabase MDB02 -ActivateOnServer AMBX1 -MountDialOverride: GoodAvailabilityMove-ActiveMailboxDatabase MDB03 -ActivateOnServer AMBX2 -MountDialOverride: GoodAvailability Move-ActiveMailboxDatabase MDB04 -ActivateOnServer AMBX2 -MountDialOverride: GoodAvailability |
|
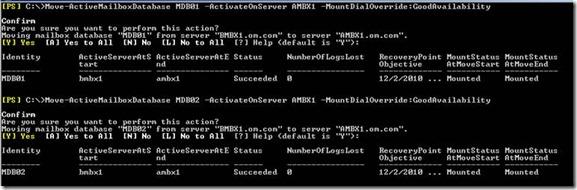
Figure 32. Move Active mailbox Database execution result.
Verify and confirm again, to see if we have the entire database moved and mounted on the primary node and other copies are replicated in Healthy state. Figure 33. Show the details of the same

Figure 33. Mailbox Database copy Status after the recovery of Database at Primary Site
Finally last but not least we wanted to disable automatic activation of database in secondary (DR) Site. This configuration is very important and it can be again disabled using the same old below PowerShell cmdlet and Figure 34 show the result of the same
| Suspend-MailboxDatabaseCopy -Identity MDB01\BMBX1 -ActivationOnlySuspend-MailboxDatabaseCopy -Identity MDB02\BMBX1 -ActivationOnlySuspend-MailboxDatabaseCopy -Identity MDB03\BMBX1 -ActivationOnly Suspend-MailboxDatabaseCopy -Identity MDB04\BMBX1 -ActivationOnly |
|

Figure 34. Disabling Activation bit on Passive copy of the Database on secondary site
With this we have tried to simulate all different type of failure – Database Failure, Server failure and Datacenter failure and how to recover back from the failure. DAG has made HA very easy and quicker to recover. Here we just talked about the DAG and the mailbox servers and Mailbox Database and the recovery it. Exchange is not just DAG. We have to plan and design for the failover and fail back of other servers like Hub, Client etc. This TechNet article has good details on other servers. I hope this article is information and you can use this in your real life scenario.