Exchange 2007 – Activation of DR Site and Failback to primary – Quick Reference..
http://technet.microsoft.com/en-us/library/bb738150(EXCHG.80).aspx

Exchange 2007 – Activation of DR Site and Failback to primary – Quick Reference..
http://technet.microsoft.com/en-us/library/bb738150(EXCHG.80).aspx
Exchange Web Services can be used to do lots of stuffs in the mailbox like access email, reply the email, access calender contacts etc. EWS has made live easier for us. EWS was introduced from Exchange 2007 and earlier lots of legacy application used to use Webdev to do the same. Webdev does not provide the great flexibility to the programmers. EWS API provides a easy access and lot more flexibility which webdev did not provide. Even as a Administrator we can use EWS with Powershell to do lots of stuffs on the mailbox.
Below is the piece of code from Glen Scales(http://gsexdev.blogspot.com), who knows in and out of Exchange EWS and Powershell. I have modified it for a requirement. Lets have a requirement to get the list of all the yahoo contacts on all the mailbox in the Exchange organization in the spread Sheet.
We need to make sure we are using a account which has full access on all the mailbox in the organization. To pull of the contacts the EWS has to get into the mailbox and get the list.
Required configuration
1. Exchange 2007 Management Shell
2. .net 3.5
3. Exchange CAS -EWS Urls
4. Account which has access on all the mailbox in the organization
5. Below code can be executed in Lab. This is because normally lab will normally have only self signed certificate not a trusted SAN certificate installed on the CAS server and without certificate EWS may not work. To mitigate the issue we have added few lines of code between 8 -36. In production you can remove this code and execute as you may have SAN certificate installed.
Start-Transcript c:\Transcript.txt$casserverName = "CASServer"$userName = "username"$password = "password"$domain = "domainname"## Code From <a href="http://poshcode.org/624">http://poshcode.org/624</a>## Create a compilation environment$Provider=New-Object Microsoft.CSharp.CSharpCodeProvider$Compiler=$Provider.CreateCompiler()$Params=New-Object System.CodeDom.Compiler.CompilerParameters$Params.GenerateExecutable=$False$Params.GenerateInMemory=$True$Params.IncludeDebugInformation=$False$Params.ReferencedAssemblies.Add("System.DLL") | Out-Null$TASource=@' namespace Local.ToolkitExtensions.Net.CertificatePolicy{ public class TrustAll : System.Net.ICertificatePolicy { public TrustAll() { } public bool CheckValidationResult(System.Net.ServicePoint sp, System.Security.Cryptography.X509Certificates.X509Certificate cert, System.Net.WebRequest req, int problem) { return true; } } }'@$TAResults=$Provider.CompileAssemblyFromSource($Params,$TASource)$TAAssembly=$TAResults.CompiledAssembly## We now create an instance of the TrustAll and attach it to the ServicePointManager$TrustAll=$TAAssembly.CreateInstance("Local.ToolkitExtensions.Net.CertificatePolicy.TrustAll")[System.Net.ServicePointManager]::CertificatePolicy=$TrustAll$dllpath = "C:\Program Files\Microsoft\Exchange\Web Services\1.0\Microsoft.Exchange.WebServices.dll"[void][Reflection.Assembly]::LoadFile($dllpath)$service = New-Object Microsoft.Exchange.WebServices.Data.ExchangeService([Microsoft.Exchange.WebServices.Data.ExchangeVersion]::Exchange2007_SP1)$windowsIdentity = [System.Security.Principal.WindowsIdentity]::GetCurrent()$sidbind = "LDAP://<SID=" + $windowsIdentity.user.Value.ToString() + ">"$aceuser = [ADSI]$sidbind$uri=[system.URI] ("<a href="https://%22/">https://"</a> + $casserverName + "/ews/exchange.asmx")$service.Url = $uri$service.Credentials = New-Object System.Net.NetworkCredential($username,$password,$domain)new-item -path c:\reportfile.csv -type file -forceget-mailbox -resultsize unlimited | Select PrimarySmtpAddress | foreach{$ContactsFolderid = new-object Microsoft.Exchange.WebServices.Data.FolderId([Microsoft.Exchange.WebServices.Data.WellKnownFolderName]::Contacts,$_) $view = New-Object Microsoft.Exchange.WebServices.Data.ItemView(1000) $findResults = $Service.FindItems($ContactsFolderid,$view) if($findResults) { foreach($contact in $findResults) { if($contact.EmailAddresses[0].address -like "*yahoo.com") { $result = $_ + " , " + $contact.EmailAddresses[0].address } Add-content -path c:\reportfile.csv -value $result }}}Stop-Transcriptresult file will be created with name C:\Reportfile.csv. It will have the list of users primarysmtpaddress and there list of contacts which has yahoo.com in it
Every one will have there own requirement and you can modify to suite your requirement. let me know if you have any requirement and i can help you on this.
Thanks Glen 🙂
Below powershell command helps to get the list of all the Sites in Active directory and domain controller in each domain. We can filter this to find the dc on specific domain controller
[system.directoryservices.activedirectory.domain]::GetCurrentDomain().domainControllers | select sitename,name
If you wanted to perform specific operation and it has to run on all the domain controllers in every site then we can filter this out. Below powershell will get one DC on each site. Its simple logic but worth it..
[system.directoryservices.activedirectory.domain]::GetCurrentDomain().domainControllers | foreach {
$Sitename = $_.sitename
$dcname = $_.name
$repSite = “”
if($Sitename -ne $repSite)
{
Write-host $Sitename $dcname
}
}
When you run Exchange Setup to prepare schema, usually the very next question is, how do I verify schema was updated successfully? Verifying only the values of attributes as mentioned below is not a good verification of Exchange setup completion. This article is intended to only provide reference to attributes and their values.
Let’s start back at Exchange 2003 SP2.
One of the last actions setup /forestprep in Exchange 2003 is to set objectVersion attribute on Exchange organization container to a value of 6903. You can verify this using ADSIEdit and navigating to Configuration NC, Exchange organization object under services\Microsoft Exchange node.
On the other hand, when setup /domainprep is run, it sets the objectVersion attribute on Microsoft Exchange System Objects container to a value of 6936. You can verify this using ADSIEdit and navigating to Domain NC, Microsoft Exchange System Objects container.
In Exchange 2007, after successful run of Setup /PrepareSchema you will find that the attributes mentioned above are not changed! You need to verify the value of rangeUpper attribute of ms-Exch-Schema-Version-Pt object in Schema NC. The value should be 10637.
It is only when you run Setup /PrepareAD the objectVersion attribute of Organization container in Configuration NC is updated to a value of 10666. You will also find that objectVersion attribute on Microsoft Exchange System Objects container in Domain NC is set to a value of 10628.
You will also notice that Setup /PrepareDomain does not have any effect on these attribute values.
Let’s briefly review what does Exchange 2007 SP1, SP2 and Exchange 2010 setup update these attribute values to.
Exchange 2007 SP1
•Value of rangeUpper attribute of ms-Exch-Schema-Version-Pt object in Schema NC is set to 11116 when setup /PrepareSchema is run successfully.
•Setup /PrepareAD sets the objectVersion attribute of Organization container in Configuration NC is updated to a value of 11221. objectVersion attribute on Microsoft Exchange System Objects container in Domain NC is also set to the same value of 11221.
•Setup /PrepareDomain does not have any effect on these attribute values.
Exchange 2007 SP2
•Value of rangeUpper attribute of ms-Exch-Schema-Version-Pt object in Schema NC is set to 14622 when setup /PrepareSchema is run successfully.
•Setup /PrepareAD sets objectVersion attribute of Organization container in Configuration NC to a value of 11222. objectVersion attribute on Microsoft Exchange System Objects container in Domain NC remains unchanged at value of 11221.
•Setup /PrepareDomain does not have any effect on these attribute values.
Exchange 2010
•Value of rangeUpper attribute of ms-Exch-Schema-Version-Pt object in Schema NC is not changed from 14622 when setup /PrepareSchema is run successfully.
•Setup /PrepareAD sets objectVersion attribute of Organization container in Configuration NC to a value of 12640. objectVersion attribute on Microsoft Exchange System Objects container in Domain NC remains unchanged at value of 12639.
•Setup /PrepareDomain does not have any effect on these attribute values.
Exchange 2010 SP1
•Value of rangeUpper attribute of ms-Exch-Schema-Version-Pt object in Schema NC is not changed from 14726 when setup /PrepareSchema is run successfully.
•Setup /PrepareAD sets objectVersion attribute of Organization container in Configuration NC to a value of 13214. objectVersion attribute on Microsoft Exchange System Objects container in Domain NC is changed to value of 13040.
•Setup /PrepareDomain does not have any effect on these attribute values.
Source of this complete articel is from Bhargavs site.. Below is the reference link. Thank to Bhargav for the excellent article..
http://www.bhargavs.com/index.php/2009/11/20/verify-exchange-server-schema-version/
1.Each DAG can have 16 Mailbox Database as its Member
2.Each Database can have 15 Copies replicated
3.You can have Multiple DAG in the Exchange Organization
4.Each Server can be member of only One DAG
5.Its not possible to have multiple coplies of the same database in a Single Server
6.if you have multiple Database copy only one database will be active and will server the users and all the other copies of the Database will be Passive
7.You can have same database Active in Multiple Exchange servers, but still only one Database will server the purpose
If you are IT guys and labs are is like your best friend. You can play with your Best friend any time but not with production boxes. Most of the companies are getting global Day by Day and it is spread across multiple location. If you wanted to simulate and test any application like Exchange and AD across the site then you need build the lab for the same. Here I am trying to explain you How to configure a domains with two sites with Routing and Remote Access servers installed as router to route the traffic between two sites on a Single Windows 2008 R2 Hyper V Server
Preparing the Network Settings
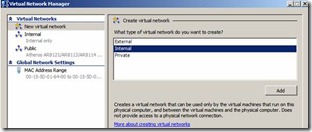
1. Configure Hyper-V Virtual Network Manager to add new "Internal" Network.
2. Configure all the Servers built on Hyper V to use this network Adapter Internal
Servers Installed and Configuration Details
Server Name | OS | Nics | IPAddress | Site |
ADC | Windows 2008 R2 | 1 | 172.168.1.1/24 | ASite |
BDC | Windows 2008 R2 | 1 | 172.168.2.1/24 | BSite |
Router | Windows 2008 R2 | 2 | 172.168.1.10/24 172.168.2.10/24 | ASite BSite |
Configuration of Window 2008 As Router
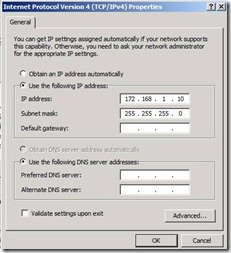
Figure 2. IP Address Configuration on the Server "Router "
2. With this NIC configuration you should be able to ping both ADC and BDC from the Server "Router". From ADC You should be able to ping IP address on the Router which is ping to ASite (172.168.1.10) but not the IPaddress of NIC point to BSite(172.168.2.10). ADC should be not able ping to BDC. This is because Router is acting as a median between Asite and Bsite and currently Router Server is not configured to route the packets from Asite to Bsite and Vice Versa.
3. Now lets configure Server Router for routing the packets. login to Server Router Launch Server Role and select Network Policy and Access Services (Figure. 3) and click next
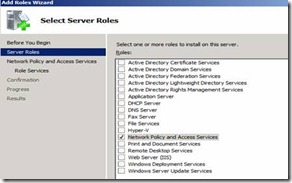
Figure 3. Adding Network Policy and Access Services
4. Select Routing and Remote Access Services (Figure 4) and click next and finish to install the same
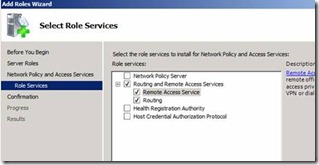
Figure 4. Enabling Routing and Remote Access Services
5. Once we have Routing and Remove access Services Role installed on the Router, we should be able to see the role added in the Server Manager. Right click on Role Network Policy and Access Services and click Configure and Enable Routing and Remote Access to enable the same
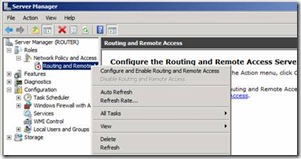
Figure 5. Network Policy Access Role added in the Server manager and its available for configuration
6. On the welcome screen to configure routing and remote access server wizard click on Next.
7. In the configuration step click on Secure Connection between two private networks (Figure 6)and click Next. This is setting which helps to enable routing and click on Next

Figure 6. Enabling Routing Settings
8. You will be prompted for enabling demand dial connection(Figure 7) which we don’t need. Click on Next
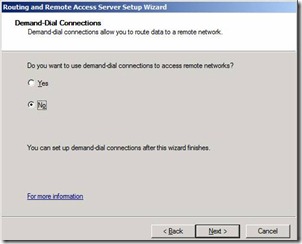
Figure 7. Option for Demand Dial
9. Finally Click on Finish and this is complete the initializing of the new role
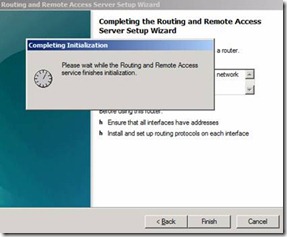
Figure 8. Completing Routing and Remote Access Service Installation
10. Once we have initialized we should be able to see new Routing and Remove Access initialized with Green up arrow. Figure 9. Expand to until you reach IP v4 | General | Right Click and select New Routing Protocol
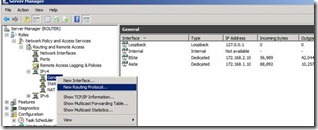
Figure 9. Server Manager after installing new Role Network Policy and Access Services
11. Select the protocol "RIP Version 2 for Internet Protocol" and click on ok to Install the same.
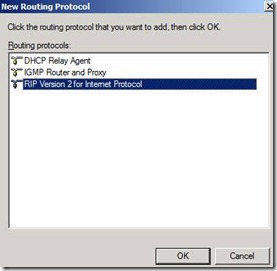
Figure 10. Installation of RIP V2 Internet Protocol
12. Once we have installed RIP Protocol we need to added the required Interface for protocol. Right Click on the RIP to install the Interface which is point to ASite and BSite
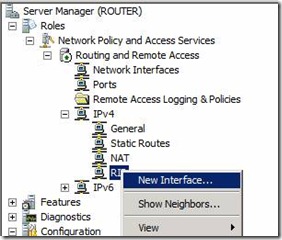
Figure 11. Configure Network Interface to the RIP Protocol
13. Keep all the default settings when you add the interface. Once we added both the interface we should be able to see the same on the console. Figure 12
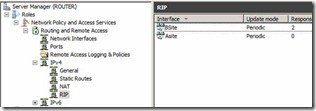
Figure 12. Settings after adding both the Network Interface on the RIP protocol
14. Once we have this configuration in place then we should be able to send and remove packets between Asite and Bsite. This can be confirmed by pining All the IP address available on BSite from Asite (Figure 13) and Vice versa
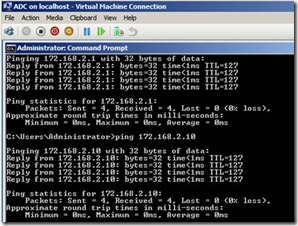
Figure 13. Pining BSite servers from Asite Servers
15. Once we have this configuration on Place we have communication established between both the sites. Now Lets Install and configure Domain Controller and Configure AD Sites for the AD Replication
16. Login to ADC | Start | Run | DCPROMO | OK to Promote ADC as domain Controller
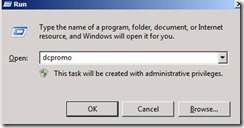
Figure 14. Starting DC Promotion
17. Click Next on the Welcome Screen
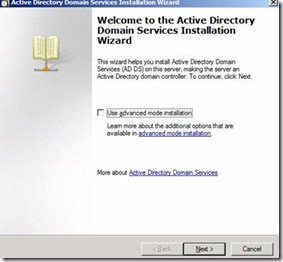
Figure 15. Installing
18. Create a new domain in the new Forest
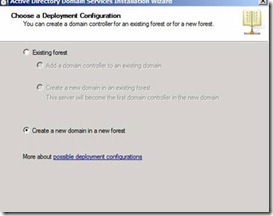
Figure 16. Creating new Domain in a New Forest
19. Provide the Required name for the domain
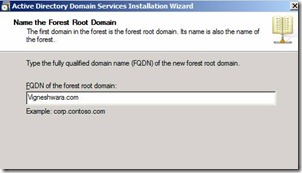
Figure 17. Creating New Vigneshwara.com
20. Configure Forest Function Level and Domain Functional Level with required settings with Windows Server 2008 and click Next
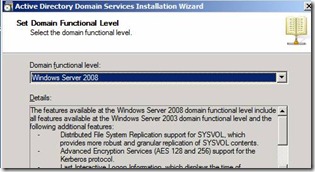
Figure 18. Configure Domain Function level
21. Configure DNS Servers to install (Figure 19) and YES to continue
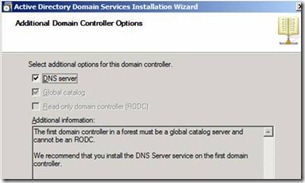
Figure 19. Installing DNS Server
22. Set the required path for the Active Directory Database , log and Sysvol. Recommended to keep it default and click on Next
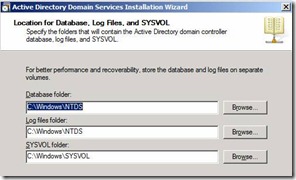
Figure 20. Configuring AD Database, log and Sysvol location
23. Provide required AD restoration Password and click on Next to Install and Configure AD and DNS on the Server. Figure 21.
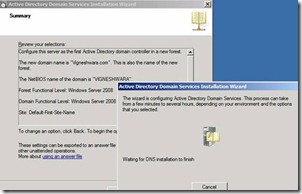
Figure 21. Installing Active Directory and DNS
24. Restart the Server once Installation is Finished
25. Now Lets configure AD Sites and Services
26. Login to ADC | START | RUN | dssite.msc | ok

Figure 22. Starting Active Directory Sites and Services
27. Expand AD sites and Services and Right click on Default-First-Site-Name to ASite
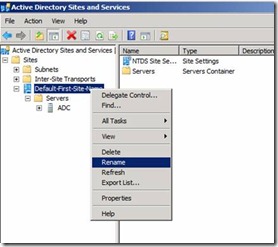
Figure 23. Reaming Default-First-Site-Name to ASite
28. Lets now Create a new Site With BSite. Right click on the Sites and click on New Site
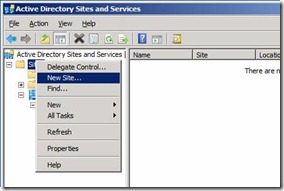
Figure 24. Create New AD Sites – Bsite
29. Provide the New Site name Bsite and click on DefaultIPSiteLink and click on OK and Next to configure the same. Figure 25.
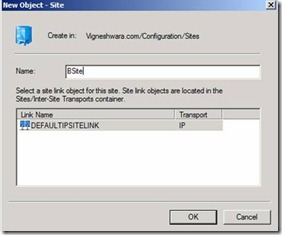
Figure 25. Creating new Site with DefaultIPsitelink Configuration
31. New we should be able to see the new Site created with the name Bsite
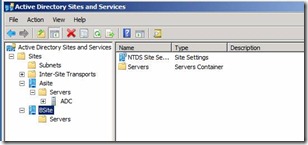
Figure 26. Console after New Site Creation with BSite
30. Once we have Sites in place lets configure subnets. To configure the same right click on Subnets and Select new Subnet Figure 27.
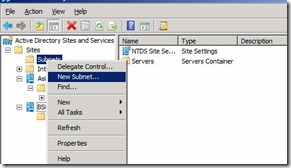
Figure 27. Creating new Subnets in Active directory users and computers
31. In our Current setup we have two subnets 172.168.1.0/24 and 172.168.2.0/24. Here we are trying to create a new subnet and associate Sites with the subnets
32. On the new Subnet enter the IP Subnet with Subnet mask 172.168.1.0/24 and click on Asite and click ok
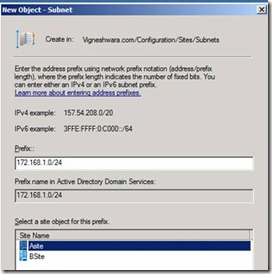
Figure 28. Configure Subnets with Asite
33. Configure the same for BSite with IP Subnet 172.168.2.0/24

Figure 29. Configure Subnets with BSite
34. Once we are done we should be able to see the new Subnets added in the Console
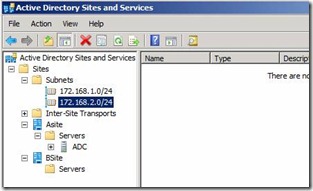
Figure 30. Active Directory Sites and Service configured with new Subnet
35. Now out Sites configures is configured. Lets go a head and install domain controller as additional domain controller on BSite and configure replication
37. Login to BDC server and configure the Network DNS to point to ADC (172.168.1.1)
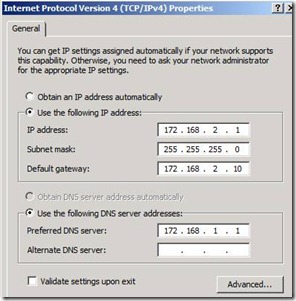
Figure 31. Configuring BDC DNS with ADC
36. Login to BDC Server | START | RUN | DCPROMO | OK
37. Click on Next on the Welcome screen and Select the option to add this domain controller to the existing forest as a new domain controller in an existing domain. Below is the configuration snap Figure 32.
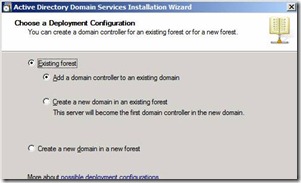
Figure 32. Configuring BDC as new domain controller and joining to the existing forest.
38. Provide the Domain name which was created and set the credentials and click on Next

Figure 33. Configuring Domain Name on BDC
39. Select the Domain Name Vigneshwara.com and click on Next
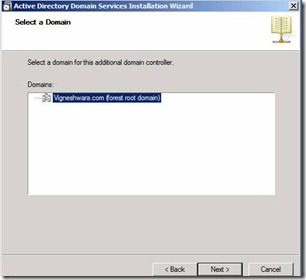
Figure 34. Selecting the domain for additional domain controller
40. Configure this domain controller to point to SiteB by selecting "Use this site that corresponds to the IP address of this computer" and select SiteB and click Next
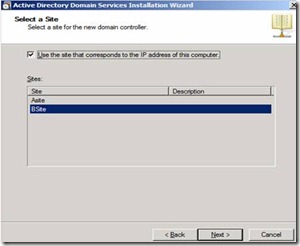
Figure 35. Adding the domain controller to Bsite
41. Select the option DNS server and Global Catalog Server and click on Next
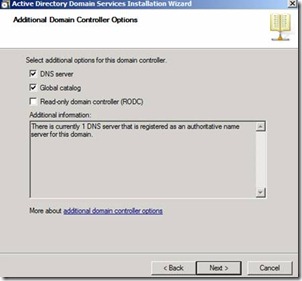
Figure 36. Enabling DNS and Global Catalog.
42. Keep the default path on the AD directory , Log files, Sysvol and Click on Next to provide the Directory Service Restore Mode Administrator Password
42. Finally click on Finish to install and configure Domain Controller, Global Catalog, DNS on server BDC under the Site BSite
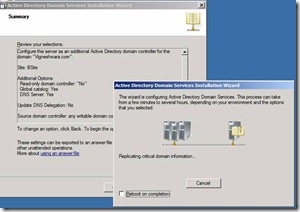
Figure 40. Finishing Domain Controller Installation on BDC
43. Restart the Server once DC is promoted on BDC
44. Once we have BDC as domain controller in place we should be able to see new DC Server add on the AD Sites and Servers under Bsite
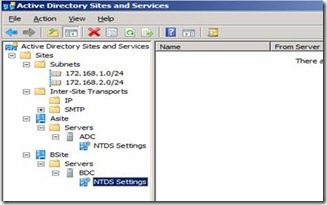
Figure 41. Ad Sites and Services after BDC installed
45. By Default Active Directory Sites are configured for replication, Any changes done on Asite will be replicated to Bsite. There will be delay in the replication. By default the replication time is configured for every 180 min. We can changed this to minimum replication for every 15 min.
46. Lets configure the replication settings between the sites to replicate every 15 min. Access Active directory sites and Sites
47. Expand until you reach Inter-Site Transports. Select IP and click on properties on the DefaultIPsitelink. Figure 42.
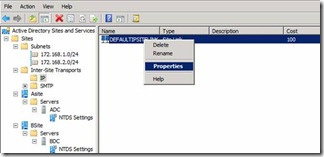
Figure 42. DefaultIPsitelink configuration
48. Change the Replicate Every to 15 min and click on apply and ok.
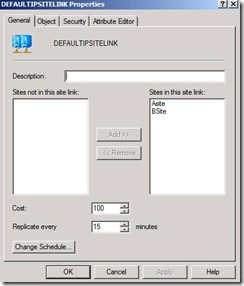
Figure 42. Changing Replication frequency between AD Sites Asite and Bsite
I Installed Exchange on my lab and wanted to do some testing for HA and DR in Exchange 2010. When first exchange 2010 Server by default it will create one Database by default. 
Figure 1. First Exchange 2010 Database
Before I start my testing wanted to make sure that I have all the database created in the right location with the right name. Then I created a new Database on the exchange Server and moved all the mailboxes from the default first database to the newly created database and then I tried to delete the Default first database , immediately I got the below error. Figure 2.

Figure 2. Error when tried to delete First Default Exchange 2010 Database
Then wanted to check if I have any arbitration mailboxes left on the exchange server and executed the command and found that I had couple of arbitration mailboxes Figure 3.
Get-mailbox -Database "Mailbox Database 1475616347" -Arbitration

Figure 3. Command to get the list of Arbitration Mailboxes on Default First Exchange 2010 database
Unless we move it out these arbitration mailbox we will not be able to delete the Default Database. Used below command to move the database out to the new Database which i manually created with the name MDB01. Figure 4. Below Powershell command get all the arbitration mailbox and pipe to New-MoveRequest to move the mailbox to the new database
Get-mailbox -Database "Mailbox Database 1475616347" -Arbitration | New-MoveRequest -TargetDatabaes MDB01

Figure 4. Moving Arbitration Mailbox to the New Database
Once we have moved out, now we are ready to delete the database. This can be done either through console or through powershell command. Once you enter this command on the Exchange management shell console and confirm the same
Remove-MailboxDatabase "Mailbox Database 1475616347"
Videos always helps to understand better. It is always good to start with a Video and then followed by the books to get some indepth knowledge on a topic
Below link has some very good exchange 2007 videos..
Installing pathes/Application on a remote computer is not a tough one when you have lots of Microsoft and third party application to do this for us.Chances that few companies still does not wanted to relay on software to install patches and Administrator manually installed this. You should ask this question to the Administrators who works on weekend installing patches manually, do you like this to do every weekend ? I am sure he will give you very dirty look for sure 🙂
Below is the small piece of code you may like to use it for installing pathces or any small application on various computer remotely.
Prerequisits
1. Download PSExec.exe from Microsoft.com (http://technet.microsoft.com/en-us/sysinternals/bb897553.aspx) and copy to C:\Psexec.exe
2. Create C:\Hotfixes and dump the path here
3. Copy below code and save it as C:\patchinstall.vbs
4. Create C:\Servers.txt with list of servername
5. Rename with the appropriate name
6. Open command prompt type cscript C:\patchinstall.vbs
This code will copy the patch to all the remote computer mentioned in C:\Servers.txt under C:\Hotfixes and it uses psexec.exe to install the patch on the remote computer
Set objShell = CreateObject("Wscript.Shell")Set objFSO = CreateObject("Scripting.FileSystemObject") set filetxt = objFSO.OpenTextFile("C:\Servers.txt",1)strPSExec = "C:\PSExec.exe"rbcopy = "c:\Windows\System32\Robocopy.exe"strPSExec = objFSO.GetFile(strPSExec).ShortPathrbcopy = objFSO.GetFile(rbcopy).ShortPath do Until filetxt.AtEndOfStream strComputer = filetxt.Readline strComputer = trim(strComputer) strCmd = "cmd /C " & rbcopy & " C:\Hotfixes" & " \\" & strComputer & "\c$\Hotfixes" wscript.echo strcmd objShell.Run strCmd, 1, True strCmd = "cmd /C " & strPSExec & " \\" & strComputer & " ""C:\Hotfixes\<Hotfixname.exe>"" /quite" wscript.echo strcmd objShell.Run strCmd, 1, TrueLoopTaskkill.exe is very great tool which come in handy when you wanted to kill or terminate a process on the remote computer or local computer. You would do easily in the local computer and if you wanted to so the same in remote computer then you would wanted some easy option. you dont have to know the exact process Id or the Process name. Even you can use Wild card to find the process and kill it.
Below is the example to kill process running on the remote computer and you also force to terminate it.
taskkill /s <servername> /f /im Processname*
Below link has detail instruciton on how to use Taskkill.exe with various options
http://www.microsoft.com/resources/documentation/windows/xp/all/proddocs/en-us/taskkill.mspx
