Step by step Instructions for Subordinate CA Migration from Windows Server 2003 to Windows Server 2008 R2 – Part 3

This is the last and final part with back-out procedure of step by step instruction for subordinate CA migration from windows server 2003 to windows server 2008 R2

1. Back-Out Procedure

In case of migration failure i.e. if the Certificate authority service fails to stop, auto enrollment failure or error/issue in any of the verifying migration steps. Then the back-out procedure has to be executed to restore the CA service on the source server.

a. Removing CA Role from Destination server

Log on to the destination server, and start Server Manager.

In the console tree, click Roles.

On the Roles pane click, Remove Roles

If the Before you begin page appears click Next

On the Remove Server Roles, Uncheck ACTIVE Directory Certificate Services and click Next

Click Remove on the Confirm Removal Selection and restart the server once completes

Remove Destination server from domain

Rename the Destination server

b. Adding CA Role on Source Server

Rename the source server to the initial name

Add the source server to domain

Launch Add or Remove programs and select add/remove windows components and select Certificate Service and click, Next

Select Enterprise Subordinate CA as CA Type and select “Use custom settings to generate the key pair and CA Certificate”

On the Public and Private Key Pair click Import and select the backed up file .p12 and enter the password and click next

Click Next to proceed with the CA configuration and close

c. Restoring CA DB on source server

Launch Certificate Authority snap in

Select CA node and click on Actions, All Task and Restore CA

On the Items to Restore select Private key and CA Certificate and Certificate Database and Certificate Database Log

Browse the CA DB Location and Click Next

Enter the password set while backing up the CA

d. Restore Certificate template list

Open a command prompt window.

Type certutil -setcatemplates +<templatelist1>,<templatelist2>.. and press ENTER.


Hope this article was informative and helpful to you .  This is based on test with real time scenario.

Below are the links of other part of the article

Part 1 – Preparing Source CA and Target server
Part 2 – Restoring the Source from backups and Verifying the migration

Please comment if you like this article 🙂

Step by step Instructions for Subordinate CA Migration from Windows Server 2003 to Windows Server 2008 R2 – Part 2

Here is the next part of the article with the step by step Instruction for Subroutine CA Migration from Windows Server 2003 to Windows Server 2008 R2.  In this 2nd part we talk about restoring the source CA from backups on the new Windows Server 2008 R2 and Verifying the migration

1. Restore Source CA Server from backup

a. Restore CA DB

Log on to the destination server by using an account that is a CA administrator.

Start the Certification Authority snap-in.

Right-click the node with the CA name, point to All Tasks, and then click Restore CA.

On the Welcome page, click Next.

On the Items to Restore page, select Certificate database and certificate database log.

Click Browse. Navigate to the parent folder that holds the Database folder (the folder that contains the CA database files created during the CA database backup).

Click Next and then click Finish.

b. Restore CA Registry

Create a backup of the current Registry setting

Open the exported registry file from source servers in notepad and verify the registry values

Open a Command Prompt window.

Type reg import <Registry Settings Backup.reg> and press ENTER.

Type net start certsvc and press ENTER.

c. Restore Certificate template list

Open a command prompt window.

Type certutil -setcatemplates +<templatelist1>,<templatelist2>.. and press ENTER.

2. Verifying migration

a. Verify ACL’s on the AIA and CDP Containers

Logging to DC and open Active Directory Sites in Services

On the Console click on Top Node

Click View and Show Services node you will find Services folder on the Left and expand to reach Public key Services

Expand Public Key Services

Click AIA folder and in the details pane, select the name of the source CA.

On the Action menu, click Properties.

Click the Security tab, and then click Add.

Click Object Types, click Computers, and then click OK.

Type the host name of the target CA, and click OK.

In the Allow column, select Full Control, and click OK.

If Account unknown with security identifier exist then select it and remove the object.

In the left pane, select CDP and the host name of the source CA.

In the details pane, select the first CRL object.

On the Action menu, click Properties, and then click the Security tab.

In the list of permitted group or user names, select the name of the source CA, click Remove, and then click Add.

Click Object Types, select Computers, and then click OK.

Type the host name of the target CA, and click OK.

In the Allow column, select Full Control, and then click OK.

If Account unknown with security identifier exist then select it and remove the object.

b. Verify Registry

Verify that CAServerName is a registry string value located under the HKEY_LOCAL_MACHINE\SYSTEM\CurrentControlSet\Services\CertSvc\Configuration\CAName\ registry key. It should be updated to represent the DNS or the host of the new CA host.

Verify that CACertPublicationURLs and CRLPublicationURLs are both registry multi-string values located under the same key as CAServerName.

c. Verify Auto Enrollment

Log on to a domain member computer by using an account that has Autoenroll, Enroll, and Read permissions for the certificate templates that are assigned to the destination CA.

Click Start, and then click Run.

Type certmgr.msc, and then click OK to open the Certificates snap-in.

In the console tree, right-click Certificates – Current User, click All Tasks, and then click Automatically Enroll and Retrieve Certificates to start the Certificate Enrollment wizard.

On the Before You Begin page, click Next.

On the Request Certificates page, a list of one or more certificate templates should be displayed. Select the check box next to each certificate template that you want to request, and then click Enroll.

Click Finish to complete the enrollment process.

In the console tree, double-click Personal, and then click Certificates to display a list of installed user certificates and to verify that the certificate that you requested is displayed.

Hope you liked this article and got some good understanding of migration process of CA server windows server 2003 to windows server 2008. Please continue with the last part with the backup process. You should know this part to revert back if necessary.

Below are the links for the other parts

Part 1 – Preparing source and target CA  server for migration.

Part 3 – Blackout procedure.

Step by step Instructions for Subordinate CA Migration from Windows Server 2003 to Windows Server 2008 R2 – Part 1

Below are the step by step comprehensive Instructions for subroutine CA migration from Windows Server 2003 to Windows Server 2008 R2.
This article is published in three parts and in this part we will discuss more in details on about preparing of source and destination server for the migration

1. Preparing Source Server

Map network share in source server to copy backup files

Perform/Verify System state backup of Source CA

a. Verify and backup CA Template set

Open Command prompt

Type certutil.exe – catemplates > catemplates.txt

Verify the contents of catemplates.txt with the templates displayed in Certificate Authority snap-in

b. Verify and backup CA’s CSP and signature algorithm

Open Command prompt

Type certutil.exe –getreg ca\csp\* > csp.txt

Verify that the csp.txt contains CSP detaill

c. Publish CRL with extended validity period

Open Certificate Authority snap in

In the console tree right click “Revoked Certificates” and click Properties

Record the current CRL Publishing Parameters

Set the CRL Delta publishing interval to 2 days

Click on “Revoked Certificates” -> all task -> publish -> Delta CRL only

d. Backup CA DB and Private Key

Map shared network drive to take the backup

on Certificate authority snap-in right click point to All task and backup CA

On the Welcome page of the CA Backup wizard, click Next.

On the Items to Back Up page, select the Private key and CA certificate and Certificate database and certificate database log check boxes, specify the backup location, and then click Next.

On the Select a Password page, type a password to protect the CA private key, and click Next.

On the Completing the Backup Wizard page, click Finish.

After the backup completes, verify the following files in the location you specified CAName.p12 containing the CA certificate and private key Database folder containing files certbkxp.dat, edb#####.log, and CAName.edb

Open command prompt and type Net stop Certsvc to stop Certificate Service

e. Backup CA Registry

Click Start, point to Run, and type regedit to open the Registry Editor.

In HKEY_LOCAL_MACHINE\SYSTEM\CurrentControlSet\Services\CertSvc, right-click Configuration, and then click Export.

Specify a location and file name, and then click Save. This creates a registry file containing CA configuration data from the source CA.

f. Remove source server

Launch Add or remove program

Click Add/Remove windows components and uncheck Certificate Services

Click next and finish

Remove source server from domain

Delete AD computer object

Rename source server to some temp name

2. Preparing Destination Server

Change destination server name to the initial source server name

Add destination server to domain

Map network share used in taking the backup on source server

a. Import the CA certificate

Start the Certificates snap-in for the local computer account.

In the console tree, double-click Certificates (Local Computer), and click Personal.

On the Action menu, click All Tasks, and then click Import to open the Certificate Import Wizard. Click Next.

Locate the <CAName>.p12 file created by the CA certificate and private key backup on the source CA, and click Open.

Type the password, and click OK.

Click Place all certificates in the following store.

Verify Personal is displayed in Certificate store. If it is not, click Browse, click Personal, and click OK.

b. Add CA and IIS roles on destination server

Log on to the destination server, and start Server Manager.

In the console tree, click Roles.

On the Action menu, click Add Roles.

If the Before you Begin page appears, click Next.

On the Select Server Roles page, select the Active Directory Certificate Services and Web Server (IIS) check box, and click Next.

On the Introduction to AD CS page, click Next.

On the Role Services page, click the Certification Authority check box, and Certification Authority Web Enrollment and click Next.

On the Specify Setup Type page, specify either Enterprise and click Next.

On the Specify CA Type page, select Subordinate CA, and click Next.

On the Set Up Private Key page, select Use existing private key and Select a certificate and use its associated private key.

In the Certificates list, click the imported CA certificate, and then click Next.

On the Configure Certificate Database page, specify the locations for the CA database and log files.

On the Confirm Installation Selections page, review the messages, and then click Install.

Hope you liked this article, please continue with the next part where we will discuss in details of the below

Part 2 – Restoring the Source from backups and Verifying the migration
Part 3 – Back Out procedure

Configuring Windows 2008 R2 AD Multi Site with Routing and Route Access Configuration for the lab


If you are IT guys and labs are is like your best friend. You can play with your Best friend any time but not with production boxes. Most of the companies are getting global Day by Day and it is spread across multiple location. If you wanted to simulate and test any application like Exchange and AD across the site then you need build the lab for the same. Here I am trying to explain you How to configure a domains with two sites with Routing and Remote Access servers installed as router to route the traffic between two sites on a Single Windows 2008 R2 Hyper V Server

Preparing the Network Settings

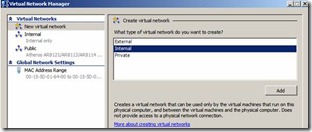
1. Configure Hyper-V Virtual Network Manager to add new "Internal" Network.

2. Configure all the Servers built on Hyper V to use this network Adapter Internal

Servers Installed and Configuration Details

Server Name

OS

Nics

IPAddress

Site

ADC

Windows 2008 R2

1

172.168.1.1/24

ASite

BDC

Windows 2008 R2

1

172.168.2.1/24

BSite

Router

Windows 2008 R2

2

172.168.1.10/24

172.168.2.10/24

ASite

BSite

Configuration of Window 2008 As Router

  1. Login Server name "Router" and make sure that 2 NIC is configured with IP address 172.168.1.10/24 and 172.168.2.10/24, without any default gateway and DNS servers. Below figure 2 has the detail configuration on one of the NIC which is having IP address Asite. Similarly configure NIC on BSite with the IPaddress 172.168.2.10/24

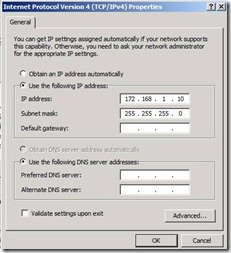
Figure 2. IP Address Configuration on the Server "Router "

2. With this NIC configuration you should be able to ping both ADC and BDC from the Server "Router". From ADC You should be able to ping IP address on the Router which is ping to ASite (172.168.1.10) but not the IPaddress of NIC point to BSite(172.168.2.10). ADC should be not able ping to BDC. This is because Router is acting as a median between Asite and Bsite and currently Router Server is not configured to route the packets from Asite to Bsite and Vice Versa.

3. Now lets configure Server Router for routing the packets. login to Server Router Launch Server Role and select Network Policy and Access Services (Figure. 3) and click next

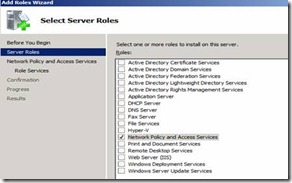
Figure 3. Adding Network Policy and Access Services

4. Select Routing and Remote Access Services (Figure 4) and click next and finish to install the same

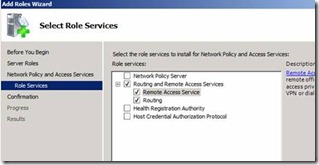
Figure 4. Enabling Routing and Remote Access Services

5. Once we have Routing and Remove access Services Role installed on the Router, we should be able to see the role added in the Server Manager. Right click on Role Network Policy and Access Services and click Configure and Enable Routing and Remote Access to enable the same

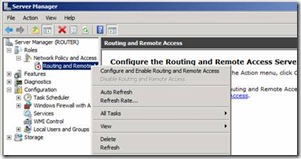
Figure 5. Network Policy Access Role added in the Server manager and its available for configuration

6. On the welcome screen to configure routing and remote access server wizard click on Next.

7. In the configuration step click on Secure Connection between two private networks (Figure 6)and click Next. This is setting which helps to enable routing and click on Next

Figure 6. Enabling Routing Settings

8. You will be prompted for enabling demand dial connection(Figure 7) which we don’t need. Click on Next

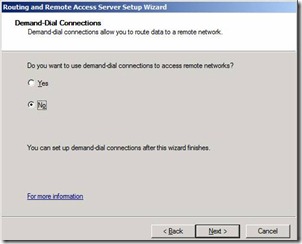
Figure 7. Option for Demand Dial

9. Finally Click on Finish and this is complete the initializing of the new role

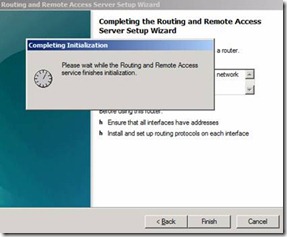
Figure 8. Completing Routing and Remote Access Service Installation

10. Once we have initialized we should be able to see new Routing and Remove Access initialized with Green up arrow. Figure 9. Expand to until you reach IP v4 | General | Right Click and select New Routing Protocol

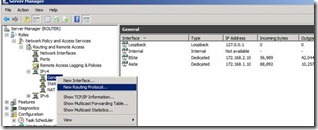
Figure 9. Server Manager after installing new Role Network Policy and Access Services

11. Select the protocol "RIP Version 2 for Internet Protocol" and click on ok to Install the same.

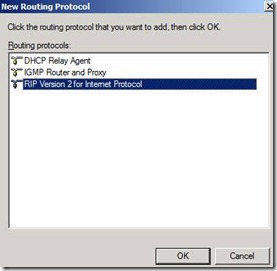
Figure 10. Installation of RIP V2 Internet Protocol

12. Once we have installed RIP Protocol we need to added the required Interface for protocol. Right Click on the RIP to install the Interface which is point to ASite and BSite

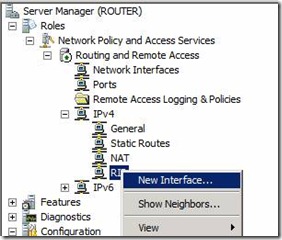
Figure 11. Configure Network Interface to the RIP Protocol

13. Keep all the default settings when you add the interface. Once we added both the interface we should be able to see the same on the console. Figure 12

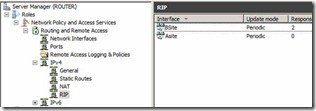
Figure 12. Settings after adding both the Network Interface on the RIP protocol

14. Once we have this configuration in place then we should be able to send and remove packets between Asite and Bsite. This can be confirmed by pining All the IP address available on BSite from Asite (Figure 13) and Vice versa

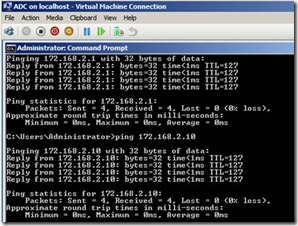
Figure 13. Pining BSite servers from Asite Servers

15. Once we have this configuration on Place we have communication established between both the sites. Now Lets Install and configure Domain Controller and Configure AD Sites for the AD Replication

16. Login to ADC | Start | Run | DCPROMO | OK to Promote ADC as domain Controller

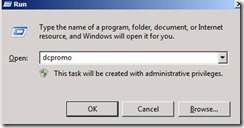
Figure 14. Starting DC Promotion

17. Click Next on the Welcome Screen

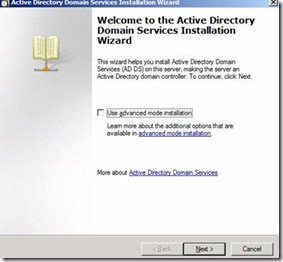
Figure 15. Installing

18. Create a new domain in the new Forest

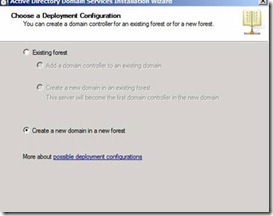
Figure 16. Creating new Domain in a New Forest

19. Provide the Required name for the domain

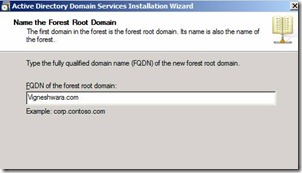
Figure 17. Creating New Vigneshwara.com

20. Configure Forest Function Level and Domain Functional Level with required settings with Windows Server 2008 and click Next

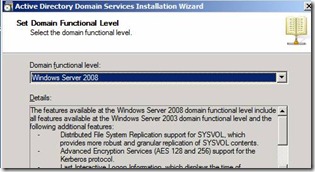
Figure 18. Configure Domain Function level

21. Configure DNS Servers to install (Figure 19) and YES to continue

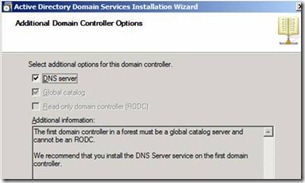
Figure 19. Installing DNS Server

22. Set the required path for the Active Directory Database , log and Sysvol. Recommended to keep it default and click on Next

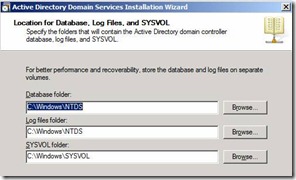
Figure 20. Configuring AD Database, log and Sysvol location

23. Provide required AD restoration Password and click on Next to Install and Configure AD and DNS on the Server. Figure 21.

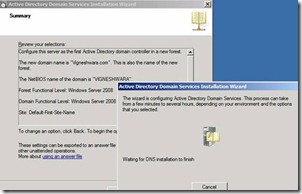
Figure 21. Installing Active Directory and DNS

24. Restart the Server once Installation is Finished

25. Now Lets configure AD Sites and Services

26. Login to ADC | START | RUN | dssite.msc | ok

Figure 22. Starting Active Directory Sites and Services

27. Expand AD sites and Services and Right click on Default-First-Site-Name to ASite

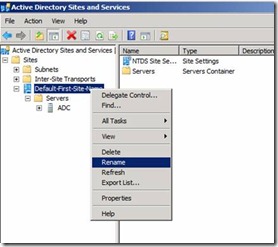
Figure 23. Reaming Default-First-Site-Name to ASite

28. Lets now Create a new Site With BSite. Right click on the Sites and click on New Site

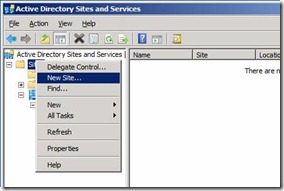
Figure 24. Create New AD Sites – Bsite

29. Provide the New Site name Bsite and click on DefaultIPSiteLink and click on OK and Next to configure the same. Figure 25.

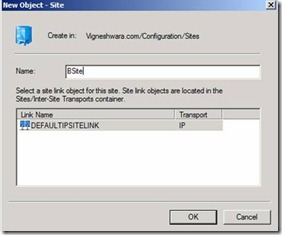
Figure 25. Creating new Site with DefaultIPsitelink Configuration

31. New we should be able to see the new Site created with the name Bsite

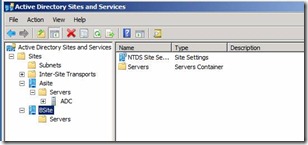
Figure 26. Console after New Site Creation with BSite

30. Once we have Sites in place lets configure subnets. To configure the same right click on Subnets and Select new Subnet Figure 27.

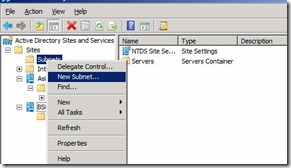
Figure 27. Creating new Subnets in Active directory users and computers

31. In our Current setup we have two subnets 172.168.1.0/24 and 172.168.2.0/24. Here we are trying to create a new subnet and associate Sites with the subnets

32. On the new Subnet enter the IP Subnet with Subnet mask 172.168.1.0/24 and click on Asite and click ok

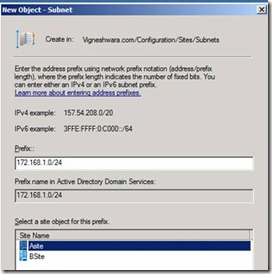
Figure 28. Configure Subnets with Asite

33. Configure the same for BSite with IP Subnet 172.168.2.0/24

Figure 29. Configure Subnets with BSite

34. Once we are done we should be able to see the new Subnets added in the Console

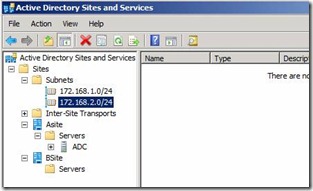
Figure 30. Active Directory Sites and Service configured with new Subnet

35. Now out Sites configures is configured. Lets go a head and install domain controller as additional domain controller on BSite and configure replication

37. Login to BDC server and configure the Network DNS to point to ADC (172.168.1.1)

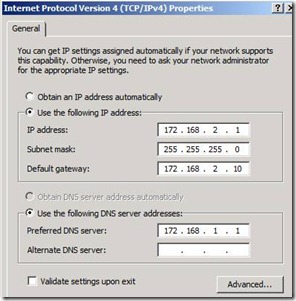
Figure 31. Configuring BDC DNS with ADC

36. Login to BDC Server | START | RUN | DCPROMO | OK

37. Click on Next on the Welcome screen and Select the option to add this domain controller to the existing forest as a new domain controller in an existing domain. Below is the configuration snap Figure 32.

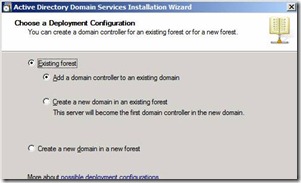
Figure 32. Configuring BDC as new domain controller and joining to the existing forest.

38. Provide the Domain name which was created and set the credentials and click on Next

Figure 33. Configuring Domain Name on BDC

39. Select the Domain Name Vigneshwara.com and click on Next

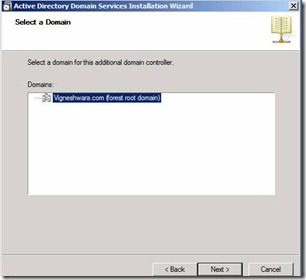
Figure 34. Selecting the domain for additional domain controller

40. Configure this domain controller to point to SiteB by selecting "Use this site that corresponds to the IP address of this computer" and select SiteB and click Next

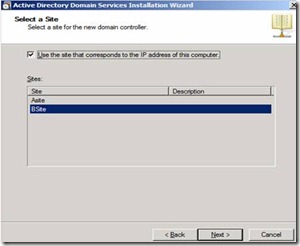
Figure 35. Adding the domain controller to Bsite

41. Select the option DNS server and Global Catalog Server and click on Next

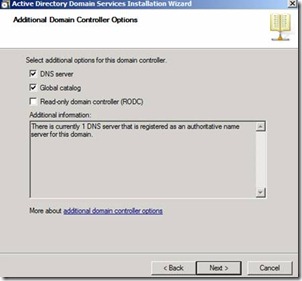
Figure 36. Enabling DNS and Global Catalog.

42. Keep the default path on the AD directory , Log files, Sysvol and Click on Next to provide the Directory Service Restore Mode Administrator Password

42. Finally click on Finish to install and configure Domain Controller, Global Catalog, DNS on server BDC under the Site BSite

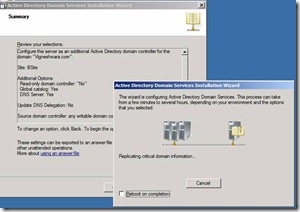
Figure 40. Finishing Domain Controller Installation on BDC

43. Restart the Server once DC is promoted on BDC

44. Once we have BDC as domain controller in place we should be able to see new DC Server add on the AD Sites and Servers under Bsite

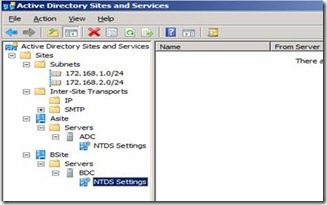
Figure 41. Ad Sites and Services after BDC installed

45. By Default Active Directory Sites are configured for replication, Any changes done on Asite will be replicated to Bsite. There will be delay in the replication. By default the replication time is configured for every 180 min. We can changed this to minimum replication for every 15 min.

46. Lets configure the replication settings between the sites to replicate every 15 min. Access Active directory sites and Sites

47. Expand until you reach Inter-Site Transports. Select IP and click on properties on the DefaultIPsitelink. Figure 42.

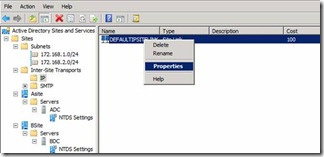
Figure 42. DefaultIPsitelink configuration

48. Change the Replicate Every to 15 min and click on apply and ok.

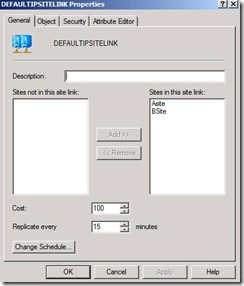
Figure 42. Changing Replication frequency between AD Sites Asite and Bsite