Active Directory Cross Forest Migration from Active Directory 2003 to Active Directory 2008 – Part 2

This is continuation of Part 1. Please continue with part two

Creating and configuring ADMTAdmin Service account

Now we need to create and configure ADMT service account to make sure ADMT service account (admtadmin) account has appropriate rights to perform the migration tasks

1. Create a Server account admtadmin in green.com and add the green\admtadmin to the local domain admin group of green.com

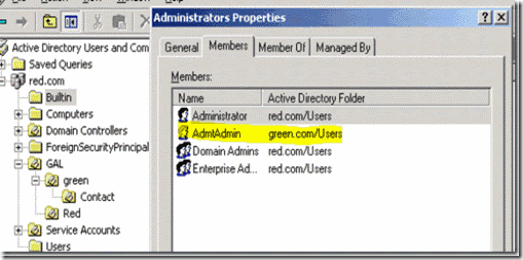
2. Connect Red.com active directory users and computers and add green\admtadmin as member of built in Administrators group

Figure 17. Adding “green\admtadmin’ as the member of built-in administrators group in red.com

Preparing and configuration PES (Password Export Server)

1. Login to the domain member server in green.com where the ADMT tool is installed and run the below command. This is to generate the encryption key for importing in to import it the source domain controller. This command will generate the encryption key file at C:\Pes.pes and it will prompt for the password and confirm password.

admt key /option:create /sourcedomain:red /keyfile:”c:\PES.pes” /keypassword:*

Figure 18. Exporting Encryption key from ADMT server

2. Copy the file C:\pes.pes to the root Directory (c:\) source(red.com) domain controller

3. login to source domain controller (red.com) and install the PES tool.

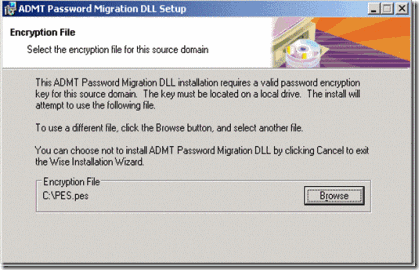
4. During the installation it will prompt for the location of the encryption key. Click on browse and point to the encryption file which was copied recently (C:\pes.pes) and click on Next

Figure 19. Importing Encryption key file into the Password export server

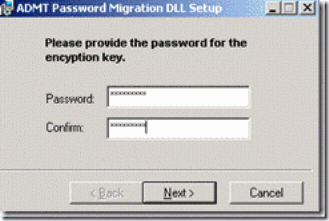
5. Enter and confirm with the same password with used to which exporting the encryption key at point 1 above and click on next

Figure 20. Confirming with password for importing encryption key

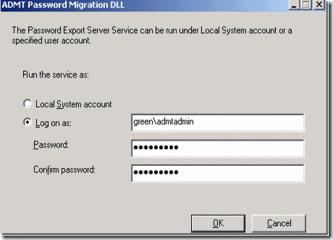
6. It will prompt to PES Service account. Specify the account green\admtadmin account with the password and click on ok to continue. Once configuration is completed, server will prompt for the reboot and confirm to reboot the server.

Figure 21. providing green\admtadmin service account to run the PES serve service

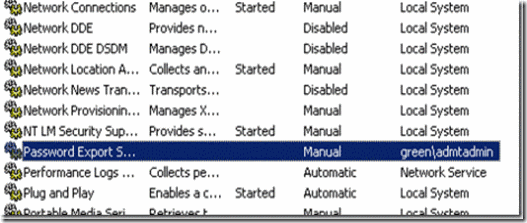
7. Password Export server will not start automatically. It has to be start manually. Only start when ever required or when ever migration is performed.

Figure 22. Password Export server service is disabled by default

8. Right click on the service and select start. you should be able to see the started status on the services console

Figure 23. Password export server service status after manually starting the service

configuring source domain controller(red.com)

Once PES service is configured then we have to configure registry to allow password export. Below is the steps to perform the same.

1. Login to the domain controller and start registry editor (regedit)

2. Navigate to HKEY_LOCAL_MACHINE\SYSTEM\CurrentControlSet\Control\Lsa

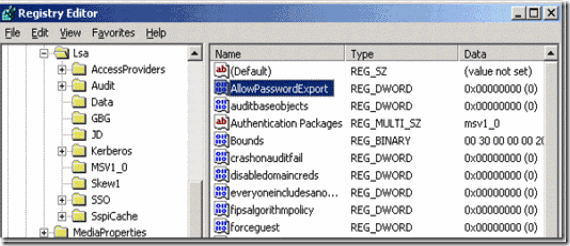
3. Access Allowpasswordexport and change the value form  0 to 1

Figure 24. Enabling password export settings from the registry

Disable SID Filtering

if we need SID history on the target domain, then we have to disable SID filtering. Run the below command on the target domain to disable SID filtering

netdom trust source.com /domain:target /quarantine:No /usero: source_admin_act   /passwordo: source_administrator_pwd

Figure 25. Disabling SID filtering


Migrating User from red.com and green.com

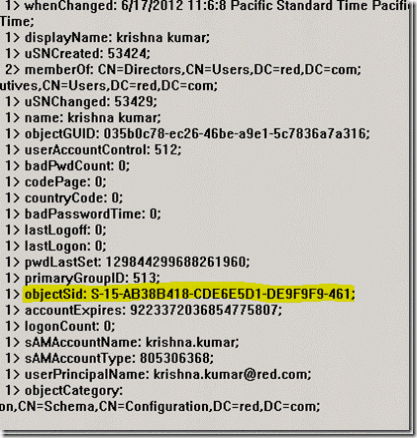
1. We will be migration user krishna.kumar from red.com to green.com. We can verify and make a note of user objectsid from the source domain with the help ldp tool or simple ldap query.

Figure 26. ObjectSid details of user krishna.kumar

2. login to the target domain member server with the green\admtadmin where ADMT tool is installed

3. Start Active directory migration tool from administrative tools

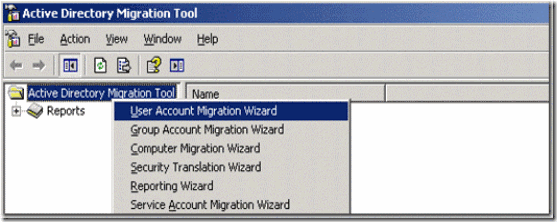
4. right click on the Active Directory Migration tool and select User Account migration wizard and click on Next

Figure 27. Starting the User Account Migration Wizard

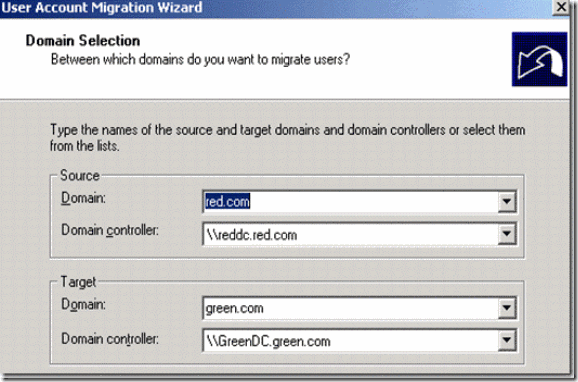
5. Select source domain,source domain controller and Target domain and target domain controller and click on next

Figure 28. Source and Target domain details for migration

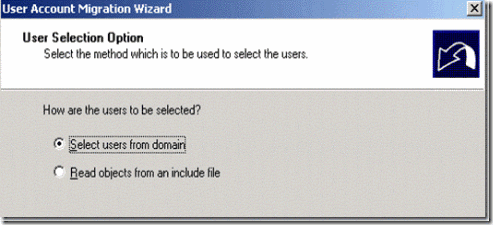
6. Select users from the domain under User Selection option and click on next

Figure 29. Manual user selection

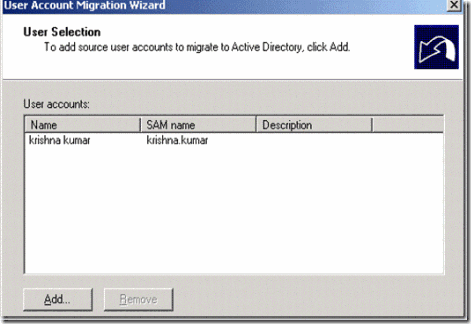
7. Add the user krisha.kumar and click on next

Figure 30. Adding krishna.kumar for user migration

8. Create a Target OU in Target domain and point to the same to create the migrated user account

Figure 31. Select the target OU where the migrated used should be created

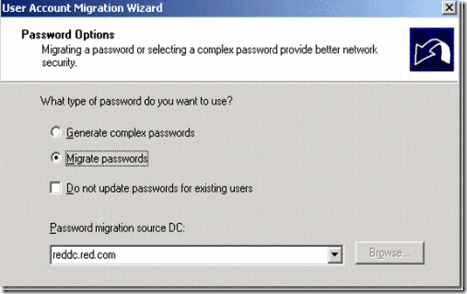
9. Select the option Migrate passwords

Figure 32. Selection migrate Password option and select the source domain controller

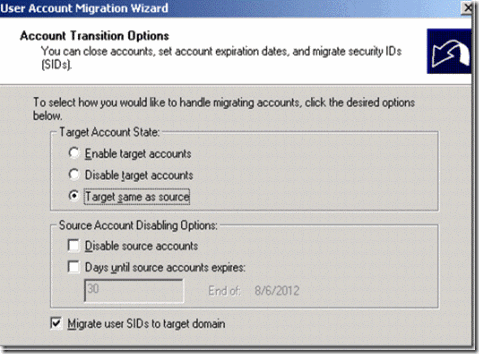
10. Select the option Target same as source and also enable to the option Migrate user SIDs to target domain and click on Next

Figure 33. option to selected on how to handle migrating accounts

11. Type account from the source domain which has administrative rights and click on next

Figure 34. Admin account for adding SID History on migrated account

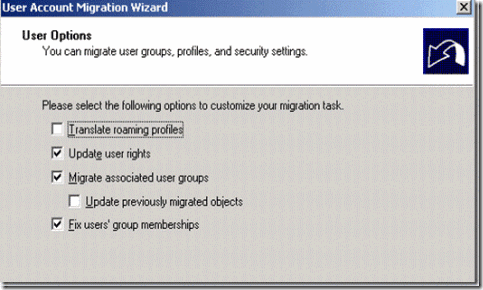
12. Select some of the import option likes update user rights, Migrate associated user group, fix users group membership and click on next

Figure 35. Option to migrate associated user groups, profiles and settings

13. Entire AD properties will be migrated to the target account. Just in case if you need any kind of properties execution then figure 36 shows the option to exclude the same.

Figure 36. Option to execute ad properties on the migrating objects.

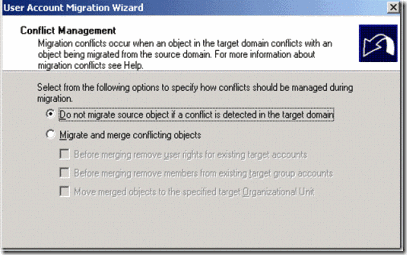
14. keep the default option do not migrate source object if the conflict is detected it the target domain and click on Next

Figure 37. Conflict management option

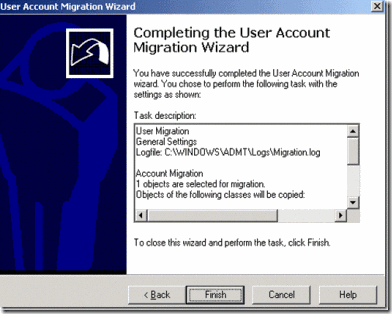
15. Click on Finish to kick start the user migration

Figure 38. Finishing the user migration

16. Once the migration is completed, you should be able to see the details on the screen. To get some advance or log detail, click on view log

Figure 39. Migration progress status

17. log file has some very good amount of information on what exactly happened during the migration. Details like Account been replicated, created, SID history added, password copied and other group membership details etc.

Figure 40. Migration log details

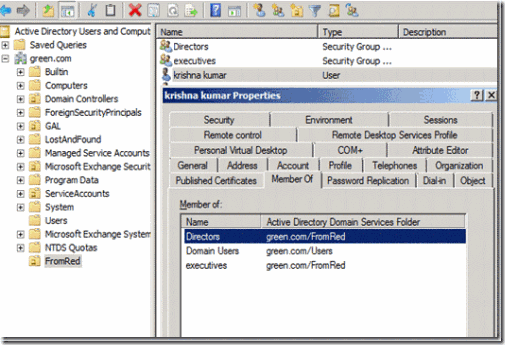
18. On the target domain we can see the Krishna.Kumar is create with all the group membership and also see that associated groups is also been migrated to the destination. You can also verify the entire user properties.

Figure 41. krishna.kumar user property after migration with group membership details

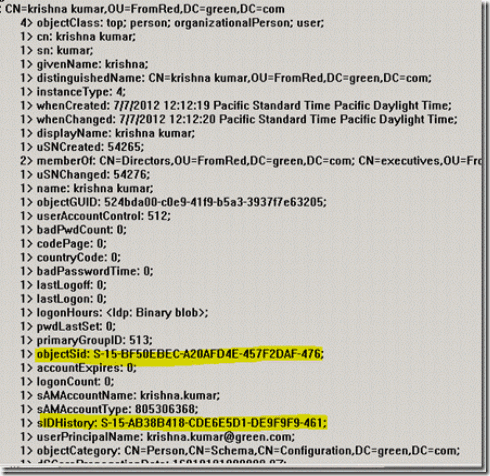
19. We can also verify the object Sid and Sid history been crated on the new object in the target domain. Sid history is the same source objectsid.

Figure 42. Objectsid and SidHistory details of krishna.kumar after migration

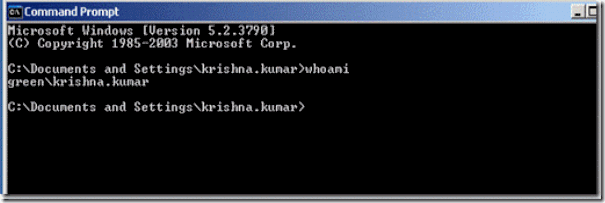
20. To check if the password is been copied, login to one of the client computer with the same password as the source domain. Below figure 43. shows the details of the login account with the domain name.

Figure 43. login details on krishna.kumar on the green.com workstation

Active Directory Cross Forest Migration from Active Directory 2003 to Active Directory 2008 – Part 1

When we say cross forest ad migration then the first thing which comes to the mind is Active Directory Migration Tool. It’s a free and very easy and powerful tool from Microsoft. Doesn’t look very fancy but does its task. There are various tools available in the market to perform cross forest migration but at we will talk about ADMT and its features and how we can use it. Before you work on ADMT in the production, you need to perform through understanding of the ADMT, test it in the lab and then it to the production.

Note: Not performing through testing can be distractive for the users. Users may lose password, lose share access and you will be in trouble.

ADMT features

1. It provide various wizards to migrate User accounts, computers accounts, service accounts, Group

2. Migrate Sid History which helps user to maintain the access to network share, application and other services even after the user been migrated to different forest

3. Migrate password form source forest to target forest.


Red.com Green.com

Current Lab Setup

Red.com DomainGreen.com Domain
Domain controller (windows 2003) Domain controller(windows 2008)
following Software installed in Source domain controller
PES 3.1(Password Export Server)  
Domain member Server(windows 2003)
following Software installed
ADMT 3.0(Active directory migration tool)
.net Framework version 2.0
SQL 2005 with latest service pack

Installation of ADMT tool on the Domain member Server

Please follow the below process order to install prerequisites and ADMT. If you have domain member server is windows 2008 or Windows 2008 R2 then you can install the latest version of the ADMT 3.1 or 3.2 respectively. In my lab I have the domain member server as widows 2003 so I am forced to install ADMT 3.0

  1. Install Microsoft .NET Framework Version 2.0 Redistributable Package (x86)
  2. Install SQL 2005
  3. Install Latest SQL service pack
  4. Install ADMT tool and accept the default database selection (If SQL 2005 is not installed prior to installing ADMT tool then it will automatically install Microsoft SQL Server Desktop Edition)

DNS Configuration between forests

DNS Configuration is a one of the primary requirement to communicate between two forests

DNS can be configured in two ways, either by creating secondary zone or forwarders. Configuring forwarders is much easier then creating secondary zone. Secondary zone has a read-only copy of the particular domain but forwarders are just forward the request to the target domain. Response to the DNS request is much faster in secondary zone than forwarders

Let me show you show to create secondary zone.

  1. Login to Green.com Domain controller
  2. Access DNS Manager
  3. Right click on the forward lookup zone and select New zone and click on Next

Figure 1. Creating new Zone

   4. Select Secondary zone and click on Next

Figure 2. Creating new Secondary Zone

   5. Provide the target domain name and click on Next

Figure 3. Providing DNS Zone name

6. Provide red.com DNS server IP address and click on Next and click on finish to complete the configuration

Figure 4. Configuring with Master DNS server of red.com

7. Need to follow the above same process (1 to 6) on the red.com DNS server to create the secondary zone for green.com domain

Cross forest trust configuration

1. Connect to the Target domain controller (green.com) and access Active directory domain and trusts from the Administrative tools

2. Right click on Active directory Domain and trusts and click on properties.

Figure 5. Starting with Trust configuration

3. Select the Trust Tab and click on new Trust and select next on welcome screen

Figure 6. Trusts tab to start the new trust configuration between forests

4. Provide the trust name with the source domain red.com and click on next

Figure 7. Domain name which you wanted to trust

5. Select external trust, as you cannot create cross forest trust between AD 2003 and AD 2008 and click on next

Figure 8. Configuring External trust

6. Select “two way” trust and click on next

Figure 9. Selecting Two-way trust option

7. Select the option “both this domain and the specified domain”

Figure 10. Option to select trust on both from red.com and green.com

8. Input the source (red.com) account which has administrative privileges and click on next

Figure 11. Passing account having administrative privileges on red.com

9. Select “Domain-Wide authentication” for red.com and click on next

Figure 12. Selecting Domain-wide authentication on outgoing trust for local domain

10. Domain wide authentication for the local domain and click on next

Figure 13. Selecting Domain-wide authentication on outgoing trust for specified remote domain

11. Select “yes, confirm the outgoing trust”

Figure 14. Confirmation to create outgoing trust

12. Select “Yes, confirm the incoming trust” and next and click on finish the configuration.

Figure 15. Confirmation to create incoming trust

13. Successfully created outgoing and incoming external trust between both the forest

Figure 16. Successful status of external trust creation.


I hope you like this part of the article will soon come up the other parts of the articles.

Powershell to query Adsites and Domain Controllers Details

Below powershell command helps to get the list of all the Sites in Active directory and domain controller in each domain. We can filter this to find the dc on specific domain controller

[system.directoryservices.activedirectory.domain]::GetCurrentDomain().domainControllers | select sitename,name

If you wanted to perform specific operation and it has to run on all the domain controllers in every site then we can filter this out. Below powershell will get one DC on each site. Its simple logic but worth it..

[system.directoryservices.activedirectory.domain]::GetCurrentDomain().domainControllers | foreach {

$Sitename = $_.sitename
$dcname = $_.name
$repSite = “”
if($Sitename -ne $repSite)
 {
  Write-host $Sitename $dcname
 }

}


Powershell to Query Active directory

Powershell to Query Active directory and get the list of Domain controllers in the current AD Site which you server is located

%{[System.DirectoryServices.ActiveDirectory.ActiveDirectorySite]::GetComputerSite().Servers | % { $_.Name} }


Powershell to Query Active directory to get the current AD sites

 [System.DirectoryServices.ActiveDirectory.ActiveDirectorySite]::GetComputerSite().name


Powershell to formally disable user accounts who have left Orginization

When user leaves orginization administrators make sure that account is disabled and its marked for deletion. Delection can happen once in 15 days or 1 month.  We may need to perform series of steps for disabling the account

eg. Disable Account, Move Object to Disabled Account OU, Hiding from GAL, removing Group members, 0 ing send and receive limits.

Below powershell script helps to perform the same.  It uses both Exchange commands and Quest Active roles command lets. We need to add the snapin to execute the code.

Add-PSSnapin Microsoft.Exchange.Management.PowerShell.Admin
Add-PSSnapin Quest.ActiveRoles.ADManagement
$AName = Read-Host “Enter User Alias name for Disable”
$AName | out-file -filePath E:\users.txt
foreach ($user in (get-content E:\users.txt)){(get-qaduser $user).memberof | Get-QADGroup | where {$_.name -ne “domain users”} | Remove-QADGroupMember -member $user}
Move-QADObject $user -NewParentContainer “domain.com/Disabled Accounts”
Disable-QADUser $user
Set-Mailbox $user  -HiddenFromAddressListsEnabled $true -UseDatabaseQuotaDefaults:$False -issuewarningQuota 0MB -ProhibitSendQuota 0MB -ProhibitSendReceive 0MB


Below location has copy of the code

http://powershell.com/cs/members/smtpport25.wordpress/files/DisableUserAccounts.ps1.aspx

Active Directory SysVol Replication Migration from FRS to DFSR in windows 2008

DFS Resplication service is only supported in Windows 2008 Domain Functional Level. If Active Directory is running in windows 2000 or windows 2003 then FRS is used to replicate Sysvole. If Domain Funcation is 2008 the all the domain controller in the domain must be windows 20080

There lots of advantages in using DFS Replication over FRS to replicate SysVolume. Below link has details description on the DFSR Migration and advantages list over FRS

http://blogs.technet.com/filecab/archive/2008/02/08/sysvol-migration-series-part-1-introduction-to-the-sysvol-migration-process.aspx


http://blogs.technet.com/filecab/archive/2008/02/14/sysvol-migration-series-part-2-dfsrmig-exe-the-sysvol-migration-tool.aspx


http://blogs.technet.com/filecab/archive/2008/03/05/sysvol-migration-series-part-3-migrating-to-the-prepared-state.aspx


http://blogs.technet.com/filecab/archive/2008/03/17/sysvol-migration-series-part-4-migrating-to-the-redirected-state.aspx


http://blogs.technet.com/filecab/archive/2008/03/19/sysvol-migration-series-part-5-migrating-to-the-eliminated-state.aspx

Powershell to get list of users who’s Dial in option is enabled in Active Directory

Powershell to get the list of users who has Dial in option is enabled in Active directory.  This has to be executed in Quest Active Roles management console. This will query all the active directory users and get the details if the user object has Dialin option is enabled

Get-QADUser -IncludeAllProperties | ?{$_.msNPAllowDialin -eq $true} |Select Displayname,mailnickname

Below powershell helps you to enable export dial in enabled users to CSV format file

Get-QADUser -IncludeAllProperties | ?{$_.msNPAllowDialin -eq $true} |Select Displayname,mailnickname | Export-Csv C:\Dialinusers.csv

Recovering Deleted User Ad account throught Active Directory powershell

We can recover any Active Directory deleted object with in the Tombstone period.
Tombstone lifetime can be found in active directory using below steps

• Load the ADSIEdit snap-in by navigating to start menu, programs, Windows 2000 Support Tools, Tools, ADSI Edit, or simply type adsiedit.msc at the run command.
• Navigate down to CN=Directory Service, through Configuration, CN=Configuration,DC=domainName,DC=com, CN=Services, CN=Windows NT, right-click and choose properties. 
• scroll down to tombstoneLifetime. This will have Tombstone period

Get-QADUser -Tombstone

Will get the list of user accounts which are Deleted and residing in Tombstone


Get-QADUser -Tombstone <name> |restore-QADDeletedObject

Will restore the user object in to the OU LOSTANDFOUND


Get-QADUser -Tombstone -LastKnownParent ‘<DN of container>’
Restores all user accounts that were deleted from a particular container to OU LOSTANDFOUND.


 Get-QADUser –Tombstone –LastChangedOn (get-date -year 2008 -month 9 -day 1)

Restores all user accounts that were deleted on September 1, 2008


Get-QADUser –Tombstone  <username> | fl

Gives the complete details of the -Tombstone account which can help in finding detained information of the Tombstoned account