Office 365 Hybrid Configuring Using Windows Azure – Part 6

I tried to keep this article series as brief as possible and cover end-to-end configuration of Exchange and Office 365. This should give you a complete understanding to take the base on-premises exchange environment and integrate with the Office 365 in the hybrid mode.

This is the final and last part of this article series. We will continue with the discussion on the topics mentioned below.

I. Provisioning Office 365 mailbox from on-premises Exchange Admin center

II. Accessing provisioned mailbox using Single Sign On(SSO)

III. Migrating mailbox from on-premises to Office 365

Other part of the Articles can be found at below link

Office 365 Hybrid Configuring Using Windows Azure – Part 1

Office 365 Hybrid Configuring Using Windows Azure – Part 2

Office 365 Hybrid Configuring Using Windows Azure – Part 3

Office 365 Hybrid Configuring Using Windows Azure – Part 4

Office 365 Hybrid Configuring Using Windows Azure – Part 5

Provisioning Office 365 mailbox from Exchange Admin Center

It is recommended to provision all the mailbox for both on-premises and Office 365 through On-premises Exchange Admin Center.

1. Login to on-Premises Exchange admin Center

2. Click on recipients -> mailboxes and click on ‘ + ‘ to select ‘Office 365 mailbox’

3. Provide all the necessary new user details and save to create the mailbox in Office 365

4. This will create an AD object at on-premises active directory and create the mailbox at Office 365. Given below is a reference snapshot of Exchange EAC with the new Office 365 mailbox.

5. The newly created object at on-premises has to be synced with Office 365. Scheduled synchronization happens every 3 hours. Follow the steps given below to force the directory synchronization immediately and allow users to login with the new accounts.

a. Login to the Dirsync server – Krisdirsync.cloudapp.net with the admin credentials

b. Access windows explore and navigate to the path “%programfiles%\Windows Azure Active Directory Sync”

c. Double-click on DirSyncConfigShell.psc1 to open a Windows PowerShell window with the cmdlets loaded.

d. In the Windows PowerShell window, type Start-OnlineCoexistenceSync, and then press ENTER

6. With force synchronization, we should be able to see the new account at Office 365 portal and given below is the reference screen shot.

These accounts need to be activated and assigned the license to allow users to login to their mailbox. Select the required ‘synced with Active Directory’ user and click on ‘Active Synced user’

7. Active the user by specifying the user location , assigning the required licenses and click on ‘Next’

8. The ‘Send result in email’ page is to send the mailbox creation with password detail to the authorized person. Since we have synced the objects from active directory, passwords are not reset for the users. Click on ‘Active’ to active the mailbox.

9. The ‘Results’ page has the mailbox activation confirmation with the message ‘The password wasn’t reset because its user’s password is synced with your on-premises’

Accessing provisioned mailbox using Single Sign on (SSO)

1. Login to the client machine and connect to the Office 365 portal via explore. Sign in with the new account rajesh.kumar@checkwhatsin.com and use the TAB key

2. Office 365 portal will check for ‘checkwhatsin.com’ SSO configuration and it will immediately redirect to the organization sign-in page

3. Input the domain\username and password and click on ‘Sign In’ to authenticate

4. The welcome page is ‘Get started with Office 365 page’, with all the necessary information to connect to Outlook, Outlook Web App, installing Office client software’s setting up the mobile device etc.

Click on ‘Outlook’ on the top ribbon to access the Outlook Web App

5. Shown below is the new and first look for users Outlook Web App

Migrating mailbox from on-premises to Office 365

The idea of having a hybrid environment is to have some or the majority of mailboxes in Office 365 and others in on-premises. Let understand how to migrate users from on-premises to Office 365 and understand as to how they continue to access their emails

1. Connect to the Exchange on-premises EAC with Organization admin credentials

2. The Mailbox Replication Proxy (MRSProxy) service is installed on every Microsoft Exchange Server Client Access server. MRSProxy helps to facilitate cross-forest move requests and it runs on the local Exchange Client Access server. However, MRSProxy is disabled by default.

3. To Enable MRS Proxy select Servers -> Virtual directories -> Double click on “EWS (Default Web Site)”

4. Select ‘Enable MRS Proxy endpoint’. This is the important configuration to allow cross forest migration of users from on-premises to Office 365.

5. Identify the user for the migration to Office 365 and click on “To Exchange Online” under ‘Move Mailbox’ to start the move mailbox wizard.

6. Confirm the migration endpoint with the Remote MRS Proxy server. Internet facing CAS server with MRS proxy enabled is Krisexch.cloudapp.net and the Internet alias name for the same is mail.checkwhatsin.com. Specific the ‘Remote MRS proxy server’ and click on ‘Next’

7. Specify the ‘New migration batch name’, ‘Target delivery domain’ name and other necessary details. In our case, Target delivery domain is ‘checkwhatsin.mail.onmicrosoft.com’. Specify the same and click on ‘Next’

10. Specify the account to deliver the batch competition status report. Also select the preferred option to start and complete the batch. Click on ‘New’ to start the migration batch

11. Click on ‘Yes’ to go to the migration dashboard to see the status of the migration batch.

12. This will automatically redirect the page to Office 365 Migration page with details of the migration batch status as syncing.

Syncing: The migration batch has been started, and mailboxes in the migration batch are being actively migrated.

13. Once synchronization of the selected mailbox is completed, click on ‘Complete this migration batch’ to perform the final migration process.

14. Confirm with ‘Yes’ to start the process.

15. Wait for the completed status to make sure the mailbox is migrated from on-premises to office 365.

16. Once mailbox is migrated to Office 365, users should start to use the Office 365 portal to connect to Outlook Web App application. Users can still connects to on-premises OWA portal to connect to the Office 365 OWA

17. Once you login to on-premises OWA, it determines the location of the mailbox in Office 365 and specifies the Office 365 portal URL to access their mailbox.

18. Click on the link to open then the new Office 365 authenticate page. This URL can be saved in the favorites for the further usage. Enter the user email address and press the Tab key

19. Since, Federated SSO is configured for the domain checkwhatsin.com, it will redirect to the on-premises reverse proxy server for authentication

20. Once authenticated using on-premises credentials, it will redirect back to Office 365 OWA page

21. Accessing Office 365 OWA seems to be a bit completed with the redirection happening forth and back in the hybrid mode. It is not the same experience for outlook users and user can continue to access the same profile and OST without changing the profile configuration

22. Once the migration is completed, the user will lose connection and it prompts the user to restart outlook.

23. When outlook is started again, it will prompt for the basic authentication popup. Input the user UPN(username@checkwhatsin.com) and password then click on ‘OK’

24. This will allow outlook to communicate, authentic and connect office 365 for email access. Below snap has the details of outlook with ‘Connected to Exchange server’ status.

25. We can connect to ‘Outlook Connection Status’ to verify the Office 365 connection. We should be able to see the connection proxy server as outlook.office365.com, which are office 365 servers.

With this we have come the end of the article series. I suppose if you want to learn Office 365 and configure Hybrid, then this is one of the best and easiest ways to learn it. Hope you have got some sound understanding as to how to build and configure Office 365 hybrid environment using Windows Azure.

It was a great experience for me to work on this article series and hope it will help you greatly to deploy and configure Office 365 hybrid mode in the production environment.

Other part of the Articles can be found at below link

Office 365 Hybrid Configuring Using Windows Azure – Part 1

Office 365 Hybrid Configuring Using Windows Azure – Part 2

Office 365 Hybrid Configuring Using Windows Azure – Part 3

Office 365 Hybrid Configuring Using Windows Azure – Part 4

Office 365 Hybrid Configuring Using Windows Azure – Part 5

Lync 2010 Address book Service, a quick glance

In the past I had written an article on Exchange 2010 address book service on how it generates the address book, distributed and client are updated. Here is the Web Link. I thought I should write one similar for Lync 2010 as well. This will give you a fair idea on Lync address book generation, synchronization and client updating process. Although it’s an entirely a different process than exchange 2010

Below is the high-level step to give you easy understating of this process

1. Lync address book service helps to generate both offline(Phones) and online address book(Lync) and its generally knows as Global Address list(GAL)

2. It also provides Address book web query service. Using these Lync clients can directory query active directory for group membership details.

3. Lync Address book service are part of the both Lync standard and Enterprise edition server

4. Only one server in a front pool can run address book service. So each front end pool will have its own address book server running address book service.

5. Address book service uses user replicator to query active directory service (AD DS) on a schedule interval and updates the data into the SQL Database RTCCab and RTC. This normally happen every 60 second

6. User Replica always performs read only from the Active directory and it use LDAP to query new and updated information on users, contacts and group objects from Active directory.

7. Address Book Server Synchronizes the user data from the RTCab database into files in the Address Book Server file store. It only pulls the new and updated data from the RTCab database. It occurs once every 24 hrs and by default it’s scheduled to run every day at 1:30 AM.

8. This schedule can be changed to multiple times depending on the requirement or it can be forced to run immediately with the help of Lync PowerShell cmdlets “Update-csAddressbook”

9. Address Book Server file store has two sets of address book files, One is for clients such as Lync 2010 with type .lsabs and other is the compact version for phone device in the format .dabs with some limited information which helps for the phone devices with lesser memory.

10. UNC Path of the Address Book Server file store is \\lyncserver\lyncshare\1-WebServices-1\ABFiles\

11. Multiples of .lsabs and .dabs are stored in Address Book Server file store. They are full address book files and delta address book files. Full address book files for lync clients start with the format F-xxxx.lsbs and delta file start with D-xxxx-yyyy.lsbs. Similarly for mobile devices, it starts with F-xxxx.dabs full version of files and C-xxxx-yyyy.dabs for compact delta version of the files. Where xxxx and yyyy represents the date in hexadecimal 0-based number of days since January 1, 2001

12. Address book file generations is most interesting part and below table 1 has outline the process of the same. This process is followed for both *.lsabs and *dabs types of files.

On Day 1 it generates full version of Address book file and on day 2, it generates one fuller version of the address book file along with the Delta file which information which are generated and updated after Day 1 full file generation. Similarly on Day 3, it generates one fuller version of the address book file and it also generated two delta file. First delta file has information which is generated between Day 2 and Day 3, second delta file has information which is generated between Day 1 and Day3. This goes on until for 30 days

DayFiles Generated (*.lsabs and *.dabs files)
Day 1Full (F1)
Day 2Full (F2), Delta of F2 – F1
Day 3Full (F3)

Delta of F3 –F2

Delta of F3 –F1

Day 4Full (F4)

Delta of F4 – F3

Delta of F4 – F2

Delta of F4 – F1

Day 5 – Day 29—-
Day 30
Full (F30)

Delta of F30-F29

Delta of F30-F28

—-

Delta of F30-F1

Table 1. Address book file generation (Table Source from TechNet – link)

13. Now the question is what happens on 31st day and how these files are deleted? Address book files will continue generate in the same fashion but from 31st day it also starts to delete all the files from Day 1 and on 32nd day it would generate the full and delta files and delete entire files of Day 2 files and this cycle continues.

14. How lync clients download the address book file? Once the lync client is authenticated then client will be provided with Address Book URL. It’s the UNC path of the Address Book Server file store.

15. Lync client uses this Address Book URL and attempts to download the current full data file for the first time and on following days it only downloads the delta files based on the last full download. E.g. on the 2 days client would only download delta of F2-F1 and on day 3 it would only download delta of F3-F2.
16. Lync client needs updated GAL immediately after every successful login, but it waits between 0 – 60 min to download the latest address book file after the successful login. This is just to make sure that clients are not overloading the server with address book request at a same time.

You have bunch of PowerShell cmdlets to manage Address book and few of them are below

Update-csAddressbook – To force synchronizes the all address book in the organization

Test-csAddressBoosService – Test and verify the address book service on the address book server

Set-CSaddressbookconfiguration – Configure various settings of Address book

Hope this article is informative and gives you a good idea on the address book service in lync 2010

Courtesy : TechNet.Microsoft.com

Configuring Exchange 2010 clients Outlook and Outlook Web App as Lync 2010 end points(IM and presence Integration with Exchange 2010 clients) using PowerShell

One of the main purposes of Lync is IM and presence in the organization. The main idea is to initiate IM conversation on whichever the client you are and also to know the presence status if user is available for chat and kick the chat conversation. The main and cool idea of Microsoft is to integrate all its application and that’s been one of the key successes with Lync and Exchange.

Lync 2010 IM and Presence Integration with Outlook

Prerequisites:

1. Deployed Microsoft Exchange Server 2010 and Lync Server 2010.
2. Lync Frontend pool where user is located and client Access server can connect
3. Lync and mailbox enabled users

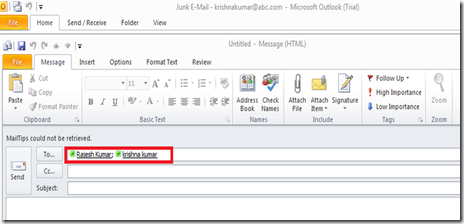
Lync 2010 IM and presence integration with outlook is automatically performed when you install Lync client on the work satiation. Lync client installs all the necessary add-ins for the outlook to pick up the presence details and also allows to chat directly from the outlook. This feature is only available in outlook 2007 and outlook 2010 clients. Below Figure 1 is reference snap.

Figure 1. Lync user presence on outlook client

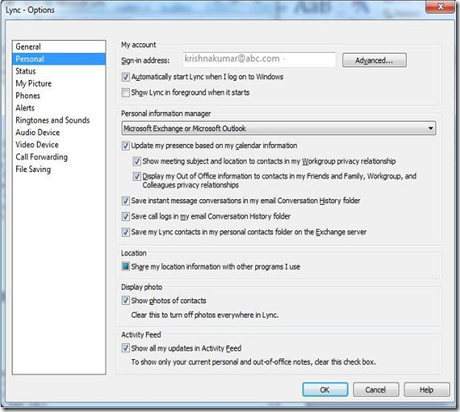
You can configure the bunch of settings on the Lync client to integrate with Microsoft Exchange or Microsoft Outlook. Some of the settings like below Figure 2.

1. Update the presence based on my calendar information.
2. Save instance message conversations in my email conversations history folder etc..

Figure 2. Lync client integration with Microsoft Exchange and Microsoft outlook

Lync 2010 IM and Presence Integration with Outlook Web App

Lync 2010 IM and presence with outlook Web App is not automatically integrated. Specific configuration has to be performed.

Prerequisites:

1. Deployed Microsoft Exchange Server 2010 and Lync Server 2010.
2. Lync Frontend pool where user is located and client Access server can connect
3. Lync and mailbox enabled users
4. Exchange Certificate to be configured with Lync for integration (Make sure CA is trusted by both Exchange 2010 and Lync 2010)

Preparing the CAS servers for the integration

1. Download CWAOWASSPMain.msi from Microsoft Office Communications Server 2010 R2 Web Service Provider and extract the file  “c:\Web Service provider Installer Package” and it will extract below mentioned files. Execute and install “CWAOWAASSP.msi”

1. CWAOWAASSP.msi
2. Donnetfx35setup.exe
3. UcamRedist.msi
4. Vcredist_x64.exe

2. Download and Install the hotfix for OCS 2007 R2 web service provider from OCS 2007 R2 Web Service Provider Hotfix

3. Update Unified Communications Managed API 2.0 Redist (64 Bit) from Hotfix KB 2282949

Configuring Exchange 2010

1. Get the exchange certificate using the below PowerShell command

$Excert = (Get-ExchangeCertificate | Where {$_.Services -like “*IIS*”}).Thumbprint
$Excert

2. Using the above exchange certificate configure the OWA virtual directory.  Need to make sure to provide appropriate parameter “Instantmessagingservername” with front end pool name. In the below example I have given as lynccst.abc.com which is the front end pool name in my lab.

Get-ExchangeServer | Get-OWAVirtualDirectory | Set-OWAVirtualDirectory -InstantMessagingType OCS -InstantMessagingEnabled:$true -InstantMessagingCertificateThumbprint $Excert -InstantMessagingServerName lyncst.abc.com

Configure the Lync 2010

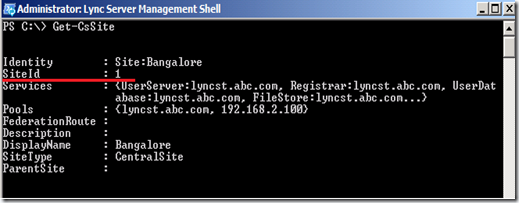
1. Access Lync Server management shell and execute the PowerShell cmdlet Get-Cssite to get the Site ID. In our lab the site ID is 1. Below is reference snap

2. Next we need to configure the Trusted application pool and Add ExchangeOutlookWebAccess as Trusted application

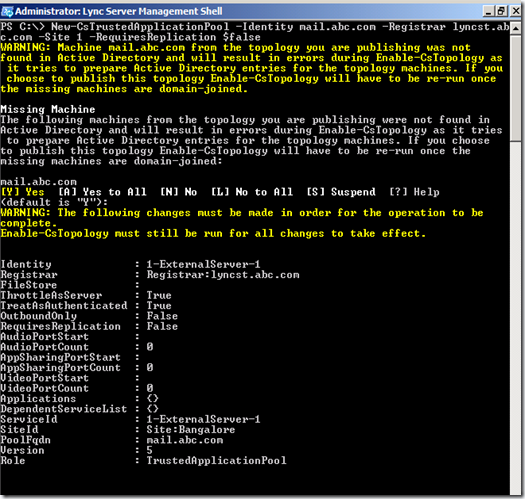
3. To configure Trusted application pool use the below mentioned PowerShell command on Lync management shell with the below parameter. You can ignore the warning message as its refering to the computer object which does not exists in the AD

  • Identity = CAS server or CAS Server Arrayname or any SAN name defined in the certificate
  • Registrar = Lync Frontend pool
  • SiteID = site id which we picked above
  • RequiresReplication = $false

New-CsTrustedApplicationPool -Identity mail.abc.com -Registrar lyncst.abc.com -Site 1 -RequiresReplication $false

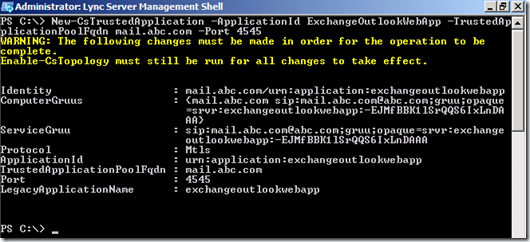
4. Add Exchangeoutlookwebapp to the Trusted application using the PowerShell cmdlet and parameter as defined below

  • ApplicationId = ExchangeOutlookWebApp
  • TrustedApplicationPoolFqdn = CAS server or CAS Server Array name or any SAN name defined in the certificate
  • pool = Any free port (You can check the unused port using netstat -a | findstr 5060)

New-CsTrustedApplication -ApplicationId ExchangeOutlookWebApp -TrustedApplicationPoolFqdn mail.abc.com -Port 5060

5. Finally its time to publish the topology using the PowerShell cmdlet Enable-CStopology

6. login to the OWA and you should be able to view the status of the users.

I think every organization should use this feature to integrate between Lync 2010 and Exchange 2010. This makes life easier where users can initiate chat from any client they are in. In the above example I have defined only the integration with one front end pool from a specific CAS server. If you have multiple front end pool then the connected pool will proxy the request to the other pool. In a bigger organization where you have multiple AD site and frontend pool for each site then you may follow the same progress and configure the CAS server and the frontend pool on the specific site. Its also a best practice to configure in this fashion but there is definitely a additional load on the CAS server.

Reference link : Microsoft TechNet

I hope you can use this in your organization as well

Director role in Lync 2010

Microsoft has introduced a new dedicated role in Lync 2010 and its known as Directory role. In OCS 2007 and R2 this role existed but was not a explicit role. it was just a frontend server with out any users homed on it.

It’s server which is generally placed before the front end pool. Its purely a optional server and it can be a single Directory role server or pool of servers behind a hardware load balancer or DNS load balancing. It can disadvantage if you have a single directory role server when it goes down. So its recommended to have multiple servers into the directory pool to avoid single point of failure. One more way of avoiding single point of failure is add multiple SRV records. One SRV record for Directory pool and other one for the Front end pool with different preference.

This role can only be deployed on the sever running Lync server2010 Enterprise edition and it cannot clubbed with any other role.

figure 1. Directory server/pool placement.

Director role acts has a mediator between Lync 2010 client and front end pool. Lync 2010 client can be coming form the Internal or Internet and service offered by the director server varies depending on the client source(Internal or Internet)

Director role service for Internal client

During deployment SRV record should be pointing to the director pool. So when the client issues a request on the SRV _sipinternaltls._tcp.<domain>.com record , then the service is handled by the director pool and it determine the front end pool where the users are located from its local database and and redirect to the correct pool. Its one more useful when you have a multiple front end pool.

Once the client determines its front end pool then director role server will not be communicated any more.

Director role service for Internet client

The main purpose of director role is for the users/client coming from the internet. Though its optional, its recommended to implement for security reasons and it allows and authenticates  clients are connecting from Internet. When users from the internet tries to connect the Lync server, it talks to the edge server and it will be forwards to director for the authentication. Once client is authenticated then it proxies the client request to the appropriate front end pool. It also maintains the communication path between the client and the user’s home pool as well as the Edge Server.

Refence link from DR Rez

DNS Requirement for Remote Access and local access of Lync 2010 client users

DNS configuration varies depending the current DNS settings in the organization. You need get check if the current DNS is configured with DNS split brain syndrome or not. DNS split brain syndrome  is a beautiful concept as such and its very useful in a organization where you have same domain name space is followed in internal and external DNS.

Eg.

Internal DNS name space : abc.com
External DNS name space : abc.com

DNS with out split brain syndrome is where internal and external name space is different.

Eg.

Internal DNS name space : abc.local
External DNS name space : abc.com

Most organization follow this for security reasons.

Lets understand how the Lync Client 2010 will connect when you have two different name space. Before we get into this, lets understand what lync 2010 client needs to connect to its frontend server

When user enters the email address Eg. Krishna@abc.com in the lync client and click on connect then the client will take the user email domain eg abc.com and try to locate the sip server  using srv record in the DNS. SRV record will be in this format eg. “_sipinternaltls._tcp.abc.com” where abc.com is the domain name. With this SRV record lync client connects and access the front-end pool on port 5061.

lync client tries to query the SRV record in the following order and connects using the best available SRV record

_sipinternaltls._tcp.abc.com
_sipinternal._tcp.abc.com
_sip._tls.abc.com

With this information lets focus on the configuration required for the internal access of lync 2010 clients

Create a zone in the internal DNS that matches the external DNS zone (for example, abc.com) and create DNS A records corresponding to the Lync Server 2010 pool used for automatic configuration. For example, if a user is homed on pool01.abc.local but signs into Lync as user@abc.com, create an internal DNS zone called abc.com and inside it, create a DNS A record for pool01.abc.com or you can create a pin point zone which matching the external DNS zone. pin point zone can only be created using dnscmd.exe. below is the example to create pin point zone in the internal dns for the domain abc.com and front-end pool name pool01.abc.com

dnscmd . /zoneadd _sipinternaltls._tcp.abc.com. /dsprimary
dnscmd . /recordadd _sipinternaltls._tcp.abc.com. @ SRV 0 0 5061 pool01.abc.com.
dnscmd . /zoneadd pool01.abc.com. /dsprimary
dnscmd . /recordadd pool01.contoso.com. @ A 192.168.1.10
dnscmd . /recordadd pool01.contoso.com. @ A 192.168.1.11

We are good from the internal, similar configuration needs to be done from the Internet DNS as well.

Create a SRV record in Internet DNS “_sip._tls.abc.com” where abc.com is the domain name

Eg.
dnscmd . /recordadd _sip._tls.abc.com. @ SRV 0 0 443
As discussed earlier, lync client uses specific order to query the SRV records. When the lync client is accessing from the internet then the first two SRV request will fail as its not available in the Internet DNS zone and it would connect using the last SRV record “_sip._tls.abc.com” which is defined in the DNS zone

I hope this information helps you to have better understanding the DNS requirement