
One of the main purposes of Lync is IM and presence in the organization. The main idea is to initiate IM conversation on whichever the client you are and also to know the presence status if user is available for chat and kick the chat conversation. The main and cool idea of Microsoft is to integrate all its application and that’s been one of the key successes with Lync and Exchange.
Lync 2010 IM and Presence Integration with Outlook
Prerequisites:
1. Deployed Microsoft Exchange Server 2010 and Lync Server 2010.
2. Lync Frontend pool where user is located and client Access server can connect
3. Lync and mailbox enabled users
Lync 2010 IM and presence integration with outlook is automatically performed when you install Lync client on the work satiation. Lync client installs all the necessary add-ins for the outlook to pick up the presence details and also allows to chat directly from the outlook. This feature is only available in outlook 2007 and outlook 2010 clients. Below Figure 1 is reference snap.
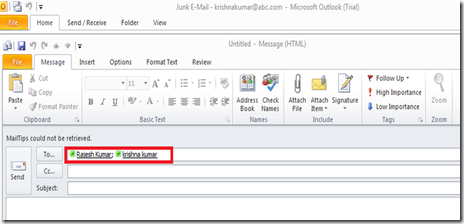
Figure 1. Lync user presence on outlook client
You can configure the bunch of settings on the Lync client to integrate with Microsoft Exchange or Microsoft Outlook. Some of the settings like below Figure 2.
1. Update the presence based on my calendar information.
2. Save instance message conversations in my email conversations history folder etc..
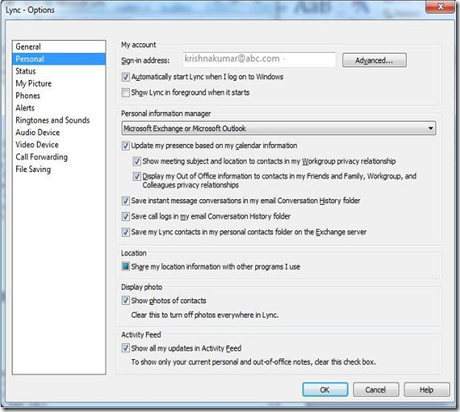
Figure 2. Lync client integration with Microsoft Exchange and Microsoft outlook
Lync 2010 IM and Presence Integration with Outlook Web App
Lync 2010 IM and presence with outlook Web App is not automatically integrated. Specific configuration has to be performed.
Prerequisites:
1. Deployed Microsoft Exchange Server 2010 and Lync Server 2010.
2. Lync Frontend pool where user is located and client Access server can connect
3. Lync and mailbox enabled users
4. Exchange Certificate to be configured with Lync for integration (Make sure CA is trusted by both Exchange 2010 and Lync 2010)
Preparing the CAS servers for the integration
1. Download CWAOWASSPMain.msi from Microsoft Office Communications Server 2010 R2 Web Service Provider and extract the file “c:\Web Service provider Installer Package” and it will extract below mentioned files. Execute and install “CWAOWAASSP.msi”
1. CWAOWAASSP.msi
2. Donnetfx35setup.exe
3. UcamRedist.msi
4. Vcredist_x64.exe
2. Download and Install the hotfix for OCS 2007 R2 web service provider from OCS 2007 R2 Web Service Provider Hotfix
3. Update Unified Communications Managed API 2.0 Redist (64 Bit) from Hotfix KB 2282949
Configuring Exchange 2010
1. Get the exchange certificate using the below PowerShell command
$Excert = (Get-ExchangeCertificate | Where {$_.Services -like “*IIS*”}).Thumbprint
$Excert

2. Using the above exchange certificate configure the OWA virtual directory. Need to make sure to provide appropriate parameter “Instantmessagingservername” with front end pool name. In the below example I have given as lynccst.abc.com which is the front end pool name in my lab.
Get-ExchangeServer | Get-OWAVirtualDirectory | Set-OWAVirtualDirectory -InstantMessagingType OCS -InstantMessagingEnabled:$true -InstantMessagingCertificateThumbprint $Excert -InstantMessagingServerName lyncst.abc.com

Configure the Lync 2010
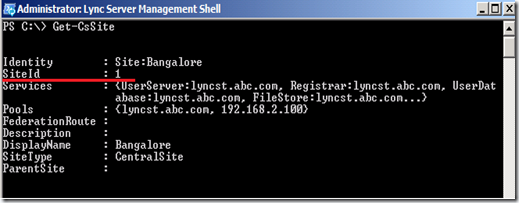
1. Access Lync Server management shell and execute the PowerShell cmdlet Get-Cssite to get the Site ID. In our lab the site ID is 1. Below is reference snap
2. Next we need to configure the Trusted application pool and Add ExchangeOutlookWebAccess as Trusted application
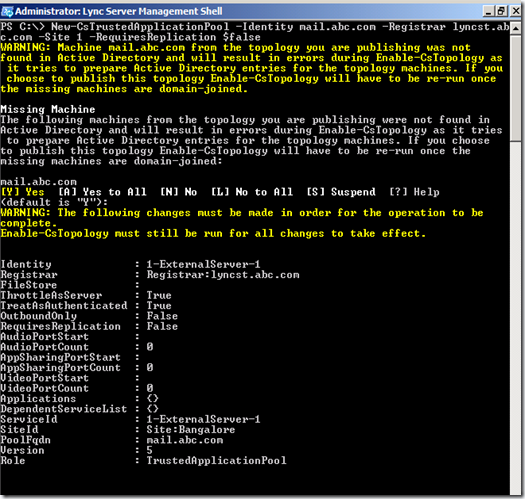
3. To configure Trusted application pool use the below mentioned PowerShell command on Lync management shell with the below parameter. You can ignore the warning message as its refering to the computer object which does not exists in the AD
- Identity = CAS server or CAS Server Arrayname or any SAN name defined in the certificate
- Registrar = Lync Frontend pool
- SiteID = site id which we picked above
- RequiresReplication = $false
New-CsTrustedApplicationPool -Identity mail.abc.com -Registrar lyncst.abc.com -Site 1 -RequiresReplication $false
4. Add Exchangeoutlookwebapp to the Trusted application using the PowerShell cmdlet and parameter as defined below
- ApplicationId = ExchangeOutlookWebApp
- TrustedApplicationPoolFqdn = CAS server or CAS Server Array name or any SAN name defined in the certificate
- pool = Any free port (You can check the unused port using netstat -a | findstr 5060)
New-CsTrustedApplication -ApplicationId ExchangeOutlookWebApp -TrustedApplicationPoolFqdn mail.abc.com -Port 5060
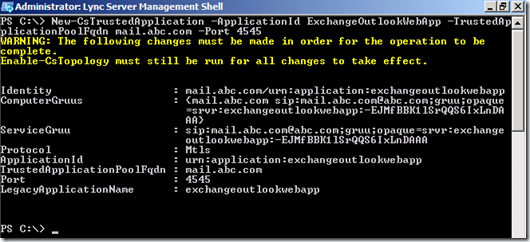
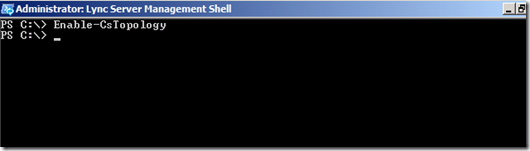
5. Finally its time to publish the topology using the PowerShell cmdlet Enable-CStopology
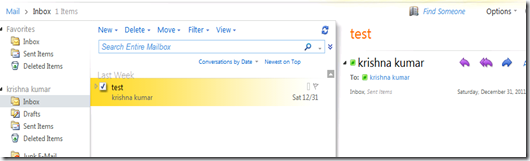
6. login to the OWA and you should be able to view the status of the users.
I think every organization should use this feature to integrate between Lync 2010 and Exchange 2010. This makes life easier where users can initiate chat from any client they are in. In the above example I have defined only the integration with one front end pool from a specific CAS server. If you have multiple front end pool then the connected pool will proxy the request to the other pool. In a bigger organization where you have multiple AD site and frontend pool for each site then you may follow the same progress and configure the CAS server and the frontend pool on the specific site. Its also a best practice to configure in this fashion but there is definitely a additional load on the CAS server.
Reference link : Microsoft TechNet
I hope you can use this in your organization as well ![]()

Definitely imagine that which you said. Your favorite reason
appeared to be on the web the easiest factor to have
in mind of. I say to you, I definitely get annoyed at
the same time as other people consider issues
that they plainly don’t realize about. You managed to hit the nail upon the top and outlined out the whole thing with no need side-effects , other folks could take a signal. Will probably be back to get more. Thank you