Exchange 2010 – Reseeding failed Database with multithreading

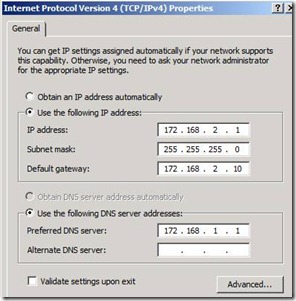
Reseeding is a process of fixing the failed passive copy of the database which basically mean is, the passive database copy is out of sync with active database. Passive copies can be a failed database or failed Index. When Database goes in failed state or failed and suspended state or database Index goes in to failed state then it needs administrator intervension and force the database reseed.  

There can be various reason for database to fail. Replication service running on the host machine is responsible for keeping the database in healthy state. It tries to take corrective action if the database goes out of sync else administrator may have to fix failed database manually.

Below is the nice piece of code which will request you to enter the DAG Name and it will determine the list of failed database and perform full reseed on each of the failed database. In the normal process, reseeding happends on the single database at a time and you can’t limit how many database you can reseed at a time. Eg

Get-MailboxDatabaseCopyStatus $strResponse  |?{$_.status -like “Failed*”} | update-mailboxdatabasecopystatus -deleteexistingfiles -confirm:$false

In the above example cmdlet will get all the failed database and it pipes to update-mailboxdatabase cmdlet. Update-Mailboxdatabasecopy performs the full reseed of the failed database one by one and brings the database into healthy state. If we have very bigger database like 100 GB and it has to update to different site then you know how long it may take. With this senarion you dont want to fix one failed database at a time.

Below script helps you to address the above defined issue. It can reseed the failed database up to max of 10 database in 10 different window at a time and if one database reseeding completes then new failed database will reseed if there is any. This count can be reduced or increased based on the performance of the local server and the network available.

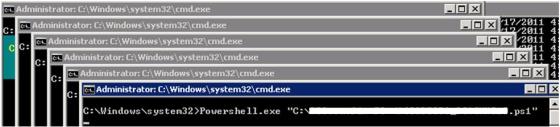
function Createfolders(){ remove-item -path "C:\DBs\bt" -force  -Recurse -confirm:$false -ErrorAction SilentlyContinue | out-null remove-item -path "C:\DBs\ps" -force  -Recurse -confirm:$false -ErrorAction SilentlyContinue| out-null remove-item -path "C:\DBs" -force  -Recurse -confirm:$false -ErrorAction SilentlyContinue| out-null new-item -path "C:\DBs" -ItemType Directory -force | out-null new-item -path "C:\DBs\bt" -ItemType Directory -force | out-null new-item -path "C:\DBs\ps" -ItemType Directory -force | out-null}$strResponse = Read-Host  "`nPlease enter DAG Name to reseed the failed Databases"write-host -f Magenta "Checking for Failed Database copies in the DAG : $strResponse"$databases = Get-MailboxDatabaseCopyStatus $strResponse  |?{$_.status -like "Failed*"}if($databases -ne $null){ write-host -f red "Following Databases are in failed state" $databases Write-host "`n" foreach($database in $databases) { $filename = $database.name $dbname = $database.name $filename = $filename.Replace("\", "_") $DBcopyReport1 = "C:\DBs\bt\$filename.bat" $DBcopyReport2 = "C:\DBs\ps\$filename.ps1" New-item -ItemType file -path $DBcopyReport1 -force | out-null New-item -ItemType file -path $DBcopyReport2 -force | out-null "Powershell.exe `"C:\DBs\bt\$filename.ps1`"" |  Out-File -filepath $DBcopyReport1 -encoding ASCII -append "Add-PSSnapin Microsoft.Exchange.Management.PowerShell.E2010 -ErrorAction SilentlyContinue"| Out-file $DBcopyReport2 -encoding ASCII -append "Suspend-MailboxDatabaseCopy -Identity `"$dbname`" -confirm:" + "$" + "false"| Out-file $DBcopyReport2 -encoding ASCII -append "Update-MailboxDatabaseCopy -Identity `"$dbname`"  -DeleteExistingFiles -confirm:" + "$" + "false -ErrorAction:Stop -WarningAction:SilentlyContinue" | Out-file $DBcopyReport2 -encoding ASCII -append  $files = [IO.Directory]::GetFiles("C:\DBs\bt\") $cmdprocess = @() Write-host -f yellow "`nReseeding the following databases" for ($i=0; $i -lt $files.count; $i++) {  $DBDName = $files[$i]  $DBDName =$DBDName.split("\")[3]  $DBDName =$DBDName.split(".")[0]  $DBDName = $DBDName.Replace("_","\")  Write-host -f yellow "$DBDName"  $cmdprocess =$cmdprocess+ [diagnostics.process]::Start($files[$i])  do  {    $cmdp = @()   $continue = 0   foreach($cmdproces in $cmdprocess)   {    $cmdp = $cmdp + $cmdproces.id   }   $processid = Get-Process | %{$_.id}   foreach($cmd in $cmdp)   {    if($processid -contains $cmd)    {       $continue = $continue + 1    }   }   start-sleep(10)   }until($continue -lt 10) } do {  $processid = Get-Process | %{$_.id}  $Loopexit = 0  foreach($cmd in $cmdp)  {    if($processid -contains $cmd)   {   $Loopexit = 1   start-sleep(10)   }  } } until($Loopexit -eq 0) Write-host -f Green "`nReseeding of Failed DB's has been completed"}Else{ Write-host -f Green "All the mailbox Database copy are in Healthy state"}CreatefoldersWrite-host -f Magenta "`nChecking for failed Catalog or Content Index in the DAG :$strResponse"$databases = Get-MailboxDatabaseCopyStatus $strResponse  |?{$_.ContentIndexState -match "Fail" }if($databases -ne $null){write-host -f red "Following Databases are in failed state" $databases Write-host "`n" foreach($database in $databases) { $filename = $database.name $dbname = $database.name $filename = $filename.Replace("\", "_") $DBcopyReport1 = "C:\DBs\bt\$filename.bat" $DBcopyReport2 = "C:\DBs\ps\$filename.ps1" New-item -ItemType file -path $DBcopyReport1 -force | out-null New-item -ItemType file -path $DBcopyReport2 -force | out-null "Powershell.exe `"C:\DBs\bt\$filename.ps1`"" |  Out-File -filepath $DBcopyReport1 -encoding ASCII -append "Add-PSSnapin Microsoft.Exchange.Management.PowerShell.E2010 -ErrorAction SilentlyContinue"| Out-file $DBcopyReport2 -encoding ASCII -append "Suspend-MailboxDatabaseCopy -Identity `"$dbname`" -confirm:" + "$" + "false"| Out-file $DBcopyReport2 -encoding ASCII -append "Update-MailboxDatabaseCopy -Identity `"$dbname`"  -DeleteExistingFiles -confirm:" + "$" + "false -ErrorAction:Stop -WarningAction:SilentlyContinue" | Out-file $DBcopyReport2 -encoding ASCII -append  $files = [IO.Directory]::GetFiles("C:\DBs\bt\") $cmdprocess = @() Write-host -f yellow "`nReseeding the following databases" for ($i=0; $i -lt $files.count; $i++) {  $DBDName = $files[$i]  $DBDName =$DBDName.split("\")[3]  $DBDName =$DBDName.split(".")[0]  $DBDName = $DBDName.Replace("_","\")  Write-host -f yellow "$DBDName"  $cmdprocess =$cmdprocess+ [diagnostics.process]::Start($files[$i])  do  {    $cmdp = @()   $continue = 0   foreach($cmdproces in $cmdprocess)   {    $cmdp = $cmdp + $cmdproces.id   }   $processid = Get-Process | %{$_.id}   foreach($cmd in $cmdp)   {    if($processid -contains $cmd)    {       $continue = $continue + 1    }   }   start-sleep(10)   }until($continue -lt 10) } do {  $processid = Get-Process | %{$_.id}  $Loopexit = 0  foreach($cmd in $cmdp)  {    if($processid -contains $cmd)   {   $Loopexit = 1   start-sleep(10)   }  } } until($Loopexit -eq 0) Write-host -f Green "`nReseeding of Failed DB's has been completed"}Else{ Write-host -f Green "All the mailbox Database copy Index are in Healthy state"}

Below is the snap of the execution window and we can see how DB reseed is been executed on multiple window. This will save you lot of time and effors in fixing the database. I hope this article will be helpful to you 🙂

Configuring Windows 2008 R2 AD Multi Site with Routing and Route Access Configuration for the lab


If you are IT guys and labs are is like your best friend. You can play with your Best friend any time but not with production boxes. Most of the companies are getting global Day by Day and it is spread across multiple location. If you wanted to simulate and test any application like Exchange and AD across the site then you need build the lab for the same. Here I am trying to explain you How to configure a domains with two sites with Routing and Remote Access servers installed as router to route the traffic between two sites on a Single Windows 2008 R2 Hyper V Server

Preparing the Network Settings

1. Configure Hyper-V Virtual Network Manager to add new "Internal" Network.

2. Configure all the Servers built on Hyper V to use this network Adapter Internal

Servers Installed and Configuration Details

Server Name

OS

Nics

IPAddress

Site

ADC

Windows 2008 R2

1

172.168.1.1/24

ASite

BDC

Windows 2008 R2

1

172.168.2.1/24

BSite

Router

Windows 2008 R2

2

172.168.1.10/24

172.168.2.10/24

ASite

BSite

Configuration of Window 2008 As Router

  1. Login Server name "Router" and make sure that 2 NIC is configured with IP address 172.168.1.10/24 and 172.168.2.10/24, without any default gateway and DNS servers. Below figure 2 has the detail configuration on one of the NIC which is having IP address Asite. Similarly configure NIC on BSite with the IPaddress 172.168.2.10/24

Figure 2. IP Address Configuration on the Server "Router "

2. With this NIC configuration you should be able to ping both ADC and BDC from the Server "Router". From ADC You should be able to ping IP address on the Router which is ping to ASite (172.168.1.10) but not the IPaddress of NIC point to BSite(172.168.2.10). ADC should be not able ping to BDC. This is because Router is acting as a median between Asite and Bsite and currently Router Server is not configured to route the packets from Asite to Bsite and Vice Versa.

3. Now lets configure Server Router for routing the packets. login to Server Router Launch Server Role and select Network Policy and Access Services (Figure. 3) and click next

Figure 3. Adding Network Policy and Access Services

4. Select Routing and Remote Access Services (Figure 4) and click next and finish to install the same

Figure 4. Enabling Routing and Remote Access Services

5. Once we have Routing and Remove access Services Role installed on the Router, we should be able to see the role added in the Server Manager. Right click on Role Network Policy and Access Services and click Configure and Enable Routing and Remote Access to enable the same

Figure 5. Network Policy Access Role added in the Server manager and its available for configuration

6. On the welcome screen to configure routing and remote access server wizard click on Next.

7. In the configuration step click on Secure Connection between two private networks (Figure 6)and click Next. This is setting which helps to enable routing and click on Next

Figure 6. Enabling Routing Settings

8. You will be prompted for enabling demand dial connection(Figure 7) which we don’t need. Click on Next

Figure 7. Option for Demand Dial

9. Finally Click on Finish and this is complete the initializing of the new role

Figure 8. Completing Routing and Remote Access Service Installation

10. Once we have initialized we should be able to see new Routing and Remove Access initialized with Green up arrow. Figure 9. Expand to until you reach IP v4 | General | Right Click and select New Routing Protocol

Figure 9. Server Manager after installing new Role Network Policy and Access Services

11. Select the protocol "RIP Version 2 for Internet Protocol" and click on ok to Install the same.

Figure 10. Installation of RIP V2 Internet Protocol

12. Once we have installed RIP Protocol we need to added the required Interface for protocol. Right Click on the RIP to install the Interface which is point to ASite and BSite

Figure 11. Configure Network Interface to the RIP Protocol

13. Keep all the default settings when you add the interface. Once we added both the interface we should be able to see the same on the console. Figure 12

Figure 12. Settings after adding both the Network Interface on the RIP protocol

14. Once we have this configuration in place then we should be able to send and remove packets between Asite and Bsite. This can be confirmed by pining All the IP address available on BSite from Asite (Figure 13) and Vice versa

Figure 13. Pining BSite servers from Asite Servers

15. Once we have this configuration on Place we have communication established between both the sites. Now Lets Install and configure Domain Controller and Configure AD Sites for the AD Replication

16. Login to ADC | Start | Run | DCPROMO | OK to Promote ADC as domain Controller

Figure 14. Starting DC Promotion

17. Click Next on the Welcome Screen

Figure 15. Installing

18. Create a new domain in the new Forest

Figure 16. Creating new Domain in a New Forest

19. Provide the Required name for the domain

Figure 17. Creating New Vigneshwara.com

20. Configure Forest Function Level and Domain Functional Level with required settings with Windows Server 2008 and click Next

Figure 18. Configure Domain Function level

21. Configure DNS Servers to install (Figure 19) and YES to continue

Figure 19. Installing DNS Server

22. Set the required path for the Active Directory Database , log and Sysvol. Recommended to keep it default and click on Next

Figure 20. Configuring AD Database, log and Sysvol location

23. Provide required AD restoration Password and click on Next to Install and Configure AD and DNS on the Server. Figure 21.

Figure 21. Installing Active Directory and DNS

24. Restart the Server once Installation is Finished

25. Now Lets configure AD Sites and Services

26. Login to ADC | START | RUN | dssite.msc | ok

Figure 22. Starting Active Directory Sites and Services

27. Expand AD sites and Services and Right click on Default-First-Site-Name to ASite

Figure 23. Reaming Default-First-Site-Name to ASite

28. Lets now Create a new Site With BSite. Right click on the Sites and click on New Site

Figure 24. Create New AD Sites – Bsite

29. Provide the New Site name Bsite and click on DefaultIPSiteLink and click on OK and Next to configure the same. Figure 25.

Figure 25. Creating new Site with DefaultIPsitelink Configuration

31. New we should be able to see the new Site created with the name Bsite

Figure 26. Console after New Site Creation with BSite

30. Once we have Sites in place lets configure subnets. To configure the same right click on Subnets and Select new Subnet Figure 27.

Figure 27. Creating new Subnets in Active directory users and computers

31. In our Current setup we have two subnets 172.168.1.0/24 and 172.168.2.0/24. Here we are trying to create a new subnet and associate Sites with the subnets

32. On the new Subnet enter the IP Subnet with Subnet mask 172.168.1.0/24 and click on Asite and click ok

Figure 28. Configure Subnets with Asite

33. Configure the same for BSite with IP Subnet 172.168.2.0/24

Figure 29. Configure Subnets with BSite

34. Once we are done we should be able to see the new Subnets added in the Console

Figure 30. Active Directory Sites and Service configured with new Subnet

35. Now out Sites configures is configured. Lets go a head and install domain controller as additional domain controller on BSite and configure replication

37. Login to BDC server and configure the Network DNS to point to ADC (172.168.1.1)

Figure 31. Configuring BDC DNS with ADC

36. Login to BDC Server | START | RUN | DCPROMO | OK

37. Click on Next on the Welcome screen and Select the option to add this domain controller to the existing forest as a new domain controller in an existing domain. Below is the configuration snap Figure 32.

Figure 32. Configuring BDC as new domain controller and joining to the existing forest.

38. Provide the Domain name which was created and set the credentials and click on Next

Figure 33. Configuring Domain Name on BDC

39. Select the Domain Name Vigneshwara.com and click on Next

Figure 34. Selecting the domain for additional domain controller

40. Configure this domain controller to point to SiteB by selecting "Use this site that corresponds to the IP address of this computer" and select SiteB and click Next

Figure 35. Adding the domain controller to Bsite

41. Select the option DNS server and Global Catalog Server and click on Next

Figure 36. Enabling DNS and Global Catalog.

42. Keep the default path on the AD directory , Log files, Sysvol and Click on Next to provide the Directory Service Restore Mode Administrator Password

42. Finally click on Finish to install and configure Domain Controller, Global Catalog, DNS on server BDC under the Site BSite

Figure 40. Finishing Domain Controller Installation on BDC

43. Restart the Server once DC is promoted on BDC

44. Once we have BDC as domain controller in place we should be able to see new DC Server add on the AD Sites and Servers under Bsite

Figure 41. Ad Sites and Services after BDC installed

45. By Default Active Directory Sites are configured for replication, Any changes done on Asite will be replicated to Bsite. There will be delay in the replication. By default the replication time is configured for every 180 min. We can changed this to minimum replication for every 15 min.

46. Lets configure the replication settings between the sites to replicate every 15 min. Access Active directory sites and Sites

47. Expand until you reach Inter-Site Transports. Select IP and click on properties on the DefaultIPsitelink. Figure 42.

Figure 42. DefaultIPsitelink configuration

48. Change the Replicate Every to 15 min and click on apply and ok.

Figure 42. Changing Replication frequency between AD Sites Asite and Bsite