Active Directory Cross Forest Migration from Active Directory 2003 to Active Directory 2008 – Part 1

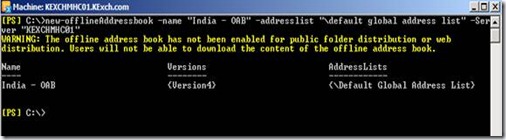
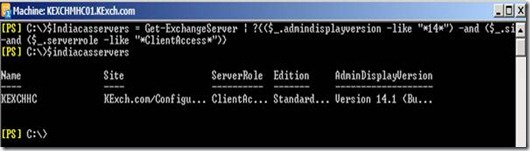
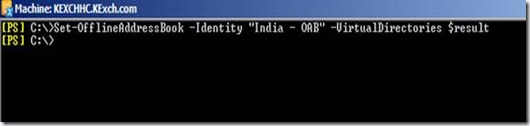
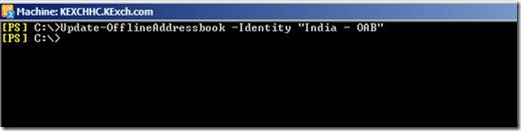
When we say cross forest ad migration then the first thing which comes to the mind is Active Directory Migration Tool. It’s a free and very easy and powerful tool from Microsoft. Doesn’t look very fancy but does its task. There are various tools available in the market to perform cross forest migration but at we will talk about ADMT and its features and how we can use it. Before you work on ADMT in the production, you need to perform through understanding of the ADMT, test it in the lab and then it to the production.

Note: Not performing through testing can be distractive for the users. Users may lose password, lose share access and you will be in trouble.

ADMT features

1. It provide various wizards to migrate User accounts, computers accounts, service accounts, Group

2. Migrate Sid History which helps user to maintain the access to network share, application and other services even after the user been migrated to different forest

3. Migrate password form source forest to target forest.


Red.com Green.com

Current Lab Setup

Red.com DomainGreen.com Domain
Domain controller (windows 2003) Domain controller(windows 2008)
following Software installed in Source domain controller
PES 3.1(Password Export Server)  
Domain member Server(windows 2003)
following Software installed
ADMT 3.0(Active directory migration tool)
.net Framework version 2.0
SQL 2005 with latest service pack

Installation of ADMT tool on the Domain member Server

Please follow the below process order to install prerequisites and ADMT. If you have domain member server is windows 2008 or Windows 2008 R2 then you can install the latest version of the ADMT 3.1 or 3.2 respectively. In my lab I have the domain member server as widows 2003 so I am forced to install ADMT 3.0

  1. Install Microsoft .NET Framework Version 2.0 Redistributable Package (x86)
  2. Install SQL 2005
  3. Install Latest SQL service pack
  4. Install ADMT tool and accept the default database selection (If SQL 2005 is not installed prior to installing ADMT tool then it will automatically install Microsoft SQL Server Desktop Edition)

DNS Configuration between forests

DNS Configuration is a one of the primary requirement to communicate between two forests

DNS can be configured in two ways, either by creating secondary zone or forwarders. Configuring forwarders is much easier then creating secondary zone. Secondary zone has a read-only copy of the particular domain but forwarders are just forward the request to the target domain. Response to the DNS request is much faster in secondary zone than forwarders

Let me show you show to create secondary zone.

  1. Login to Green.com Domain controller
  2. Access DNS Manager
  3. Right click on the forward lookup zone and select New zone and click on Next

Figure 1. Creating new Zone

   4. Select Secondary zone and click on Next

Figure 2. Creating new Secondary Zone

   5. Provide the target domain name and click on Next

Figure 3. Providing DNS Zone name

6. Provide red.com DNS server IP address and click on Next and click on finish to complete the configuration

Figure 4. Configuring with Master DNS server of red.com

7. Need to follow the above same process (1 to 6) on the red.com DNS server to create the secondary zone for green.com domain

Cross forest trust configuration

1. Connect to the Target domain controller (green.com) and access Active directory domain and trusts from the Administrative tools

2. Right click on Active directory Domain and trusts and click on properties.

Figure 5. Starting with Trust configuration

3. Select the Trust Tab and click on new Trust and select next on welcome screen

Figure 6. Trusts tab to start the new trust configuration between forests

4. Provide the trust name with the source domain red.com and click on next

Figure 7. Domain name which you wanted to trust

5. Select external trust, as you cannot create cross forest trust between AD 2003 and AD 2008 and click on next

Figure 8. Configuring External trust

6. Select “two way” trust and click on next

Figure 9. Selecting Two-way trust option

7. Select the option “both this domain and the specified domain”

Figure 10. Option to select trust on both from red.com and green.com

8. Input the source (red.com) account which has administrative privileges and click on next

Figure 11. Passing account having administrative privileges on red.com

9. Select “Domain-Wide authentication” for red.com and click on next

Figure 12. Selecting Domain-wide authentication on outgoing trust for local domain

10. Domain wide authentication for the local domain and click on next

Figure 13. Selecting Domain-wide authentication on outgoing trust for specified remote domain

11. Select “yes, confirm the outgoing trust”

Figure 14. Confirmation to create outgoing trust

12. Select “Yes, confirm the incoming trust” and next and click on finish the configuration.

Figure 15. Confirmation to create incoming trust

13. Successfully created outgoing and incoming external trust between both the forest

Figure 16. Successful status of external trust creation.


I hope you like this part of the article will soon come up the other parts of the articles.

Clearing some of the confusions behind the Exchange 2010 CAS arrays

Found a nice article on celarning some the confusions behind the CAS arrrays, which can save you with some good amount of money and time..

http://blogs.technet.com/b/exchange/archive/2012/03/23/demystifying-the-cas-array-object-part-1.aspx

http://blogs.technet.com/b/exchange/archive/2012/03/28/demystifying-the-cas-array-object-part-2.aspx


Performance Monitor counters Exchange 2010

Performance counters are very important to determine the performance of the server. As an administrator/Consultant/architect you should aware of the basis performance counter which are important for both exchange and administrator prospective.

Microsoft TechNet article (http://technet.microsoft.com/en-us/library/dd335215) talks in-depth of the performance counters for each of the exchange role and we will touch base some of the important ones on server role basis

You also find the spreadsheet which talk about the Exchange 2010 performance and threshold counters  from the below location

http://gallery.technet.microsoft.com/Performance-and-Threshold-d32ff5a6

Microsoft Exchange 2003 to Exchange 2010 Cross Forest migration in Brief

I wanted to write this article from a very long time and unfortunately I could not make it up. Today I decided to write this in just few lines and come back with in-depth details. Migration from One platform to other is not easy and it needs lots of planning , efforts and times. Things can go wrong at every step but just don’t give up, don’t give up, don’t give up…

  • Prepare new AD forest and Install exchange 2010 in the new forest. Exchange 2010 can also be a different organization due to merger and acquisition. 
  • Migration cannot happen over night and its important that we make necessary configuration that users from both the forest are able to send and receive emails and they are able to see Global Address book of each other and more importantly free busy information is synchronized.  
  • Configure mail flow between exchange 2003 and exchange 2010 using SMTP connectors for exchange 2003 and Send and receive connectors for exchange 2010

  • Configure FIM 2010 or ILM 2007 for GAL synchronization between exchange 2003 and exchange 2010

  • Configure Inter org replication tool to share free busy information between exchange 2003 to Exchange 2010

  • GAL sync will create Mail Enabled contacts(MEU) in the target forest,  for each mailboxes in the source forest. With Custom code, FIM/ILM can also create mail enabled users(MEU) in the target forest instead of mail enabled user

  • If only Mail enabled users are created using FIM/ILM then you can use Prepare- MoveRequest.ps1

  • Prepare-MoveRequest.ps1 will convert the mail enabled contacts to mail enabled users and it will also disable the user and it will copy the follow attributes to the destination mail enabled user – legacyExchangeDN, mail, mailnickname, msExchmailboxGuid, proxyAddresses, X500, targetAddress, userAccountControl, userprincipalName

  • Prepare a server for installation of ADMT(Active directory migration tool).  This tool will help to get the SID History and export the password of source account to destination

  • SID History is to maintain the access of users resources on the target domain and Password export server will help in exporting the password form source account to the destination account

  • I think you are all set now to move the mailbox from the exchange 2003 to exchange 2010 using the Powershell cmdlet

I think this the quick summary process of migration from exchange 2003 to exchange 2010. I am very eager to write this complete article in details. I will come back soon on this soon 🙂


DNS Requirement for Remote Access and local access of Lync 2010 client users

DNS configuration varies depending the current DNS settings in the organization. You need get check if the current DNS is configured with DNS split brain syndrome or not. DNS split brain syndrome  is a beautiful concept as such and its very useful in a organization where you have same domain name space is followed in internal and external DNS.

Eg.

Internal DNS name space : abc.com
External DNS name space : abc.com

DNS with out split brain syndrome is where internal and external name space is different.

Eg.

Internal DNS name space : abc.local
External DNS name space : abc.com

Most organization follow this for security reasons.

Lets understand how the Lync Client 2010 will connect when you have two different name space. Before we get into this, lets understand what lync 2010 client needs to connect to its frontend server

When user enters the email address Eg. Krishna@abc.com in the lync client and click on connect then the client will take the user email domain eg abc.com and try to locate the sip server  using srv record in the DNS. SRV record will be in this format eg. “_sipinternaltls._tcp.abc.com” where abc.com is the domain name. With this SRV record lync client connects and access the front-end pool on port 5061.

lync client tries to query the SRV record in the following order and connects using the best available SRV record

_sipinternaltls._tcp.abc.com
_sipinternal._tcp.abc.com
_sip._tls.abc.com

With this information lets focus on the configuration required for the internal access of lync 2010 clients

Create a zone in the internal DNS that matches the external DNS zone (for example, abc.com) and create DNS A records corresponding to the Lync Server 2010 pool used for automatic configuration. For example, if a user is homed on pool01.abc.local but signs into Lync as user@abc.com, create an internal DNS zone called abc.com and inside it, create a DNS A record for pool01.abc.com or you can create a pin point zone which matching the external DNS zone. pin point zone can only be created using dnscmd.exe. below is the example to create pin point zone in the internal dns for the domain abc.com and front-end pool name pool01.abc.com

dnscmd . /zoneadd _sipinternaltls._tcp.abc.com. /dsprimary
dnscmd . /recordadd _sipinternaltls._tcp.abc.com. @ SRV 0 0 5061 pool01.abc.com.
dnscmd . /zoneadd pool01.abc.com. /dsprimary
dnscmd . /recordadd pool01.contoso.com. @ A 192.168.1.10
dnscmd . /recordadd pool01.contoso.com. @ A 192.168.1.11

We are good from the internal, similar configuration needs to be done from the Internet DNS as well.

Create a SRV record in Internet DNS “_sip._tls.abc.com” where abc.com is the domain name

Eg.
dnscmd . /recordadd _sip._tls.abc.com. @ SRV 0 0 443

As discussed earlier, lync client uses specific order to query the SRV records. When the lync client is accessing from the internet then the first two SRV request will fail as its not available in the Internet DNS zone and it would connect using the last SRV record “_sip._tls.abc.com” which is defined in the DNS zone

I hope this information helps you to have better understanding the DNS requirement

Creating and Configuring Custom Offline Address book with Web-Based Distribution in Exchange 2010 using PowerShell

What is offline address book? Its a copy of address book that allow us to download via outlook client. The main use of offline address book is to allow access address book when the users are disconnected from the network or when they are working offline/cached mode.

OAB has evolved thought various versions like OAB Version2, OAB Version 3 and now its OAB Version4. OAB Version 4 was introduced in Exchange 2003 sp2 and same is still continued in Exchange 2007 and Exchange 2010.

Microsoft Introduced the concept of Web-based distribution point from Exchange 2007, it has various advantages over legacy public folder distribution, thought its still supported. Web-based distribution is the most effective and stable way to create, configure and download OAB. Web-based distribution supports more clients, consumes less bandwidth. The OAB is virtual directory in the client access server. This virtual directory is created on default website in IIS and configured for Internal Access.

Before we configure Multiple OAB lets try to understand how OAB generation and web-distribution works together and how outlook downloads the OAB to its client machine.

1. First Mailbox Server in the Organization is identified as OAB Generation Server. (generally moved to different server later point)

2. OABGen service running on the mailbox server helps to generate, creates and updates OAB files. OABGen service is part of the System Attendant Service. All OAB Generated file by default will be located at path “\Program Files\Microsoft\Exchange Server\V14\ExchangeOAB”.

3. OABGen communicates with the active directory and generates the address book for all the mailboxes, contacts and other exchange resources in the Exchange organization.

4. OAB files in the mailbox server are compressed file with the extension .LZX format.

5. OAB files are generated in Exchange 2010 Mailbox servers and outlook do not connect directory to the mailbox servers. The solution approach is to use Client Access Server role with web based distribution.

6. On every Client Access Role server, a virtual directory called OAB runs within the default web site. This virtual directory helps in distributing the OAB

7. Do you think we got the complete answer ? No. How does the OAB virtual directory gets the OAB data files from the mailbox server.

8. The answer is, Microsoft Exchange File Distribution Service running on the Client access Server.

9. Microsoft Exchange File Distribution Servers polls the OABGen Server and copies the OAB data from the mailbox servers to CAS server.  Once the complete OAB data is copied then if there is any update then only that data is synchronized with CAS server. The synchronization or poll frequency is 8 hours by default and you can change it if required using PowerShell cmdlets or Exchange console

10. Outlook clients uses the web https URL of the web distribution point and it downloads the OAB into the local computer.

Lets create and configure a new OAB for Particular region and the same configuration steps can be replicated in various region based on the requirement(to create multiple OAB). The main idea is to avoid having mutiple CAS (Multiple web-distribution point) servers in each region pinting to one OAB generating server. Each of the web-distribution server from different region will have to contact the centralized OAB generation server to get the updates. To avoid this scenario we can create additional OAB generating server in each region and configure web-distribution servers pointing to OAB generating server in the local region.

In the below configuration we have a AD site “India” and will be creating a new OAB and will point all the web distribution points to it

Sl.Server nameRoleAD site
1.KEXCHDCDomain ControllerIndia
2.KEXCHHCHub transport server and Client access serverIndia
3.KEXCHMHC01Mailbox ServerIndia

Below is the following activities we will be performing

1. Creating new Offline Address book and configuring web distribution point

2. Updating the address book

3. Configuring mailbox Databases with new OAB

4. Downloading OAB and verification from outlook client

1. Creating Address book and configuring web distribution point


We can create and manage offline address book (OAB) using PowerShell cmdlets. To create a new Offline address book , use the cmdlet New-offlineaddressbook. Below cmdlet creates a new OAB “India – OAB” on a Mailbox server “KEXCHMHC01” and it also adds default global address list into the OAB. Figure 1. show the execution result of new-offlineaddresbook cmdlet. Its throws the warning “OAB needs further configuration and users will not be able to download offline address book”. At the moment OAB not configured for web distribution or public folder distribution, this can be ignored at the moment.

New-offlineAddressbook -name “India-OAB” -addresslist “\default global address list” -server “KEXCHMHC01”

Figure 1. Create new OAB “India – OAB

We created new OAB “India – OAB” and now lets configure it with web-distribution points. Before we configure it we need to get the list of all web distribution servers for India region. Below cmdlet queries all the Client Access(web distribution servers) in the India AD site and assigns to the variable $IndiaCasServers. Figure 2 has the execution summary of the same


$IndiaCasservers = Get-Exchangeserver | ?{($_.admindisplayversion -like “*14*”) -and ($_.site -like “*India”) -and ($_.serverrole -like “*clientaccess*”)} | %{$_.name}

$IndiaCasservers

Figure 2. Get the list of all the Web distribution servers in India AD site

Now we create the list of OAB virtual directory from the CAS server list $IndiaCasservers into the array $result

$default = “\OAB (Default web site)”

$result = @()

foreach($server in $IndiaCasservers)

{

      $value = $server + $default

      $result = $result + $value

}


Figure 3. Get the list of OAB Virtual directory for all the CAS Servers

Its time to configure CAS server OAB Virtual directories with the Offline address book. This will also enable to OAB for web distribution. Below is the reference cmdlet and Figure 4 show the execution result.


Set-offlineAddressbook -Identity “India-OAB” -Virtualdirectories $result

Figure 4. Configures offline address book with the CAS OAB virtual directories

Lets check out the properties of the new offline address book and you should be able to see WebdistributionEnabled is set to True and Virtualdirectories is also configured with the CAS server OAB virtual directories. Figure 5. Marked with red shows the same.

Figure 5. OAB “India-OAB” Properties details

2. Updating the address book

Updating offline address book is the process to force update the offline address book immediately. As we just create a new OAB, it has to be updated with all the recipients in the organization. Update process communicates with the Active directory and get all the recipient like mailbox, contacts etc. and updates itself. Its normally scheduled to run once a day and you can change the schedule depending on the size of the OAB and organization requirement.

Below is the PowerShell cmdlet to update “India – OAB” immediately and figure 6. shows the execution details of the same.


Update-OfflineAddressbook -Identity “India-OAB”

Figure 6. Updating offline address book

The new OAB “India-OAB” has updated itself with the latest information and this information has to be replicated to all the CAS Server. To force update of the CAS server we need to use the below cmdlet which executes update-file distribution service on all the CAS server in the India region and figure 7. shows the execution result of the same.


Get-ExchangeServer | ?{$_.admindisplayversion -like “*14*”) -and ($_.Serverrole -like “*Client*”) -and ($_.site -like “*India*”)} | %{

Update-FileDistributionService $_

}

Figure 7. updating File distribution service

3. Configure mailbox Database with new OAB

As we have successfully created, configured and updated the new OAB. Its time to configure the mailbox databases with the new OAB. With the below cmdlet we get all the Exchange database in the India region and configure with the new OAB “India – OAB” and figure 8. shows the execution summary


Get-Exchangeserver | ?{($_.serverrole -like “*Mailbox*”) -and ($_.site -like “*India*”)} | get-mailboxdatabase | set-mailboxdatabase -offlineaddressbook “India – OAB”

Figure 8. Updating Exchange database with new mailbox database.

4. Downloading OAB and verification


Lets verify using outlook to see if we can download the new OAB and we can also verify the OAB Distribution point URL

Access user mailbox using outlook and click on send/receive from the menu and click on Download Address book. Make sure you are accessing mailbox which is located in the database which are configured with OAB(above). Figure 9. shows the snap of the same.

Figure 9. Process to download OAB using Outlook

You should be able to see outlook downloading the OAB into the local computer.

Figure 10. Downloading OAB files into local computer

Outlook OAB file are stored in the default location “\Users\<username>\AppData\Local\Microsoft\Outlook\Offline Address Books” with the extension .oab.


Figure 11. OAB file in the user computer

 We can always find outlook connecting CAS and OAB URL path. Right-click the Outlook icon in the System Tray and select Test E-mail AutoConfiguration and then click on “Test” button on the Test E-mail Auto Configuration as shown in the figure 12. OAB URL is the path OAB distribution point details.

Figure 12. Test E-mail Auto configuration execution result

With this we have successfully created and configured new OAB for a particular region. If you need for multiple region then the same configuration can be replicated. Some times OAB may trouble you some times and it may not update itself. Some of the basic troubleshooting step is rerun the update-offlineaddressbook powershell cmdlet, restart file distribution service and may try force the AD replication. I hope you like to article and you can use this in a real time scenarios

Exchange 2010 – Reseeding failed Database with multithreading

Reseeding is a process of fixing the failed passive copy of the database which basically mean is, the passive database copy is out of sync with active database. Passive copies can be a failed database or failed Index. When Database goes in failed state or failed and suspended state or database Index goes in to failed state then it needs administrator intervension and force the database reseed.  

There can be various reason for database to fail. Replication service running on the host machine is responsible for keeping the database in healthy state. It tries to take corrective action if the database goes out of sync else administrator may have to fix failed database manually.

Below is the nice piece of code which will request you to enter the DAG Name and it will determine the list of failed database and perform full reseed on each of the failed database. In the normal process, reseeding happends on the single database at a time and you can’t limit how many database you can reseed at a time. Eg

Get-MailboxDatabaseCopyStatus $strResponse  |?{$_.status -like “Failed*”} | update-mailboxdatabasecopystatus -deleteexistingfiles -confirm:$false

In the above example cmdlet will get all the failed database and it pipes to update-mailboxdatabase cmdlet. Update-Mailboxdatabasecopy performs the full reseed of the failed database one by one and brings the database into healthy state. If we have very bigger database like 100 GB and it has to update to different site then you know how long it may take. With this senarion you dont want to fix one failed database at a time.

Below script helps you to address the above defined issue. It can reseed the failed database up to max of 10 database in 10 different window at a time and if one database reseeding completes then new failed database will reseed if there is any. This count can be reduced or increased based on the performance of the local server and the network available.

function Createfolders(){ remove-item -path "C:\DBs\bt" -force  -Recurse -confirm:$false -ErrorAction SilentlyContinue | out-null remove-item -path "C:\DBs\ps" -force  -Recurse -confirm:$false -ErrorAction SilentlyContinue| out-null remove-item -path "C:\DBs" -force  -Recurse -confirm:$false -ErrorAction SilentlyContinue| out-null new-item -path "C:\DBs" -ItemType Directory -force | out-null new-item -path "C:\DBs\bt" -ItemType Directory -force | out-null new-item -path "C:\DBs\ps" -ItemType Directory -force | out-null}$strResponse = Read-Host  "`nPlease enter DAG Name to reseed the failed Databases"write-host -f Magenta "Checking for Failed Database copies in the DAG : $strResponse"$databases = Get-MailboxDatabaseCopyStatus $strResponse  |?{$_.status -like "Failed*"}if($databases -ne $null){ write-host -f red "Following Databases are in failed state" $databases Write-host "`n" foreach($database in $databases) { $filename = $database.name $dbname = $database.name $filename = $filename.Replace("\", "_") $DBcopyReport1 = "C:\DBs\bt\$filename.bat" $DBcopyReport2 = "C:\DBs\ps\$filename.ps1" New-item -ItemType file -path $DBcopyReport1 -force | out-null New-item -ItemType file -path $DBcopyReport2 -force | out-null "Powershell.exe `"C:\DBs\bt\$filename.ps1`"" |  Out-File -filepath $DBcopyReport1 -encoding ASCII -append "Add-PSSnapin Microsoft.Exchange.Management.PowerShell.E2010 -ErrorAction SilentlyContinue"| Out-file $DBcopyReport2 -encoding ASCII -append "Suspend-MailboxDatabaseCopy -Identity `"$dbname`" -confirm:" + "$" + "false"| Out-file $DBcopyReport2 -encoding ASCII -append "Update-MailboxDatabaseCopy -Identity `"$dbname`"  -DeleteExistingFiles -confirm:" + "$" + "false -ErrorAction:Stop -WarningAction:SilentlyContinue" | Out-file $DBcopyReport2 -encoding ASCII -append&nbsp; $files = [IO.Directory]::GetFiles("C:\DBs\bt\") $cmdprocess = @() Write-host -f yellow "`nReseeding the following databases" for ($i=0; $i -lt $files.count; $i++) {  $DBDName = $files[$i]  $DBDName =$DBDName.split("\")[3]  $DBDName =$DBDName.split(".")[0]  $DBDName = $DBDName.Replace("_","\")  Write-host -f yellow "$DBDName"  $cmdprocess =$cmdprocess+ [diagnostics.process]::Start($files[$i])  do  {    $cmdp = @()   $continue = 0   foreach($cmdproces in $cmdprocess)   {    $cmdp = $cmdp + $cmdproces.id   }   $processid = Get-Process | %{$_.id}   foreach($cmd in $cmdp)   {    if($processid -contains $cmd)    {       $continue = $continue + 1    }   }   start-sleep(10)   }until($continue -lt 10) } do {  $processid = Get-Process | %{$_.id}  $Loopexit = 0  foreach($cmd in $cmdp)  {    if($processid -contains $cmd)   {   $Loopexit = 1   start-sleep(10)   }  } } until($Loopexit -eq 0) Write-host -f Green "`nReseeding of Failed DB's has been completed"}Else{ Write-host -f Green "All the mailbox Database copy are in Healthy state"}CreatefoldersWrite-host -f Magenta "`nChecking for failed Catalog or Content Index in the DAG :$strResponse"$databases = Get-MailboxDatabaseCopyStatus $strResponse  |?{$_.ContentIndexState -match "Fail" }if($databases -ne $null){write-host -f red "Following Databases are in failed state" $databases Write-host "`n" foreach($database in $databases) { $filename = $database.name $dbname = $database.name $filename = $filename.Replace("\", "_") $DBcopyReport1 = "C:\DBs\bt\$filename.bat" $DBcopyReport2 = "C:\DBs\ps\$filename.ps1" New-item -ItemType file -path $DBcopyReport1 -force | out-null New-item -ItemType file -path $DBcopyReport2 -force | out-null "Powershell.exe `"C:\DBs\bt\$filename.ps1`"" |  Out-File -filepath $DBcopyReport1 -encoding ASCII -append "Add-PSSnapin Microsoft.Exchange.Management.PowerShell.E2010 -ErrorAction SilentlyContinue"| Out-file $DBcopyReport2 -encoding ASCII -append "Suspend-MailboxDatabaseCopy -Identity `"$dbname`" -confirm:" + "$" + "false"| Out-file $DBcopyReport2 -encoding ASCII -append "Update-MailboxDatabaseCopy -Identity `"$dbname`"  -DeleteExistingFiles -confirm:" + "$" + "false -ErrorAction:Stop -WarningAction:SilentlyContinue" | Out-file $DBcopyReport2 -encoding ASCII -append&nbsp; $files = [IO.Directory]::GetFiles("C:\DBs\bt\") $cmdprocess = @() Write-host -f yellow "`nReseeding the following databases" for ($i=0; $i -lt $files.count; $i++) {  $DBDName = $files[$i]  $DBDName =$DBDName.split("\")[3]  $DBDName =$DBDName.split(".")[0]  $DBDName = $DBDName.Replace("_","\")  Write-host -f yellow "$DBDName"  $cmdprocess =$cmdprocess+ [diagnostics.process]::Start($files[$i])  do  {    $cmdp = @()   $continue = 0   foreach($cmdproces in $cmdprocess)   {    $cmdp = $cmdp + $cmdproces.id   }   $processid = Get-Process | %{$_.id}   foreach($cmd in $cmdp)   {    if($processid -contains $cmd)    {       $continue = $continue + 1    }   }   start-sleep(10)   }until($continue -lt 10) } do {  $processid = Get-Process | %{$_.id}  $Loopexit = 0  foreach($cmd in $cmdp)  {    if($processid -contains $cmd)   {   $Loopexit = 1   start-sleep(10)   }  } } until($Loopexit -eq 0) Write-host -f Green "`nReseeding of Failed DB's has been completed"}Else{ Write-host -f Green "All the mailbox Database copy Index are in Healthy state"}

Below is the snap of the execution window and we can see how DB reseed is been executed on multiple window. This will save you lot of time and effors in fixing the database. I hope this article will be helpful to you 🙂

Powershell Script to generate report on update rollup installed on all the Exchange Server 2010 Servers

Latest RU available at this point of time is RU5. When you start updating it’s hard to keep track which server is updated and which server is not unless you make note off. If you wanted to query all the exchange 2010 to find what the rollup version is installed then it’s not easy to find one. Exchange management shell and console will not show the version number of the RU, it only show the major version and service pack version. Exchange console and shell gets updated when ever we install server pack. So one of the best ways to find the latest RUs installed is by checking the version number of Exsetup.exe which is available in the Bin director on the Exchange installed servers.

Below is the script which queries all the Exchange 2010 serves for the file version of Exsetup.exe and write to the text file result.txt. It has the data in the format servername, version number and role installed and each is divided by “|” so its easy to format using excel

$installpath = "c$\Program Files\Microsoft\Exchange Server\V14\Bin\ExSetup.exe"Get-ExchangeServer  | ?{$_.admindisplayversion -like  "*14*"} | %{$Servername = $_.Name$role = $_.serverrole$Path = "\\" + $Servername + "\" + $installpath$fileversion = (Get-Command $Path).FileVersionInfo |ForEach {$_.FileVersion}$result = $Servername + "|" +  $fileversion + "|" + $role$result$result >> result.txt}

I hope this helps you some day to pull this report for your team and manager real quick 🙂

Exchange 2010 – Client Access Server – HA and DR

Exchange 2010 has come up with lots of interesting and advanced features and one of the most important features is HA. Being exchange one of the most mission critical application of any organization, it’s important that we must have a strong HA solution for any kind of issues. It can be either server failure or a complete Site Failure

Most of your would have gone through the DAG features which provides us with the HA flexibility with in the same site and across the site for the MAILBOX role servers. There are other important server’s roles which mailbox server depends and it’s very important that we plan HA for them as well and they are CAS role and HUB role server. HUB role are designed with HA by default using active directory. If any server HUB server fails in a site then other HUB servers are used and during the site failure all the email will be routed to the new HUB servers in the DR site and if there are multiple HUB servers they are load balanced in round robin fashion.

Let’s talk about the CAS servers with HA and DR flexibility. Exchange 2010 has come up with the new HA for CAS server and it is called as CAS Array. Outlook uses this CAS Array to configure the outlook. You may already know that outlook uses CAS server for the MAPI connection. CAS Array allows you to add all the CAS servers into the array with behind the load balancer and expose the Virtual IP (VIP) for the user connection. Load balancer poles all the CAS servers in the array and if there is any server down then user connection will not directed to the failed CAS server until it comes up. In this fashion we have HA flexibility within the site when we have one or more CAS server failure.

Highlight of this article is to find how CAS Array works when there is a site failure in a DR Scenario which we don’t find much information around.

 Let’s consider a scenario, we have 2 AD site. First is the primary site with the name SiteA and second is the DR site with the name SiteB. Below Table 1 shows the details of the CAS Array with their site specific names and there corresponding IP address

If there is failure of siteA then with the help of DAG we mount all the database on the server in the SiteB(DR Site) with this user will not have the outlook connected. They will still be in disconnected state, because all the users’ outlook is configured with PrimaryCASArray.domain.com and it is down because of the site failure.

Now it’s not feasible configure the entire database in SiteB (DR site) with the new CAS Array DRCASArray.domain.com and reconfigure the entire user’s outlook with new CAS array name. This is not a solution any company would require for DR and it doesn’t look good even from the design prospective. Ideal and simple solution is to change the DNS IP address of PrimaryCASArray.Doamin.com with the SiteB IP address 172.168.1.100. May need to wait for some time for the replication and soon you should find user outlook coming online. Table 2 shows the new IP address on PrimaryCASArray.domain.com during DR. Once you wanted to failback to the primary site (SiteA) then we have again revert the CAS array IP address to the old state as defined in the Table 1.

I am sure many would have had this query in your mind as I had and hope this article helps you in design a solution depending on your requirement.

Offline Address book(OAB) Generation in Exchange and Outlook 2010


Offline Address book allows user to download the address book offline into the local machine. It helps to query the address book when you are not connect to the network. It’s a complete copy of the global Address book.

lets understand how the OAB is generated, synchronized and available for distribution for the outlook users.

1. One Mailbox Server in the Organization is identified as OAB Generation Server. This is first mailbox server in the organization or any mailbox server assigned with the OAB generation role during the later stage.

2.  OABGen service running on the mailbox server helps to generate ,creates and updates OAB files. OABGen service is part of the System Attendant Service. All OAB Generated file by default will be located at path “\Program Files\Microsoft\Exchange Server\V14\ExchangeOAB”.

3. OABGen communicates with the active directory and generates the address book for all the mailbox, contact and other exchange resources in the Exchange organization.

4. OAB files in the mailbox server are compressed file with the extension .LZX format.

5. Till now we have learnt how the OAB files are generated and how is created. Now lets learn how OAB is distributed to the clients ?

6. There are two ways for Distribution in Exchange 2010. They are through web based distributions and through public folder distribution.

7. Web based distribution is only supported with outlook 2007 clients and higher. OAB distribution through public folder is supported by any version outlook.

8. Lets only talk about the web based distribution as we  don’t want to use public folder any more and most of the clients are outlook 2007 or outlook 2010.

9. OAB files are generated in Exchange 2010 Mailbox servers and outlook do not connect directory to the mailbox servers. The solution approach is to use Client Access Server role with web based distribution.

10. On the Client Access Role server, a virtual directory called OAB runs with in the default web site. This virtual helps in distributing the OAB

11. Do you think we got the complete answer ? No. How does the OAB virtual directory gets the OAB data files from the mailbox server ?

12. Answer to this is Microsoft Exchange File Distribution Service running on the Client access Server

13. Microsoft Exchange File Distribution Servers polls the OABGen Server and copies the OAB data from the mailbox servers to CAS server.  Once the complete OAB data is copied then if there is any update then only that data is synchronized with CAS server. The synchronization or pol frequency is 8 hrs by default and you can change it if required using PowerShell cmdlets.

13. You may curiously wanted to know how the Web based distribution looks like. hold CTRL key and right click on outlook Icon system tray and Select “Email auto configuration” option from the menu.

14. Enter the User email address and password and click on Test. On the result tab you should be able to see what the OAB URL your outlook is connected to download the OAB from Exchange.

This is the quick info on how the OAB work in Exchange 2010.  I hope this article helps you all