Gal Sync between exchange 2003 and Exchange 2007 – Part 1

This document is to provide step by step instruction to GAL Sync between Red.com (Exchange 2003) and Blue.com (Exchange 2007 ) organization using IIFP SP2

This document is majorly divided into 4 parts

1. Installing and configuration IIFP

2. Preparing and configuring Active Directory on both Red.com and Blue.com

3. Creating and configuration MA Agents to create mail enabled contacts in both Active directory forest

4. Executing and scheduling MA profiles

Lets talk each of the parts in detail

1. Installing and Configuration IIFP

Follow these steps in order to build and setup IIFP on a Windows Server on any of the domain, either red.com or blue.com

1. Install Windows 2003 R2 enterprise edition and configure server as per best practice

2. Join the server to the domain

3. Install IIS, ASP.net 2.0

4. Install Microsoft SQL Server 2005 with SP1

5. Install Identity Integration Feature Pack SP2

6. Run Microsoft Updates to bring system up to latest patch levels.

2. Creating and Configuring Blue.com – GAL MA

2.1 Configuring Red.com Active Director

1. Login to Red.com domain controller

2. From Start, click Administrative Tools; click Active Directory Users and Computers.

3. Select View from the top drop down menu and select Advanced Features.

4. Create new user “RedGalsync” with password and ensure that password is set not to expire and not to change the password for next logon

5. Select RED.COM and right-click, select Delegate Control

6. On the Welcome to the Delegation of Control Wizard page click Next.

7. On the Users or Groups page click Add.

8. On the Select Users, Computers, or Groups dialog box type “RedGalsync” and click OK.

9. On the Users or Groups page click Next.

10. On the Tasks to Delegate page select create a custom task to delegate, and click Next.

11. On the Active Directory Object Type page except the defaults and click Next.

12. On the Permissions page select General, Property-specific, and Creation/deletion of specific child objects, under permissions select Replicate Directory Changes and Replication Synchronization, and click Next.

13. On the Completing to the Delegation of Control Wizard page click Finish.

14. Create new OU with the name “Blue” under root and create sub OU “Contacts”

15. Right-click the Contacts OU and select Properties.

16. On the Contacts Properties dialog box click Security.

17. On the Contacts Properties dialog box click Add.

18. On the Select Users, Computers, or Groups dialog box type “REDGalsync” and click OK.

19. On the Contacts Properties dialog box select Read, Write, Create All Child Objects, and Delete All Child Objects, and then click OK. Make sure to Apply to this child and all objects.

20. Open ADSIEdit and navigate to the container “Blue”

21. Right-click on OU “Contacts” and select Properties.

22. Click on the Security tab, and click Advanced.

23. Choose to Add an ACE.

24. Specify REDGalsync to apply the permissions to. This will display the permissions dialog.

25. Click on Properties.

26. Drop down the Apply Onto dropdown box and select Child Objects Only.

27. Scroll down and mark Write proxyAddressesAllow.

28. Choose to save the properties. This permission will be applied to every child object whose Allow inheritable permissions from the parent to propagate to this object and all child objects option is selected. This is located in the user’s Advanced Security property sheet. Any user that does not have this selected will not have the permissions granted to it


2.2 Configuring Blue.com Active Director

1. Login to Blue.com domain controller

2. From Start, click Administrative Tools; click Active Directory Users and Computers.

3. Select View from the top drop down menu and select Advanced Features.

4. Create new user “BlueGalsync” with password and ensure that password is set not to expire and not to change the password for next logon

5. Select Blue.com and right-click, select Delegate Control

6. On the Welcome to the Delegation of Control Wizard page click Next.

7. On the Users or Groups page click Add.

8. On the Select Users, Computers, or Groups dialog box type “BlueGalsync” and click OK.

9. On the Users or Groups page click Next.

10. On the Tasks to Delegate page select create a custom task to delegate, and click Next.

11. On the Active Directory Object Type page except the defaults and click Next.

12. On the Permissions page select General, Property-specific, and Creation/deletion of specific child objects, under permissions select Replicate Directory Changes and Replication Synchronization, and click Next.

13. On the Completing to the Delegation of Control Wizard page click Finish.

14. Create new OU with the name “Red” under root and create sub OU “Contacts”

15. Right-click the Contacts OU and select Properties.

16. On the Contacts Properties dialog box click Security.

17. On the Contacts Properties dialog box click Add.

18. On the Select Users, Computers, or Groups dialog box type BlueGalsync and click OK.

19. On the Contacts Properties dialog box select Read, Write, Create All Child Objects, and Delete All Child Objects, and then click OK. Make sure to Apply to this child and all objects.

20. Open ADSIEdit and navigate to the container name “Red”

21. Right-click on OU “Contacts” and select Properties.

22. Click on the Security tab, and click Advanced.

23. Choose to Add an ACE.

24. Specify BlueGalsync to apply the permissions to. This will display the permissions dialog.

25. Click on Properties.

26. Drop down the Apply Onto dropdown box and select Child Objects Only.

27. Scroll down and mark Write proxyAddressesAllow.

28. Choose to save the properties. This permission will be applied to every child object whose Allow inheritable permissions from the parent to propagate to this object and all child objects option is selected. This is located in the user’s Advanced Security property sheet. Any user that does not have this selected will not have the permissions granted to it

Exchange Autodiscover in a multi- forest environment

Most of the organization have Exchange multi-forest environment. Organization could be in multi forest environment because of the merger and acquisition or it could be because of security reason. Auto discover is the new feature introduced in Exchange 2007 and its been carried forward in all the subsequent version of exchange like Exchange 2010 and Exchange 2013.

Below link should give you good understanding on the information about

Exchange Autodiscover in a multi-forest environment  1

Exchange Autodiscover in a multi-forest environment 2


Hope you got some good understanding on Autodiscover in Exchange 🙂

Exchange Jetstress – Determine maximum disk subsystem throughput

JetStress is a tool for Architects and administrator to test the storage if it can suites your requirement. Through understanding of the Jetstress is important. Proper desiging and right testing with Jetstress make your design a robust solution.
 

Link: Determine throughput of disk subsystem using Jetstress

Step by step Instructions for Subordinate CA Migration from Windows Server 2003 to Windows Server 2008 R2 – Part 1

Below are the step by step comprehensive Instructions for subroutine CA migration from Windows Server 2003 to Windows Server 2008 R2.
This article is published in three parts and in this part we will discuss more in details on about preparing of source and destination server for the migration

1. Preparing Source Server

Map network share in source server to copy backup files

Perform/Verify System state backup of Source CA

a. Verify and backup CA Template set

Open Command prompt

Type certutil.exe – catemplates > catemplates.txt

Verify the contents of catemplates.txt with the templates displayed in Certificate Authority snap-in

b. Verify and backup CA’s CSP and signature algorithm

Open Command prompt

Type certutil.exe –getreg ca\csp\* > csp.txt

Verify that the csp.txt contains CSP detaill

c. Publish CRL with extended validity period

Open Certificate Authority snap in

In the console tree right click “Revoked Certificates” and click Properties

Record the current CRL Publishing Parameters

Set the CRL Delta publishing interval to 2 days

Click on “Revoked Certificates” -> all task -> publish -> Delta CRL only

d. Backup CA DB and Private Key

Map shared network drive to take the backup

on Certificate authority snap-in right click point to All task and backup CA

On the Welcome page of the CA Backup wizard, click Next.

On the Items to Back Up page, select the Private key and CA certificate and Certificate database and certificate database log check boxes, specify the backup location, and then click Next.

On the Select a Password page, type a password to protect the CA private key, and click Next.

On the Completing the Backup Wizard page, click Finish.

After the backup completes, verify the following files in the location you specified CAName.p12 containing the CA certificate and private key Database folder containing files certbkxp.dat, edb#####.log, and CAName.edb

Open command prompt and type Net stop Certsvc to stop Certificate Service

e. Backup CA Registry

Click Start, point to Run, and type regedit to open the Registry Editor.

In HKEY_LOCAL_MACHINE\SYSTEM\CurrentControlSet\Services\CertSvc, right-click Configuration, and then click Export.

Specify a location and file name, and then click Save. This creates a registry file containing CA configuration data from the source CA.

f. Remove source server

Launch Add or remove program

Click Add/Remove windows components and uncheck Certificate Services

Click next and finish

Remove source server from domain

Delete AD computer object

Rename source server to some temp name

2. Preparing Destination Server

Change destination server name to the initial source server name

Add destination server to domain

Map network share used in taking the backup on source server

a. Import the CA certificate

Start the Certificates snap-in for the local computer account.

In the console tree, double-click Certificates (Local Computer), and click Personal.

On the Action menu, click All Tasks, and then click Import to open the Certificate Import Wizard. Click Next.

Locate the <CAName>.p12 file created by the CA certificate and private key backup on the source CA, and click Open.

Type the password, and click OK.

Click Place all certificates in the following store.

Verify Personal is displayed in Certificate store. If it is not, click Browse, click Personal, and click OK.

b. Add CA and IIS roles on destination server

Log on to the destination server, and start Server Manager.

In the console tree, click Roles.

On the Action menu, click Add Roles.

If the Before you Begin page appears, click Next.

On the Select Server Roles page, select the Active Directory Certificate Services and Web Server (IIS) check box, and click Next.

On the Introduction to AD CS page, click Next.

On the Role Services page, click the Certification Authority check box, and Certification Authority Web Enrollment and click Next.

On the Specify Setup Type page, specify either Enterprise and click Next.

On the Specify CA Type page, select Subordinate CA, and click Next.

On the Set Up Private Key page, select Use existing private key and Select a certificate and use its associated private key.

In the Certificates list, click the imported CA certificate, and then click Next.

On the Configure Certificate Database page, specify the locations for the CA database and log files.

On the Confirm Installation Selections page, review the messages, and then click Install.

Hope you liked this article, please continue with the next part where we will discuss in details of the below

Part 2 – Restoring the Source from backups and Verifying the migration
Part 3 – Back Out procedure

Routing Group Connector configuration for Exchange 2003 to Exchange 2010 in Multi AD site environment

One of the common issue when you are transition from Exchange 2003 to Exchange 2010 in multi Ad site environment that there is no Routing group connector created for each of the AD site. Exchange 2010 would create one routing group connector in the Ad site during the installation of first Hub transport server in the environment. This might not happen in the subsequent installation of Hub servers in multiple AD sites where Exchange 2003 servers is also residing.

To avoid this scenario we need to create Routing group connector manually for each of the AD site. Below is the example to create new Routing Group connector for a particular AD site. We need to make sure we add multiple exchange 2010 hub server for the parameter SourceTransportServers and similarly multiple exchanges 2003 at parameter TargetTransportServers. These servers should be based on the particular AD site and it will not allow adding servers form multiple AD site. It’s also important to make sure Bidirectional is set to $true. This is because routing group connectors are unidirectional by default and it has to be enable bidirectional if it needs to route email both the side else we need create two routing group connector in each site and  swap the values of sourcetransportserver and Targettransportservers parameter. PublicFolderReferralsEnabled parameter would help public folder referrals to use routing group connectors. This is important if you want to replication public folder between exchange 2003 and exchange 2010

Below is the command to create new routing group connector for a specific AD site

New-RoutingGroupConnector -Name "connector name – AD site" -SourceTransportServers "Hub2010-01.contoso.com, Hub2010-02.contoso.com” -TargetTransportServers "Exch2003-01.contoso.com, Exch2003-02.contoso.com” -Cost 10 -Bidirectional $true -PublicFolderReferralsEnabled $true

As multiple routes exists in the organization between exchange 2003 and exchange 2010, this can cause looping. To avoid looping we need to suppress Link state updates. Below TechNet link has the registry update steps to suppress Link state updates

http://technet.microsoft.com/en-us/library/aa996728(v=exchg.141).aspx

Exchange Profile Analyzer for Exchange 2003 and 2007, what is there for Exchange 2010 ?

EPA is great tool to understand the current users profile and it’s fairly simple to run this tool and generate the result.

This tool cannot be used for Exchange 2010 as it uses WebDev to pull the data and Exchange 2010 does not support WebDev

Here is the PowerShell script from Rob Campbell which can get the similar stats from exchange 2010 servers as well. This will scan through all the transport servers’ logs from the previous day, and generate stats for each user, by primary smtp address, for

Total Messages and Bytes Sent
Unique Messages and Bytes Sent
Total Messages and Bytes Received
for both Internal and External emails.

http://gallery.technet.microsoft.com/scriptcenter/bb94b422-eb9e-4c53-a454-f7da6ddfb5d6#content

Active Directory Cross Forest Migration from Active Directory 2003 to Active Directory 2008 – Part 3

This is the last and final part of  of Cross forest migration.

you can catch-up with Part 1 and  Part 2 before coming to this article.

Migrating Groups from red.com and green.com

1. Migrating the Global Security Group(Exchange Admins) with the member AD admins

Figure 44. Ad group with another AD group as member for migration

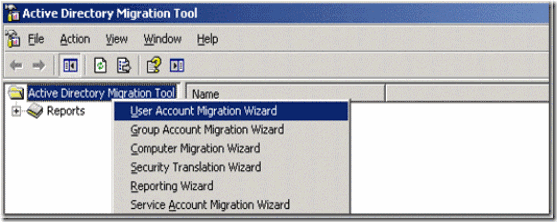
2. Start Active directory Migration tool from Administrative tools and right click on Active directory migration tool to select “group account migration wizard”

Figure 45. Starting Group account migration wizard

3. Select the appropriate source and target domain and appropriate domain controller

Figure 46. Selection source and target domain

4. select the option groups from domain

Figure 47. Selecting the manual group selection option

5. Add the Group Exchange Admin

Figure 48. Adding group exchange Admin for migration

6. Select the target OU where u want to drop the Group object in the target domain

Figure 49. Selecting the target the OU in the target domain

7. Select the option Copy group members, fix membership of group and migration group SIDs to target domain

Figure 50. Option to select to migrate group members along with the group

8. Type the account which has administrative rights on the source domain

Figure 51. providing admin account from the source domain

9. If you have any exclusion attribute then use the option, else click next to continue

Figure 52. Excluding Ad properties if any

10. select the option Do not migrate source object if a conflict is detected in the target domain. Just to make sure conflicting accounts are not merged. If you also have the option to merge users.

Figure 53. Conflict management option

11. Select the option Migrate passwords to migrate passwords for the group members.

Figure 54. Password Migration option for the group members

12. Under Group member Migration option , keep the Target account state as default “Target same as source”. If the source account is disabled then target account will also be disabled and if source account is enabled then the target account will also be enabled.

Figure 55. Selecting target account status after migration

13. Once all the desired options are selected then its time to click on finish and kick the migration process.

figure 56. Completing the group account migration wizard

14. Migration profess will start migrating groups and it group members based on the options selected. Once the migration is completed, logs can be viewed

Figure 57. Migration progress status

15. Log file will give you the group migration details. These log file is very important for verification and troubleshooting purpose.

Figure 58. Migration log details

We have successfully migrated users accounts and groups. ADMT provides various others wizards like

Service account migration Wizard

Computer account migration wizard

Password migration wizard

Reporting wizard

Security Translation wizard etc.

Figure 59. ADMT Migration Wizard

Once the user accounts are migrated then it’s time to move the mailbox from source to destination. Depending on the target environment you may have to decide the cmdlets to move the mailboxes.

As ADMT is a free tool it can save us some good amount of money but it’s very important to make sure the tool is fully tested in the lab and create the proper process document before starting to migration production users, groups and computers. Happy Migration 

Active Directory Cross Forest Migration from Active Directory 2003 to Active Directory 2008 – Part 2

This is continuation of Part 1. Please continue with part two

Creating and configuring ADMTAdmin Service account

Now we need to create and configure ADMT service account to make sure ADMT service account (admtadmin) account has appropriate rights to perform the migration tasks

1. Create a Server account admtadmin in green.com and add the green\admtadmin to the local domain admin group of green.com

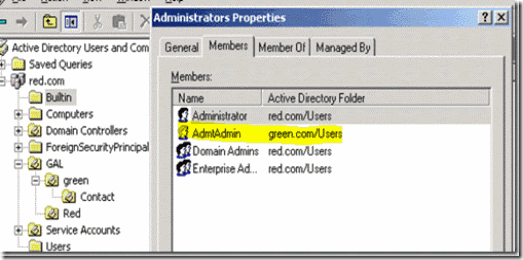
2. Connect Red.com active directory users and computers and add green\admtadmin as member of built in Administrators group

Figure 17. Adding “green\admtadmin’ as the member of built-in administrators group in red.com

Preparing and configuration PES (Password Export Server)

1. Login to the domain member server in green.com where the ADMT tool is installed and run the below command. This is to generate the encryption key for importing in to import it the source domain controller. This command will generate the encryption key file at C:\Pes.pes and it will prompt for the password and confirm password.

admt key /option:create /sourcedomain:red /keyfile:”c:\PES.pes” /keypassword:*

Figure 18. Exporting Encryption key from ADMT server

2. Copy the file C:\pes.pes to the root Directory (c:\) source(red.com) domain controller

3. login to source domain controller (red.com) and install the PES tool.

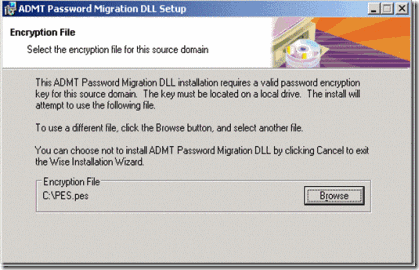
4. During the installation it will prompt for the location of the encryption key. Click on browse and point to the encryption file which was copied recently (C:\pes.pes) and click on Next

Figure 19. Importing Encryption key file into the Password export server

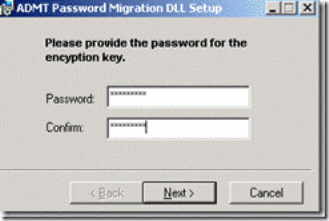
5. Enter and confirm with the same password with used to which exporting the encryption key at point 1 above and click on next

Figure 20. Confirming with password for importing encryption key

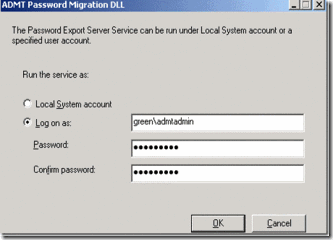
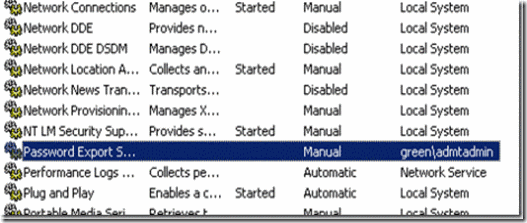
6. It will prompt to PES Service account. Specify the account green\admtadmin account with the password and click on ok to continue. Once configuration is completed, server will prompt for the reboot and confirm to reboot the server.

Figure 21. providing green\admtadmin service account to run the PES serve service

7. Password Export server will not start automatically. It has to be start manually. Only start when ever required or when ever migration is performed.

Figure 22. Password Export server service is disabled by default

8. Right click on the service and select start. you should be able to see the started status on the services console

Figure 23. Password export server service status after manually starting the service

configuring source domain controller(red.com)

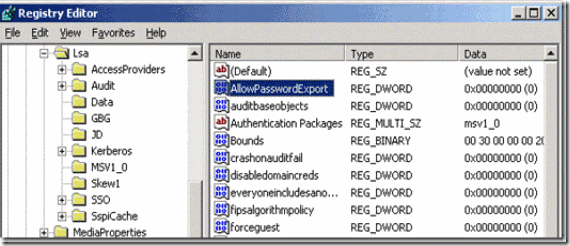
Once PES service is configured then we have to configure registry to allow password export. Below is the steps to perform the same.

1. Login to the domain controller and start registry editor (regedit)

2. Navigate to HKEY_LOCAL_MACHINE\SYSTEM\CurrentControlSet\Control\Lsa

3. Access Allowpasswordexport and change the value form  0 to 1

Figure 24. Enabling password export settings from the registry

Disable SID Filtering

if we need SID history on the target domain, then we have to disable SID filtering. Run the below command on the target domain to disable SID filtering

netdom trust source.com /domain:target /quarantine:No /usero: source_admin_act   /passwordo: source_administrator_pwd

Figure 25. Disabling SID filtering


Migrating User from red.com and green.com

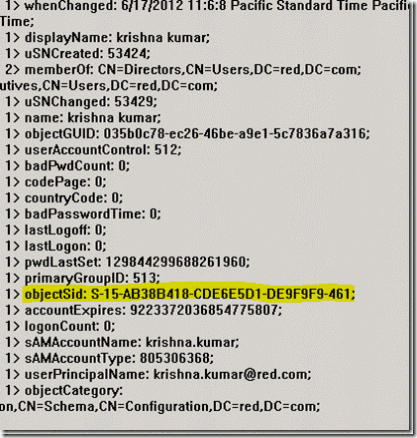
1. We will be migration user krishna.kumar from red.com to green.com. We can verify and make a note of user objectsid from the source domain with the help ldp tool or simple ldap query.

Figure 26. ObjectSid details of user krishna.kumar

2. login to the target domain member server with the green\admtadmin where ADMT tool is installed

3. Start Active directory migration tool from administrative tools

4. right click on the Active Directory Migration tool and select User Account migration wizard and click on Next

Figure 27. Starting the User Account Migration Wizard

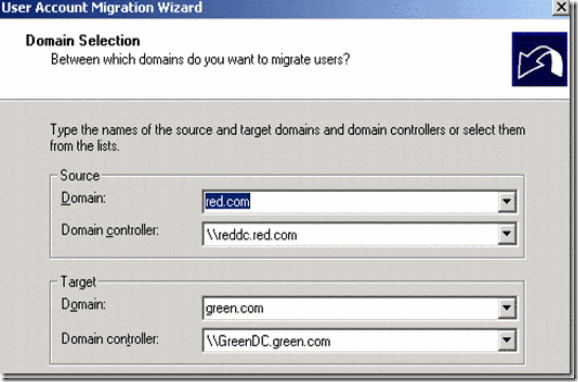
5. Select source domain,source domain controller and Target domain and target domain controller and click on next

Figure 28. Source and Target domain details for migration

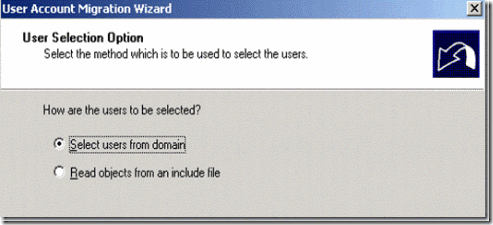
6. Select users from the domain under User Selection option and click on next

Figure 29. Manual user selection

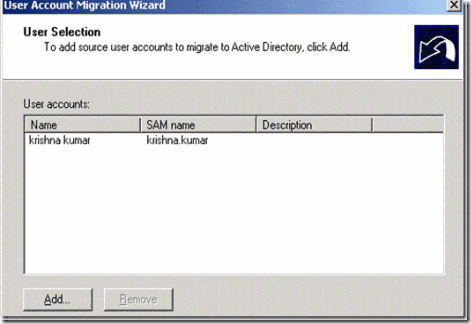
7. Add the user krisha.kumar and click on next

Figure 30. Adding krishna.kumar for user migration

8. Create a Target OU in Target domain and point to the same to create the migrated user account

Figure 31. Select the target OU where the migrated used should be created

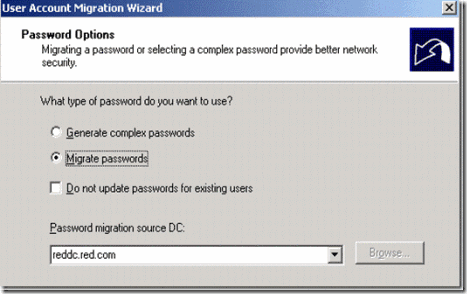
9. Select the option Migrate passwords

Figure 32. Selection migrate Password option and select the source domain controller

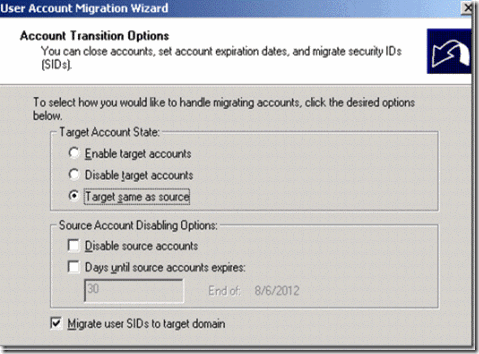
10. Select the option Target same as source and also enable to the option Migrate user SIDs to target domain and click on Next

Figure 33. option to selected on how to handle migrating accounts

11. Type account from the source domain which has administrative rights and click on next

Figure 34. Admin account for adding SID History on migrated account

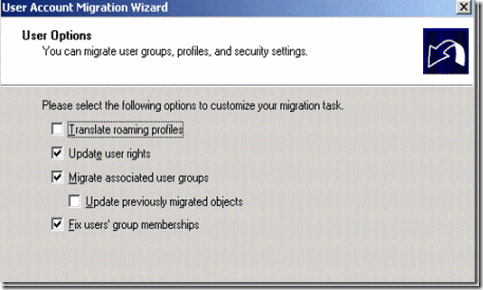
12. Select some of the import option likes update user rights, Migrate associated user group, fix users group membership and click on next

Figure 35. Option to migrate associated user groups, profiles and settings

13. Entire AD properties will be migrated to the target account. Just in case if you need any kind of properties execution then figure 36 shows the option to exclude the same.

Figure 36. Option to execute ad properties on the migrating objects.

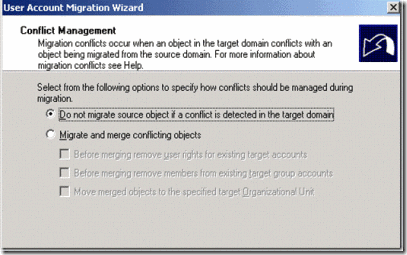
14. keep the default option do not migrate source object if the conflict is detected it the target domain and click on Next

Figure 37. Conflict management option

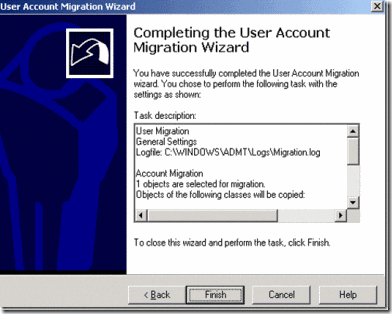
15. Click on Finish to kick start the user migration

Figure 38. Finishing the user migration

16. Once the migration is completed, you should be able to see the details on the screen. To get some advance or log detail, click on view log

Figure 39. Migration progress status

17. log file has some very good amount of information on what exactly happened during the migration. Details like Account been replicated, created, SID history added, password copied and other group membership details etc.

Figure 40. Migration log details

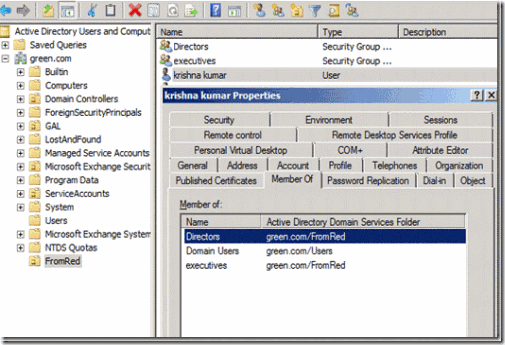
18. On the target domain we can see the Krishna.Kumar is create with all the group membership and also see that associated groups is also been migrated to the destination. You can also verify the entire user properties.

Figure 41. krishna.kumar user property after migration with group membership details

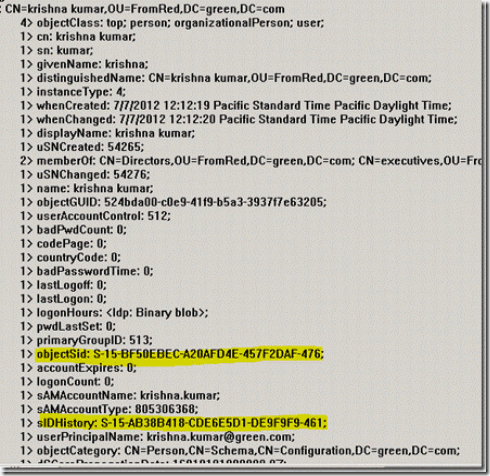
19. We can also verify the object Sid and Sid history been crated on the new object in the target domain. Sid history is the same source objectsid.

Figure 42. Objectsid and SidHistory details of krishna.kumar after migration

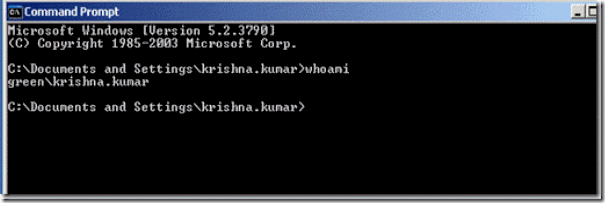
20. To check if the password is been copied, login to one of the client computer with the same password as the source domain. Below figure 43. shows the details of the login account with the domain name.

Figure 43. login details on krishna.kumar on the green.com workstation