Exchange Database and Transactions log Reset

Chances that some times Database has grow too big or some time database is corrupted , then you may have to move all the user to the different store and reset the Database

Reset Database – Care full while doing this task. Make sure that you select the right DB

1. Select the require Exchagne database from Exchange system manager or Exchange management console
2. Right click on the database and click on Dismount
3. Find the path of the database. Select Edb and Stm file and rename the file(Can be deleted later)
4. Right click on the database and click on Mount
5. This will create a new database with the same old Database name.
6. You can start moving users


Reset Transaction Logs – Careful while doing this task. Make sure that you select the right Storage Group

1. Transaction Logs are for each Storage group. In exchange 2007 it’s recommended to have one database on each storage group. Managing would be easy when you have one database in each storage group. We can always have multiple databases
2. Stop Information store service
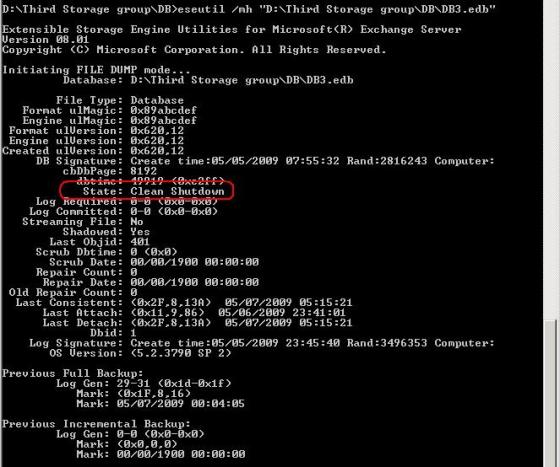
3. Run Eseutil /mh “Database Path” on each of the database which you wanted to transaction log reset. Make sure that you get “Clean Shutdown” status.

 4. Once you have clean shutdown on all the databases then you can go to the log folders and move all the files to the temp location
5. Start the Information store service again

Working with Recovery Storage Group in Exchange 2007 using powershell and Microsoft Exchange Troubleshooting Assiatance


Recovery Storage group is the feature of restoring and mount the second copy of the exchange mailbox store to the exchange server to export mails and data from the required mailboxes with out affecting the production. This is originally introduced in Exchange 2003 SP1.


Features

  1. Only one Recovery storage group can be created in a exchange server
  2. Recovering database and Exchange 2007 server should be on the same active directory forest.
  3. Recovery Storage group can be managed in two ways one with Microsoft Exchange troubleshooting assistant(ExTRA) and Exchange power shell    

Below article describes procedure steps to work on Recovery Storage group using power shell

1. Below snap of DB3 which we will be working on recovering in to the Recovery Storage Group


2. Lets take the backup of DB3 using default windows Backup Utility
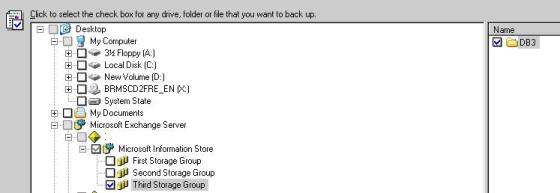


3. Create a new Recovery Storage group using Exchange powershell, below is the command for the same. –Recovery option will create a recovery storage group.

New-StorageGroup –Server <servername>  –LogFolderPath “D:\Recovery Storage Group\log” –Name “Recovery Storage Group” –SystemFolderPath “D:\Recovery Storage Group\log” –Recovery


4. Get-StorageGroup “Recovery storage group” | fl
   Will get the details of the new Recovery storage group which is created now

5. Create the new Database with the name DB3 and provide the path of the Edb file. 
  

5. Create the new Database with the name DB3 and provide the path of the Edb file.
   New-MailboxDatabase –MailboxDatabaseToRecover “DB3” –StorageGroup “Servername\Recovery Storage Group” –EDBFilePath “D:\Recovery Storage Group\DB\DB3.edb”

6. Once Mailbox Database is created we need to restore from the backup before that the restore we need set AllowFilerestore to true with the below command
    Set-MailboxDatabase -Identity “<ServerName>\Recovery Storage Group\DB3” -AllowFileRestore $true

7. Use Backup Utility to restore the Database to the Recovery Storage group. By selecting the DB3 and click restore and make sure that “Last Restore Set” is checked
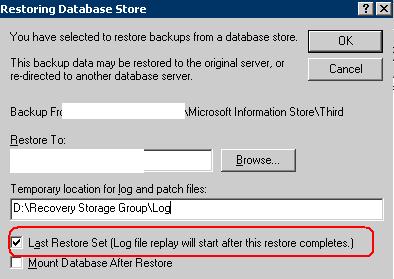
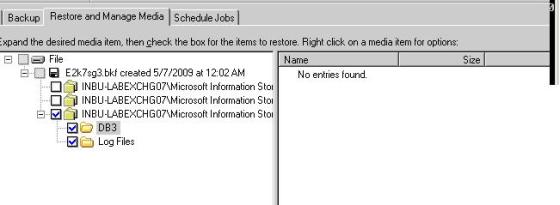


8. Mount the Restored database using below mentioned power shell command
   Mount-Database –Identity “<SERVERNAME>\Recovery Storage Group\DB3”

9. Final step is merging mails from the Recovery Storage group mails to production mailbox. This can be done either both from ExTRA (Exchange Trouble shooting assistance) and from Power shell. I feel that recovering mail using Extra is much easier then recovering through power shell. Power shell will not only merge on the production mailbox into the folder name Recovered but ExTRA will directly merge into the production mailbox.  

10. To open ExTRA, Open Exchange Management console and click on tools and on the right panel click on Database Recovery Management.


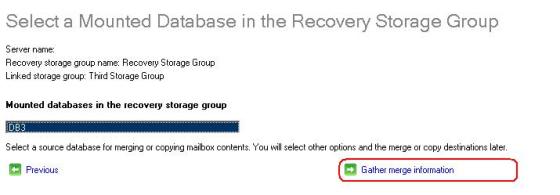
11. Click on “Select Task” on the left column on ExTRA and click on Database recovery Management and  In the next page enter the Mailbox Server name and DC and click on  Next to continue to get the below mentioned page and click on Merge or copy mailbox content
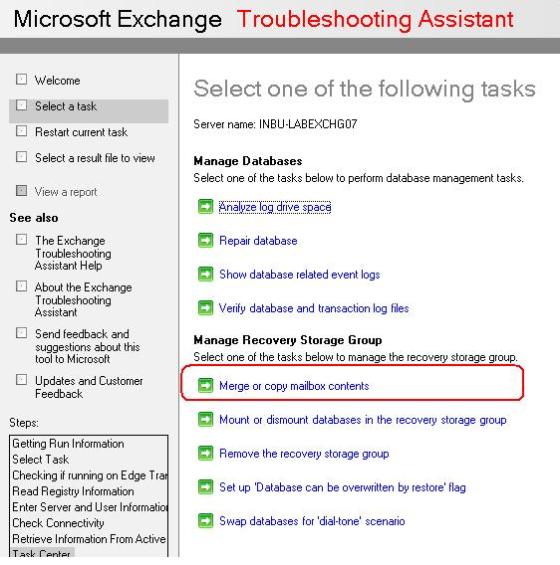


12. Click on “Gather merge information”


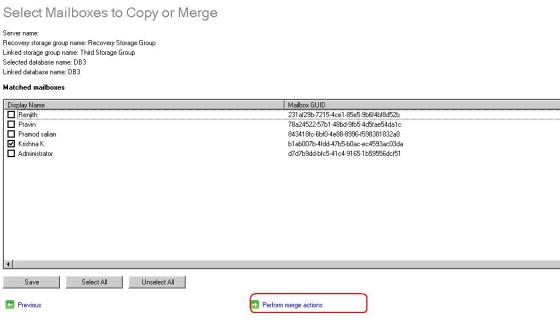
13. Select the required mailbox and click on “Perform merge action” to merge the recovered mailbox to the production mailbox. Recovered mail will directly reflect in the mailbox of the user
Converting Legacy Mailbox to User Mailbox in Exchange 2007


During migration of users from Exchagne 2003 to exchagne 2007  some time you may see like after user is migrated to exchange 2007 server and if you see the properties of the user , it will still show as Legacy mailbox.  If user is still showing as Legacy Mailbox then chances that OWA may not work for that user. User has to be converted to the regular mailbox. Below is the powershell to set legacy mailbox to user mailbox.

Set-Mailbox -id <Username> -ApplyMandatoryProperties

Adding Mail enabled public folder as the member of Distribution list

Some times you may wanted to add mail enabled public folder as the member of Distrubution list and you wanted to send copy of mail to PF which is sent to distrubution list.  For this you may need to add mail enabled public folder as the member of the DL

Its not possible add public folder as members of DL in Exchange 2003. This can be only done from Exchagne 2007.
Throught Exchange 2007 you can add both throught Exchange management console and Powershell command

Powershell command
Add-DistributionGroupMember  -Identity “DLName”  -Member “Email address”

Exchange Management console
Expand Recipient Configuration -> Distibution Group -> find the requied DL -> Add the same

Preventing Internal mails from application reaching Junk E-mail folder

Some times there can be chances that internal mail from the application reaches Junk Email folder and some reaches Inbox. Some time it annoys you because some reaches inbox and other to Junk Email folder.

Every mail will be checked for the SPAM CONFIDENTIAL LEVEL (SCL). If SCL is more than 5 then mail will directly reach Junk email folder.

We can modify the SCL of the mails with the help of transport rules

1. Create the Email account(address) with the required email address for the application
2. Open Exchange Management console
3. Expand Organization Configuration
4. Select Hub Transport
5. On the right side Click on New-Transport rule
6. Input the Name -> click Next
7. Check “From People” -> Bottom click on people and browse the from address
8. Click Next -> Check “Set the spam confidence level to value” and set the value to “-1”


9.      Click next to and new to create the new one

Removing Dead or Dirty Exchange 2003 Server from AD and ESM

Removing dead Exchagne 2003 servers from the Exchange System Manager and Active Directory please follow below mentioned steps

1. Open Exchange system Manager
2. Expand Adminstrative group until you reach the required server
3. Right click on the server -> All Tasks -> Remove Server
4. Confirm the same by clicking yes.

If this did not help then you may need to Dig into Active directory through Adsiedit and remove the server Manually

Go to Start, Run and write ADSIEdit.msc and hit OK button.

Configuration Container
CN=Configuration, DC=Domainname,DC=com
CN=Services
CN=Microsoft Exchange
CN=Your_Organization_Name
CN=Administrative Groups
CN=AdminstrativeGroup_Name
CN=Servers
Right click on the Required server click Delete  and confirm the same.

Powershell to get the list of Disconnected mailbox in the Exchange Server

If we delete a user account then it will automatically disconnects mailbox from the account and adds to Disconnected Mailbox list. Mailbox  will be listed until retention period of 30 days

Get-MailboxStatistics -server <servername> | where { $_.DisconnectDate -ne $null } | select DisplayName,MailboxGuid,Database,DisconnectDate

Gets the list of Disconnected mailbox in the specified Exchange 2007 Server


Get-MailboxStatistics  | where { $_.DisconnectDate -ne $null } | select DisplayName,MailboxGuid,Database,DisconnectDate

Gets the list of Disconnected mailbox on the Exchange 2007  maibox server where you are running this command

Recovering Deleted User Ad account throught Active Directory powershell

We can recover any Active Directory deleted object with in the Tombstone period.
Tombstone lifetime can be found in active directory using below steps

• Load the ADSIEdit snap-in by navigating to start menu, programs, Windows 2000 Support Tools, Tools, ADSI Edit, or simply type adsiedit.msc at the run command.
• Navigate down to CN=Directory Service, through Configuration, CN=Configuration,DC=domainName,DC=com, CN=Services, CN=Windows NT, right-click and choose properties. 
• scroll down to tombstoneLifetime. This will have Tombstone period

Get-QADUser -Tombstone

Will get the list of user accounts which are Deleted and residing in Tombstone


Get-QADUser -Tombstone <name> |restore-QADDeletedObject

Will restore the user object in to the OU LOSTANDFOUND


Get-QADUser -Tombstone -LastKnownParent ‘<DN of container>’
Restores all user accounts that were deleted from a particular container to OU LOSTANDFOUND.


 Get-QADUser –Tombstone –LastChangedOn (get-date -year 2008 -month 9 -day 1)

Restores all user accounts that were deleted on September 1, 2008


Get-QADUser –Tombstone  <username> | fl

Gives the complete details of the -Tombstone account which can help in finding detained information of the Tombstoned account

Deleted Mailbox not appearing in Disconnected mailbox in Exchange 2007

Deleted mailboxes will appear in disconnected mailbox list, but it will not reflect immediately. We have to wait for online maintenance to run and complete.

If we accidentally delete mailbox and if we wanted to reconnect it back then we may not be able to find it Disconnected Mailbox. We have run Clean-MailboxDatabase to get the deleted mailbox.

Eg.

Clean-MailboxDatabase \servername\SGName\Store
Cleaning Database of Individual Store

Get-Mailboxdatabase | Clean-MailboxDatabase
Cleans all the database in the Organization

Get-Mailboxdatabase | Where{ $_.Server –eq “<servername>”}| clean-MailboxDatabase
Cleans all the database in the specific store

Get-Mailboxdaatabase | Where{ $_.Name –eq “<DatabaseName>”}| clean-MailboxDatabase
Cleans all the Database which matches the specific name given in Databasename