Recovery Storage group is the feature of restoring and mount the second copy of the exchange mailbox store to the exchange server to export mails and data from the required mailboxes with out affecting the production. This is originally introduced in Exchange 2003 SP1.
Features
- Only one Recovery storage group can be created in a exchange server
- Recovering database and Exchange 2007 server should be on the same active directory forest.
- Recovery Storage group can be managed in two ways one with Microsoft Exchange troubleshooting assistant(ExTRA) and Exchange power shell
Below article describes procedure steps to work on Recovery Storage group using power shell
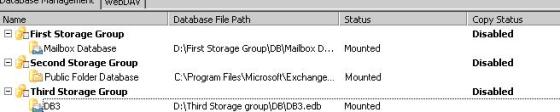
1. Below snap of DB3 which we will be working on recovering in to the Recovery Storage Group
2. Lets  take the backup of DB3 using default windows Backup Utility
3. Create a new Recovery Storage group using Exchange powershell, below is the command for the same. –Recovery option will create a recovery storage group.
New-StorageGroup –Server <servername> –LogFolderPath “D:\Recovery Storage Group\log” –Name “Recovery Storage Group” –SystemFolderPath “D:\Recovery Storage Group\log” –Recovery
4. Get-StorageGroup “Recovery storage group” | fl
Will get the details of the new Recovery storage group which is created now
5. Create the new Database with the name DB3 and provide the path of the Edb file.
5. Create the new Database with the name DB3 and provide the path of the Edb file.
New-MailboxDatabase –MailboxDatabaseToRecover “DB3” –StorageGroup “Servername\Recovery Storage Group” –EDBFilePath “D:\Recovery Storage Group\DB\DB3.edb”
6. Once Mailbox Database is created we need to restore from the backup before that the restore we need set AllowFilerestore to true with the below command
Set-MailboxDatabase -Identity “<ServerName>\Recovery Storage Group\DB3” -AllowFileRestore $true
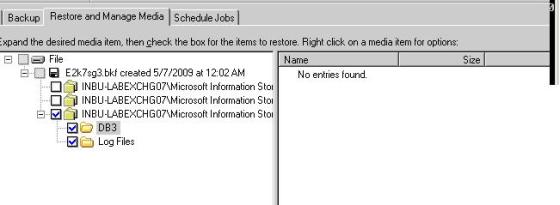
7. Use Backup Utility to restore the Database to the Recovery Storage group. By selecting the DB3 and click restore and make sure that “Last Restore Set” is checked
8. Mount the Restored database using below mentioned power shell command
Mount-Database –Identity “<SERVERNAME>\Recovery Storage Group\DB3”
9. Final step is merging mails from the Recovery Storage group mails to production mailbox. This can be done either both from ExTRA (Exchange Trouble shooting assistance) and from Power shell. I feel that recovering mail using Extra is much easier then recovering through power shell. Power shell will not only merge on the production mailbox into the folder name Recovered but ExTRA will directly merge into the production mailbox.
10. To open ExTRA, Open Exchange Management console and click on tools and on the right panel click on Database Recovery Management.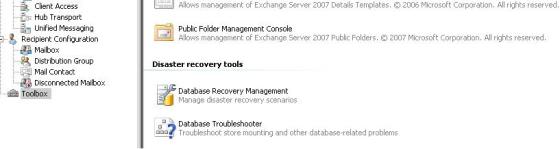
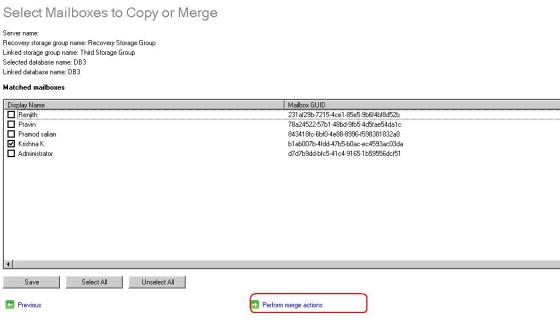
11. Click on “Select Task” on the left column on ExTRA and click on Database recovery Management and In the next page enter the Mailbox Server name and DC and click on Next to continue to get the below mentioned page and click on Merge or copy mailbox content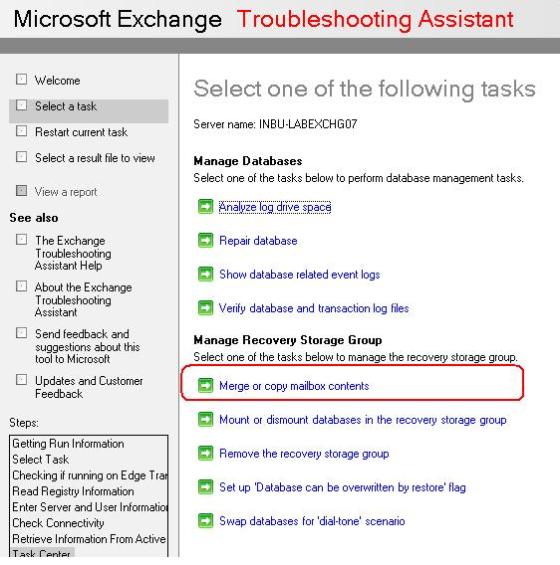
12. Click on “Gather merge information”
13. Select the required mailbox and click on “Perform merge action” to merge the recovered mailbox to the production mailbox. Recovered mail will directly reflect in the mailbox of the user