PowerShell to Create New Mailboxes in the smallest database in Exchange 2007 Organization

Loadbalance of the Exchange Database is very important. We need to make sure that  database is not dumped with all the mailbox and once database gets big then move maiboxes to the other database. We can automate this process buy make the script to find the smallest size of the database in the Exchange orginisation and create the mailbox in the same

$MailboxSvr = Get-MailboxServer | select name
$i = 0
foreach($svr in $mailboxsvr)
 {
  $db = Get-MailboxDatabase -Server $svr.Name
  
  foreach($database in $db)
   {
    $Server = $database.Server.Name
    $Db = $database.Identity
    $edbfilepath = $database.EdbFilePath
  
    $path = “`\`\” + $Server + “`\” + $edbfilepath.DriveName.Remove(1) + “$”+ $edbfilepath.PathName.Remove(0,2)
    $Dbsize =  get-item $path |select-object length
    $K = $Server + ” ” + $Db + ” ” + $Dbsize.Length
    if ($i -eq 0 )
     {
     
     $edbsize = $Dbsize.Length
     }
    
    If ($edbsize -gt $Dbsize.Length)
    {
       $edbsize = $Dbsize.Length  
     $sdb = $database.Identity
    } 

    $i = 1
       
   }
    
    
 }
 
Write-output “ENTER THE FOLLOWING DETAILS”
$DName = Read-Host “User Diplay Name  ”
$FName = Read-Host “First Name ”
$LName = Read-Host “Last Name ”
$passwd = Read-Host “Password ” -asSecureString
$PrincipalName = $FName + “.” + $LName + “@domain.com”
$Aliasname = $FName + “.” + $LName
New-Mailbox -Name $DName -Database $sdb -UserPrincipalName $PrincipalName -FirstName $FName -LastName $LName -Alias $Aliasname -Password $passwd -ResetPasswordOnNextLogon $true -SamAccountName $Aliasname


You can get the complete copy of the code in the below link file

http://powershell.com/cs/cfs-filesystemfile.ashx/__key/CommunityServer.Components.UserFiles/00.00.00.30.62/NewMailbox_5F00_SmalletDatabase.txt

Add-IPAllowListEntry

IP Allow List is used to add the list of IP address into Exchange server to allow computer with IP address to use exchange server for relay purpose and mail sent for the computer which is added in IP Allow list is not scan by anti-spam agent. With this mail comming from the machine with IP allow list will not be sent to spam mails or Junk mail folder. To do this need to make sure that Anti-Spam agent is intalled on the Hub server

Instruction on how install Anti spam agent. Need to make sure you run on all the Hub Transport server

1. Open powershell -> Navigate to the folder “Program Files\Microsoft\Exchange Server\Scripts”
2. Type ./install-AntispamAgents.ps1 and Enter to install the same to get the below output


3. Restart the “Microsoft Exchange Transport” service from services
4. Open the Exchange Management Console -> Organization configuration -> select Hub Transport.
5. The “Anti-Spam” tab should be visible in Hub Transport properties. Make sure that IP Allow List is enabled. If not right click and enabled the same


Instruction on How to add IP address and IP address range into allow list can be find in the below link.

http://technet.microsoft.com/en-us/library/bb125225(EXCHG.140).aspx

Powershell to apply Fullaccess and Send as permission to Exchange 2007 Mailbox

Below powershell can help to apply users full access rights and and SendAs permission to the mailbox for the given input CSV file

Format ofthe CSV something like this

UserMailbox,User
Krishna,Domain/Krishna

———————————————————————————————————————-

$csv = Import-csv -path “C:\Userdetails.csv”
foreach($line in $csv)
{
Add-MailboxPermission $Line.UserMailbox -AccessRights FullAccess -user $Line.User
Add-ADPermission $Line.UserMailbox -Extendedrights “Send As” -User $Line.User

}

———————————————————————————————————————-

Configuring Exchange 2007 Client Access Server with LoadBalancer

To configure Multiple Exchange 2007 client access server with load balancer we need to Offload Certificate to the load balancer.

Offloading Certificate is the process where we uploaded certificate into the load balancer and this box will accept the request and decrypt the certificate and it will create a new session from the load balancer to the exchange servers. This is called SSL termination where SSL Session from the client is terminated at the LB and new session is created between the Server and Load Balancer

To configure SSL offloading for Outlook Web Access, you must perform the following procedure on each of your Client Access servers. Below is the link which gives the details description on configuring Client Access Servers

http://technet.microsoft.com/en-us/library/bb885060.aspx

Below link on F5 Load balancer which has details description on how to configure for Exchange 2007 Client Access server for OWA, Active Sync, Pop3, IMAP etc

http://www.f5.com/pdf/deployment-guides/f5-exchange07-dg.pdf

Exchange 2007 soft recovery of the database

Soft Recovery is the process of remounting the database when the database was shutdown abruptly and when log files and Database files are intact.

 Simple Soft Recovery Process

Mounting of the database is simple soft recovery process which will check the checkpoint file and find the log latest log updated and will update the remaining logs.  If there you no check point it will try to apply oldest log files available. 


Advanced Soft Recovery Process (Careful, Make sure that you have the copy of the database and log files before you do this option)

When there is abrupt shutdown and there are chances that Database may go into Dirty shutdown state. When you try to mount the database it may not mount as it is the Dirty Shutdown state. Need to reply the logs manually to bring the database into clean shutdown state.


1.  Eseutil /mh “Databasepath” (gets you the details of the clean shutdown or dirty shutdown)

Below snap give the details of the dirty shutdown and it also provide the details of Log Required.


2. Eseutil /ml “Path of the log file” (get you the header of the logs and there you will find the value of Base name: E00 to use for the applying the logs. This may vary in the log header. Need to make sure that you get the database before you apply the logs


3. Move the Check point file the other location .This will cause to replay all the logs available


4. Open command prompt and browse to the log file location and run the below mentioned command

 Eseutil /r  /a E00 /d “C:\EDB file path” /S “C:\Log file path” /L “C:\Chckpoint file creation path”

 Make sure that you taken the backup of the log file before you use these options and you make sure that you have all the log file required as per the header of the Database and provide the correct paths. For the simple recovery use below mentioned command

 Eseutil /r E00

 5. On completion it should mount automatically or you can mount the database from Exchange management console. We can checked if Datbase is been changed to clean shutdown form the below mentioned command

 Eseutil /mh “Database path.edb”

Powershell to get Complete Mailbox Statistics in the Exchange 2007 Orginisation


Below is the powershell command to export the complete details of the Mailbox in the Exchange Organization. Details like Name, Mailbox size (MB), Mailcount, Mailbox limits, Account Active or disabled, CreatedDate, Lastlogon time, Last logofftime etc into the CSV file. This Data can even imported in to the SQL database and Query to analyst the growth of the mailbox. If you collect these details on Daily basis and uploaded into SQL then you can easily get the details of the mailbox in seconds for auditing or capacity management etc.

With SQL integration you can query details like Top 100 mailbox, Top 100 Fastest growing mailbox, List of all active maibox, List of disabled mailbox, List of mailbox out of default quota limits, maiboxes not used in past few days. Newly created mailbox in past one month etc

Get-Mailbox -ResultSize Unlimited |  select DisplayName, Alias, Database, PrimarySmtpAddress,@{name=’IssuewarningQuota’;expression={if ($_.IssueWarningQuota -match “UNLIMITED”) {“-1”} else {$_.IssueWarningQuota.value.tomb() }}},@{name=’ProhibitSendQuota’;expression={if ($_.ProhibitSendQuota -match “UNLIMITED”) {“-1”} else {$_.ProhibitSendQuota.value.tomb() }}},@{name=’ProhibitSendReceiveQuota’;expression={if ($_.ProhibitSendReceiveQuota -match “UNLIMITED”) {“-1”} else {$_.ProhibitSendReceiveQuota.value.tomb() }}},WhenCreated  |export-csv C:\stats.csv
“DisplayName,Alias,MailboxSizeMB,ItemCount,PrimarysmtpAddress,IssueWarningQuotaMB,ProhibitSendQuotaMB,ProhibitSendReceiveQuotaMB,DatabaseName,CreationDate,LastLogonTime,LastLogoffTime,isActive” | out-file C:\MailstatsResult.csv
$csv = Import-csv -path “C:\stats.csv”
foreach($line in $csv)
{
 $MailboxStats =  Get-MailboxStatistics $Line.Alias | Select TotalItemSize,Itemcount,LastLogoffTime,LastLogonTime
 $L = “{0:N0}” -f $mailboxstats.totalitemsize.value.toMB()
 $Size = “”
 $Len = $L.Split(‘,’)
 for ($i=0; $i -lt $Len.length; $i++)
  {
   $Size = $Size +$Len[$i]
  }
  $temp=$Line.PrimarysmtpAddress
  $adobjroot = [adsi]”
  $objdisabsearcher = New-Object System.DirectoryServices.DirectorySearcher($adobjroot)
  $objdisabsearcher.filter = “(&(objectCategory=Person)(objectClass=user)(mail= $Temp)(userAccountControl:1.2.840.113556.1.4.803:=2))”
  $resultdisabaccn = $objdisabsearcher.findone() | select path

if($resultdisabaccn.path)
 {
 $actStatus = “1”
 }
 Else
 {
 $actStatus = “0”
 }
 
 $out =$Line.Displayname  + “,” + $Line.Alias  + “,” +  $Size + “,” + $MailboxStats.ItemCount  + “,” + $Line.PrimarySmtpAddress   + “,” +  $Line.IssueWarningQuota + “,” +  $Line.ProhibitSendQuota  + “,” +  $Line.ProhibitSendReceiveQuota + “,” + $Line.Database + “,” +  $Line.WhenCreated + “,” + $MailboxStats.LastLogonTime + “,” + $MailboxStats.LastLogoffTime + “,” + $actStatus
 $Out | Out-File C:\MailstatsResult.csv -Append
}

You can get the copy of the script in the below text file

http://powershell.com/cs/cfs-filesystemfile.ashx/__key/CommunityServer.Components.UserFiles/00.00.00.30.62/MailboxStats.txt

Exchange Database and Transactions log Reset

Chances that some times Database has grow too big or some time database is corrupted , then you may have to move all the user to the different store and reset the Database

Reset Database – Care full while doing this task. Make sure that you select the right DB

1. Select the require Exchagne database from Exchange system manager or Exchange management console
2. Right click on the database and click on Dismount
3. Find the path of the database. Select Edb and Stm file and rename the file(Can be deleted later)
4. Right click on the database and click on Mount
5. This will create a new database with the same old Database name.
6. You can start moving users


Reset Transaction Logs – Careful while doing this task. Make sure that you select the right Storage Group

1. Transaction Logs are for each Storage group. In exchange 2007 it’s recommended to have one database on each storage group. Managing would be easy when you have one database in each storage group. We can always have multiple databases
2. Stop Information store service
3. Run Eseutil /mh “Database Path” on each of the database which you wanted to transaction log reset. Make sure that you get “Clean Shutdown” status.

 4. Once you have clean shutdown on all the databases then you can go to the log folders and move all the files to the temp location
5. Start the Information store service again

Working with Recovery Storage Group in Exchange 2007 using powershell and Microsoft Exchange Troubleshooting Assiatance


Recovery Storage group is the feature of restoring and mount the second copy of the exchange mailbox store to the exchange server to export mails and data from the required mailboxes with out affecting the production. This is originally introduced in Exchange 2003 SP1.


Features

  1. Only one Recovery storage group can be created in a exchange server
  2. Recovering database and Exchange 2007 server should be on the same active directory forest.
  3. Recovery Storage group can be managed in two ways one with Microsoft Exchange troubleshooting assistant(ExTRA) and Exchange power shell    

Below article describes procedure steps to work on Recovery Storage group using power shell

1. Below snap of DB3 which we will be working on recovering in to the Recovery Storage Group


2. Lets 
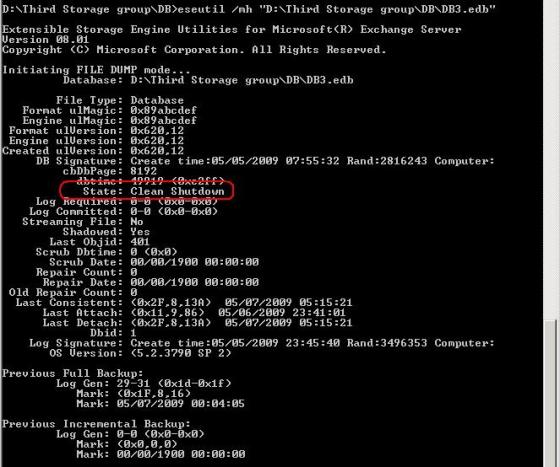
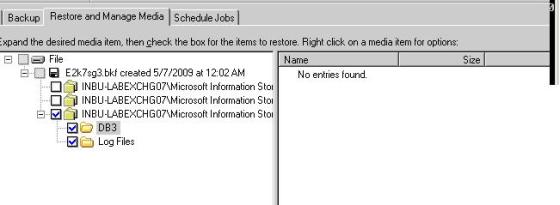
take the backup of DB3 using default windows Backup Utility


3. Create a new Recovery Storage group using Exchange powershell, below is the command for the same. –Recovery option will create a recovery storage group.

New-StorageGroup –Server <servername>  –LogFolderPath “D:\Recovery Storage Group\log” –Name “Recovery Storage Group” –SystemFolderPath “D:\Recovery Storage Group\log” –Recovery


4. Get-StorageGroup “Recovery storage group” | fl
   Will get the details of the new Recovery storage group which is created now

5. Create the new Database with the name DB3 and provide the path of the Edb file. 
  

5. Create the new Database with the name DB3 and provide the path of the Edb file.
   New-MailboxDatabase –MailboxDatabaseToRecover “DB3” –StorageGroup “Servername\Recovery Storage Group” –EDBFilePath “D:\Recovery Storage Group\DB\DB3.edb”

6. Once Mailbox Database is created we need to restore from the backup before that the restore we need set AllowFilerestore to true with the below command
    Set-MailboxDatabase -Identity “<ServerName>\Recovery Storage Group\DB3” -AllowFileRestore $true

7. Use Backup Utility to restore the Database to the Recovery Storage group. By selecting the DB3 and click restore and make sure that “Last Restore Set” is checked


8. Mount the Restored database using below mentioned power shell command
   Mount-Database –Identity “<SERVERNAME>\Recovery Storage Group\DB3”

9. Final step is merging mails from the Recovery Storage group mails to production mailbox. This can be done either both from ExTRA (Exchange Trouble shooting assistance) and from Power shell. I feel that recovering mail using Extra is much easier then recovering through power shell. Power shell will not only merge on the production mailbox into the folder name Recovered but ExTRA will directly merge into the production mailbox.  

10. To open ExTRA, Open Exchange Management console and click on tools and on the right panel click on Database Recovery Management.


11. Click on “Select Task” on the left column on ExTRA and click on Database recovery Management and  In the next page enter the Mailbox Server name and DC and click on  Next to continue to get the below mentioned page and click on Merge or copy mailbox content


12. Click on “Gather merge information”


13. Select the required mailbox and click on “Perform merge action” to merge the recovered mailbox to the production mailbox. Recovered mail will directly reflect in the mailbox of the user

Adding Mail enabled public folder as the member of Distribution list

Some times you may wanted to add mail enabled public folder as the member of Distrubution list and you wanted to send copy of mail to PF which is sent to distrubution list.  For this you may need to add mail enabled public folder as the member of the DL

Its not possible add public folder as members of DL in Exchange 2003. This can be only done from Exchagne 2007.
Throught Exchange 2007 you can add both throught Exchange management console and Powershell command

Powershell command
Add-DistributionGroupMember  -Identity “DLName”  -Member “Email address”

Exchange Management console
Expand Recipient Configuration -> Distibution Group -> find the requied DL -> Add the same