Exchange 2010 Connectors
Introduction
A connector, as its name implies, is used to communicate between Exchange 2010 and External Entities like Internet Email Servers, legacy Exchange servers, 3rd Party mail servers, applications, appliances etc. Understanding this will help to create and configure various connectors and configure for the communication. This also helps on how mail flow can happen between exchange and other external entities.
This article is for all administrators on how to create and configure connectors and the application of the connectors. I thought of putting all the connectors will help to get some clear understanding of mail flow between Exchange and other email communication word.
Below are the various connectors which can be created and configured in Exchange 2010 Servers. Let’s understand one by one
– Send connector
– Receive connector
– Foreign (Delivery Agent) connector
– Linked connector
– Routing Group connector
Send connectors
A Send connector is basically used to send email to Internet Servers (i.e. servers outside of your own organization), and it controls how email should be passed to the “outside world”. No send connectors are created by default during the installation and setup of your Exchange server roles, and at least one needs to be created manually, which is a process we’ll look at in just a moment.
While there are invisible Send connectors which are created by default, these are used for mail delivery within the Exchange 2010 organization, and we have no control over them. Send connectors which we manually create must be created on a Hub Transport server, and are stored in the Active Directory. This information is therefore accessible to any Hub Transport Servers in the organization, which can then use this connector to send the email to the Internet word.
Multiple Send connectors can be configured to send email outside your organization. Multiple send connectors can be created with different cost for sending emails through different ISP Connection. This helps when you have multiple ISP connection and when there is failure of one ISP then you can use different Send connectors to route the email to the Internet. Multiple send connectors also help when you want certain traffic routed using a different connector. For Example you wanted to send email to Microsoft.com using a specific ISP connection and email to Simple-talk.com using a different ISP connection then different send connectors come in handy.
In addition, the Hub Transport server can be configured to send email to directly to the recipient, or it can direct outgoing email to a smart host (which can be an Edge Server or any application like Borderware, Postini, ironport etc.). If it’s configured to send email directly, then we need to make sure that the DNS is properly configured so that it can resolve internal and external DNS MX records. On the other hand, if it’s configured to send email to a smart host, then naturally the smart host should be configured to deliver the email to the Internet. Let’s take a look at how to set these options up.
How to Create and Configure Send Connectors
There are two ways to create a Send connector; via the Exchange Management Console or the Exchange Management Shell. Both methods end up with exactly the same result, you just need to pick the process you feel more comfortable with.
Via the Exchange Management Console
Open the Exchange management console and navigate to the result pane under Organization Configuration > Hub Transport Server. Select the Send connectors tab, and click on New Send Connector within the Action pane.
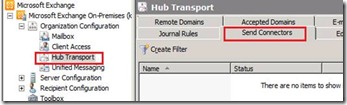
Figure 1. Creating a new Send Connector within the Exchange Management Console.
Now you need to go through a few configuration steps to make sure the new Send connector is correctly set up.
1) Specify the intent of the Connector
Providing a unique name which describes the connector’s purpose, particularly if you have multiple connectors, will help you to identity and differentiate specific connectors. Once you’ve given the connector a name, you need to specify its intended use:
– Custom: Custom options are used when you wanted to send mail to a specific domain which is not an Exchange Server. Custom connectors are used for forwarding messages to a smart host, which are configured to use DNS MX records to deliver the email to their destination.
– Internal: Internal connector is used when you want your Exchange Server to communicate with other Exchange severs in different forests. Eg. If there are multiple Exchange forests in your organization and you want communication between the multiple forests to follow a specific path then an Internal connector is the way to define that path.
– Internet: An Internet connector is used to send email directly to the Internet, and is configured to use DNS MX records to route email to its destination. This will be created on the organizations Internet-facing server(s) in order to deliver email. This option is generally used when you do not use a smart host to deliver email.
– Partner: The Partner connector is, unsurprisingly, used to send email to a partner domain. For example, if a one company acquires another, then there may be business requirements that need these two companies to run independently, but they also want to make sure that emails shared between these domains are not sent over the public internet. This is when the partner Send connector comes into effect.
More in-depth information on the Intended options can be found on Technet.
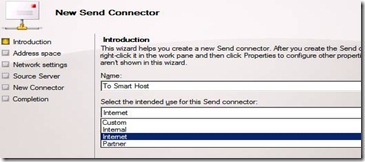
Figure 2. Specifying the intended use of your Send connector
2) Specify the Address Space
Once you’ve specified the purpose of your Send connector, we have to state the domain address space to which the connector will be used to send mail:
– A “*” in the Address indicates that this connector will route all domains that do not match the internal organization’s list of accepted domains.
– “Domain.com” in the address indicates that this connector is dedicated to sending email to domain.com addresses.
– “*.Domain.com” in the address space indicates that this connector is used for sending email to recipients in domain.com and any sub-domains.
– Cost is used to set the priority of this connector, used when two or more connectors are configured for the same address space. The lower the cost higher the priority.
– A Scoped Send connector identifies which Hub Transport servers can use this connector. Send connectors are objects stored in Active Directory and, as they are also an organization configuration object, can normally be used by any Hub Transport servers in the organization. If you want to restrict the scope of the Send connector, so as to limit its use to just within the AD site of the Hub server it was created on, then this option needs to be checked.
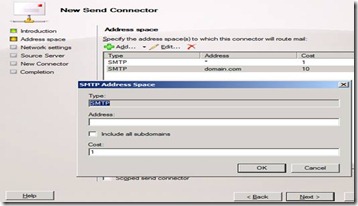
Figure 3. Configuring the address space of the new Send Connector
3) Configuring the Network Settings
The Network Settings determine how the message is to be routed to the destination SMTP server, and they can be configured to work in one of two ways:
1. Use DNS MX records to route mails automatically.
2. Route mails though to one or more smart hosts and let them handle the rest of the delivery.
The option to use Domain Name System MX records to route email automatically should be taken when you want your Send connector to talk directly with the destination SMTP server’s gateway and deliver the emails to that destination gateway itself. You need to make sure that DNS is properly configured for the server to resolve the Destination MX Records. This option is only available when you have selected Custom, Partner or Internet as your connector intent in step 1, above.
Alternatively, if you select the route mail through the following smart hosts option, you will need to supply one or more IP addresses or the FQDN of the smart host which is going to accept the email from this connector. Obviously, you need to make sure that the smart host is capable of delivering emails to the destination SMTP server.
If this send connector needs to resolve remote domains using External DNS server then check "Use the external DNS lookup settings on the Transport Server" as shown in Figure 4. When you use this check box you also need to make sure the each Hub Transport servers which communicates with the Internet hasits ExteernalDNSServers configured. To Configure External DNS servers on Hub Transport Servers, the command is:
Set-TransportServer <ExchangeServer> -ExternalDnsServer <ExternalDNSIPaddress1>,<ExternalDNSIPaddress2>
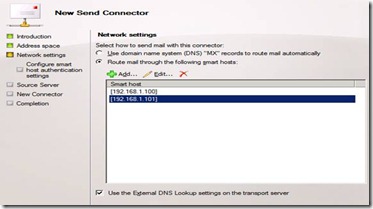
Figure 4. Specifying IP addresses for smart hosts.
Configuration of the connection(s) to the smart host(s) requires some additional steps to control authentication with the smart host server(s). The options available are:
– None : The smart host does not require any authentication, and it accepts anonymous connections.
– Basic Authentication: You will need to provide the smart host with an appropriate username and password to authenticate the connection. If you have multiple smart hosts, then you will need to make sure that they all allow access to the same username and password. Basic Authentication sends the credentials as plain text, and checking Basic authentication Over TLS will enable encryption on the communication.
– Exchange Server Authentication: This option authenticates the connection to a smart host using an Exchange authentication mechanism, such as TLS direct trust or TLS\Kerberos.
– Externally Secured: Select this option if the connection to the smart host is secured by external means, such as being physically secured over a private network or secured using Internet Protocol security (IPsec).
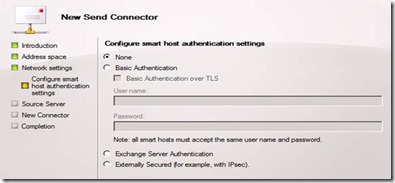
Figure 5. Authenticating the connection to the smart host.
4) Source Server Settings.
This is the final configuration step in which you need to identify which severs will be making use of the new connector to route emails. Adding only required servers helps to ensure that only specific servers are able to participate in email delivery to the Internet or other partner networks. Adding the required servers is simply a matter of clicking the Add icon at the top of the configuration pane, and supplying the necessary server names and details.
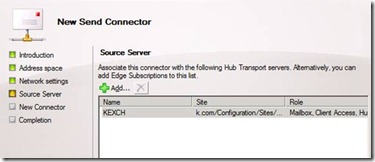
Figure 6. Specifying which servers will be using the new Connector
5) Create the Send Connector
Once you’re done with the configuration, then you can just click Next and then New to create the new Send connector. At this point, we are pretty much done with the creation of send connectors through the Exchange management console.
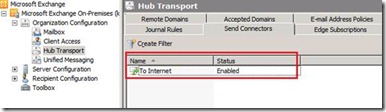
Figure 7. The newly-created Send connector, configured and active.
Exchange Management Shell
Creating the Send connector in Powershell is pretty easy, because it’s just a single command, although naturally you need to make sure the parameters are correctly provided. Below is the simple command to create the Send connector for sending mail to the Internet, and it will create exactly the same connecter as the one we created using the console.
New-SendConnector -Name ‘To Internet’ -Usage ‘Custom’ -AddressSpaces ‘SMTP:*;1’ -IsScopedConnector $false -DNSRoutingEnabled $false -SmartHosts ‘[192.168.1.100]’,'[192.168.1.101]’ -SmartHostAuthMechanism ‘None’ -UseExternalDNSServersEnabled $false -SourceTransportServers ‘KEXCH’
Post-Creation Configuration
There are some important configurations which you should consider after creating your Send connectors; specifically, things like MaxMessageSize, SMTPMaxMEssagePerconnection, Protocollogging etc. Adjusting these configurations on a Send connector can be easily done using the set-Sendconnector cmdlet:
Set-Sendconnector -Name ‘To Internet’ -MaxMessageSize 20 MB -smtpmaxmessageperconnection 25
If you’re not sure how your Send connector is configured, using the Get-Sendconnector cmdlet will give you more information on the connectors, which you may want to take a look at in order to better understand them:
Get-senderconnector -name "Connector name" |format-List
Receive Connectors
As the names suggests, this connector is used to receive incoming email from other Exchange servers, the Internet, partners, etc. Receive connectors are dependent on the Hub Transport Servers, and each Hub Transport server is created with two receive connectors; a default Receive connector (for SMTP) and a client Receive connector (for POP3 and IMAP)
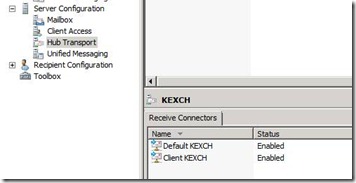
Figure 8. The two default Receive connectors on the Hub Transport Server role.
Each of these connectors has a specific configuration which we will take a look at shortly, and you can also create custom Receive connectors on the Hub Transport servers to act as secure relays within your organization. Each connector is associated with a local IP address and port number, and it’s also useful to define the IP address or range of IP addresses that a receive connector can accept connections and emails from, as well as the maximum message size, necessary authentication, permissions etc.
Initial Receive connectors on the Hub Transport Servers
As you can see in figure 8, each Hub Transport Server has two initial Receive connectors already in place: The default connector (for handling incoming SMTP email) and the client connector (for handling SMTP relay email). Both of these are configured to be secure by default, and it’s generally a good idea to keep them this way. Anonymous users permission is not enabled by default. Let’s take a closer look at these two connectors now:
Client [ServerName]
This connector is created when installing a Hub Transport server, accepts email from non-MAPI clients for SMTP relay, and is configured to use port 587. It can accept messages from any IP address and has permission to accept mail from Exchange Users, as they are basically authenticated users. The available authentication methods for use with this connector are: Transport Layer Security (TLS), Basic authentication, Exchange Server authentication, and Integrated Windows authentication. Only Exchange users have permission to use this connector.
Default [ServerName]
Also created upon server installation, this connector is configured to accept email from other hub servers and other servers on port 25 (the universal SMTP port). This connector is also configured to accept messages from any IP address, and it is configured with permissions for use by Exchange users, Exchange servers and legacy Exchange servers. The available authentication methods are: TLS, Basic authentication, and Integrated Windows authentication. Exchange users, Exchange users , Exchange Servers and Exchange Legacy Servers have permission to use this connector.
Custom Receive Connector
If you wanted a specific application server to be able to send email to an Exchange server then you can create a custom receive connector to accept email only from the specific application server. Configuration of Receive connectors to accept email from specific server and port is very important from a security point of view. This is so that we don’t allow any other application (such as a malware application) to use Exchange servers to relay email. To better understand Various configuration options available, let’s create a custom receive connector to suit our requirement and secure it.
First, access the Exchange Management console and navigate to Server Configuration > Hub Transport. Select the required Exchange Hub Transport Server from the upper result pane, and click on New Receive connector in the action pane Figure 9.
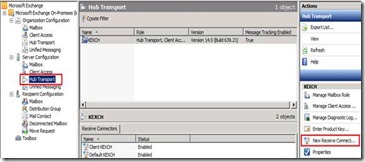
Figure 9: Starting the Receive connector creation process.
1) Specify the Intent of the Connector
As when creating a Send connector, provide a unique and appropriate name for the connector, and you now have various options for the connector’s intended use: Custom, Internal, Internet, Client and Partner. Each configuration has options for how clients can authenticate, interact with the local network, port configuration, the remote IP address range which can uses the Receive connector, etc. Let’s look at what each of the options provides us with:
– Custom: This selection provides the most flexible options to create and configure receive connectors. Eg. Custom is selected when you have specific application requirements for communicating with Exchange on a different port.
– Internet: This connector is open to messages from the Internet, and this setting provides the options to manage the connector’s local network IP addresses, ports and specific FQDNs, as well as providing anonymous and TLS authentication options.
– Internal: This option only allows you to actively restrict which local network IP addresses can use this connector. This setting also provides options for TLS and Exchange server authentication, as well as permissions for Exchange servers and legacy Exchange servers.
– Client: This setting only provides you with the option to change remote IP address settings. All Exchange users have permission to use this connector, and this setting also provides options for TLS, and also basic authentication with a TLS connection.
– Partner: Similar to the “Custom” setting, “Partner” provides the option to manage the connector’s local IP addresses, FQDNs and ports, as well as the accepted remote IP address range. However, it only provides permission to partners, and provides TLS and enables domain security authentication.
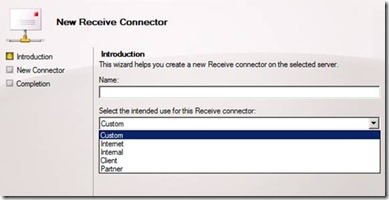
Figure 10. Specifying the intent of the new Receive connector.
2) Modifying the Local Network Settings
The next step in creating the custom receive connector is modify the local Network settings with the connector’s IP address (es) and specified FQDN details. As you can see from the text in figure 11, these settings control which IP addresses and ports the connector will use to receive mail.
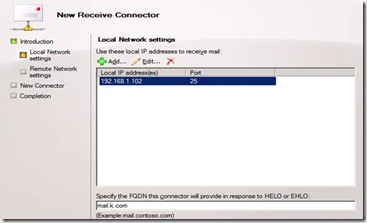
Figure 11. Defining the connector’s local network settings.
3) Managing the Remote Network Settings.
The next step is to control the range of remote IP addresses which can use this connector;:
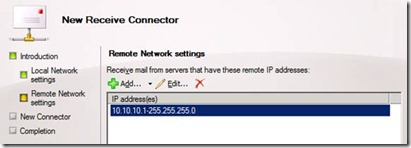
Figure 12. Controlling the range of remote IP addresses which the connector will receive mail from.
4) Create the Receive Connector
Once you are done with configuring your custom Receive connector, follow the final instructions of the connector creation wizard, and you should be able to see the new connector alongside the others in the Exchange Management Console:
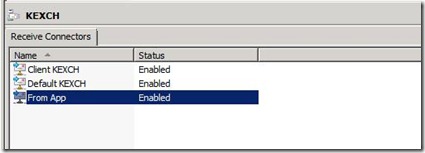
Figure 13. The newly-create Receive Connector
Exchange Management Shell
Creating the Receive Connectors in Powershell is pretty easy, because it’s just a single command, although naturally you need to make sure the parameters are correctly provided. Below is the simple command to create the Receive Custom connector for Receiving email on port 25, and it will create exactly the same connecter as the one we created using the console.
New-Receiveconnector -Name ‘From App’ -usage ‘Custom’ -Bindings ‘192.168.1.102:25’ -fqdn ‘mail.k.com’ -remoteIPrantes ‘10.10.10.1-255.255.255.0’ -Server ‘KEXCH’
Post Creation Configuration
Once this connector has been created, you can still manage and configure it either by right-clicking on it and examining its properties, or by using the set-receiveconnector Powershell cmdlet to do the same. The settings which are most worth your time are the various authentication options available and required for incoming connections, such as:
– Basic authentication
In Basic authentication username and password is send in clear text which is not recommended. It is always advice to select the check box Office basic authentication only after starting TLS. Once this check box is enabled then first TLS connection is established between Exchange and other entity and then basic authentication is performed.
– Integrated Authentication
When Integrated Authentication is checked then NTLM and/or Kerberos are used for authentication
– Exchange Server Authentication (Generic Security Services application programming interface (GSSAPI) and Mutual GSSAPI).
This is used when you wanted Smart host to authenticate using TLS direct trust or Kerberos through TLS
– Externally Secured,
Using this security mechanism that’s external to Exchange. The connection may be an Internet Protocol security (IPsec) association or a virtual private network (VPN)
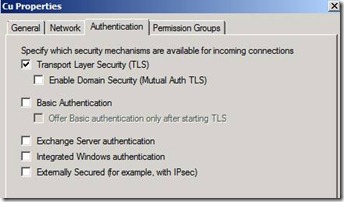
Figure14. Defining the authentication options for a Receive connector.
Once you are done with the authentication settings, now its time to configure permission groups. First of all we need to make sure that we don’t enable anonymous users which will allow this connector as open relay. So that any one cannot use this connector with out appropriate rights. Other options available are Exchange users, exchange servers, legacy exchange servers and partners.
Exchange users – Offers Basic Authentication over TLS for connection
Exchange users and Exchange servers – Offers TLS and Exchange Server authentication
Partner Permission – offers TLS and Enable Domain Security (Mutual Auth TLS) authentication. When you want a receive connector to receive email from a partner company over a TLS connection. More information on configuring Mutual Auth TLS can be found in TechNet.

Figure 15. Defining the Permission Groups allowed to use this connector
As already mentioned, Get-Receiveconnector also provides access to these settings, in case you prefer to use the Exchange Management Shell. Some of the options which are worth paying attention to are things like banner, maxinboundconnections, connection timeout, and protocol logging.
-MaxInboudconnections
This setting is to determine the maximum number of connections a receive connector can process at a single time.
-ConnectionTimeout
Connection Time out specifies how long connection can be established with the exchange server before it can Timeout.
-ProtocolLogging
Determine whether auditing is enabled on the connector. If is enabled then all the connection details and other related details will be logged. This can be very useful for troubleshooting issues.
-Banner
Banner is the message which is displayed when a connection is initiated with the Exchange server. The default banner can give server details. If you don’t want this information to be displayed then this can be changed using Set-Receiveconnector.
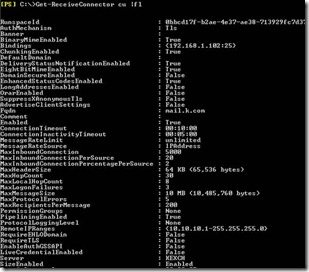
Figure 16. a screenshot of just some of the information available through get-receiveconnector.
If you want to modify a Receive connector, the Set-Receiverconnector cmdlet provides you with a quick method for doing this. You can find extensive documentation of this cmdlets parameters and switches in this TechNet article, but here’s a simple example:
Set-ReceiveConnector -Identity "Internet Receive Connector" -Banner "220 Banner Text here" -ConnectionTimeout 00:15:00
Foreign Connectors
Foreign connectors are used to communicate with 3rd party systems, but rather than use SMTP to communicate with these systems, it uses drop directories to communicate. For example, if Exchange 2010 wants to communicate with such a 3rd party system (which could be a server or an application), then it leaves the message in a drop directory on the Hub Transport server or Network Share. The 3rd party application then retrieves the message from the drop directory, and processes the emails.
Alternatively, if a 3rd party application wants to send a message into Exchange 2010, then it performs a similar action using the replay directory, which exists on the Hub Transport server; correctly formatted email message files that are copied to the Replay directory are submitted for delivery.
Foreign connectors are stored in Active directory and are available to all the Hub Transport servers in the organization, which then use foreign connectors to route emails to destination folders for a given address space. For redundancy, multiple Hub Transport servers can be added to the connector, so that if one server fails or is otherwise unavailable, then the email will be routed using an alternate Hub Transport server.
In Exchange 2010, foreign connectors use Delivery Agent connectors to route email to the foreign systems. Delivery Agent connectors ensure that the messages intended for foreign systems are inserted into the appropriate queues on the Hub Transport servers that are used for delivering such messages. After the messages are queued, the delivery agent is invoked by Connection Manager, and the agent handles the actual delivery of the message to the foreign system.
Creating and Configuring a New Foreign Connector
For the sake of speed, we’ll handle this task using the Exchange Management Shell; once you’ve got the shell open, we run the New-Foreignconnector command, which is extensively documented on TechNet:
New-Foreignconnector -identity "ForeignConnector" -AddressSpaces "fax:*" -SourceTransportServers "Hub01.domain.com","Hub02.domain.com"
In Figure 17, we are trying to create a foreign connector for the Fax application, with the address space “Fax:*”, and making use of just a single Hub Transport server called “Kexch”. Naturally, any fax messages would use this connector:
New-Foreignconnector -name "foreignconnector" -addressspace fax:* -sourcetransportserver Kexch

Figure 17. Running the New-Foreignconnector cmdlet, and seeing the results.
Once you have created the connector, you can easily modify it based on your requirements using the Set-foreignconnector cmdlet. Below I have specified the drop directory for my new connector, and set the maxmessage size to 10 MB.
Set-Foreignconnector -Identity "Foreignconnector" -Maxmessagesize 10MB -dropdirectory C:\DropDirectory
Linked connector
As the name suggests, this is a situation where a Receive Connector which is linked to a Send connector (and so it is a relationship, rather than an actual connector in itself), and it exists for a very good reason. This connector is used when you have 3rd -party anti-spam and anti-virus systems (such as postini) processing your messages at a vendor’s location or on a different server. In that situation, you need to ensure that all the incoming email passes through the 3rd party appliance, and then receive those emails back once the email scanning and filtering is completed, and this is what the Linked connector enables.
Linked connectors are created on Hub Transport or Edge Transport Servers and, thankfully, can be used without changing your existing configurations, such as your MX records, Sender Policy Framework etc. Let’s look at how we can create Linked connectors on the existing network:
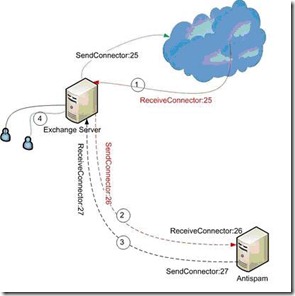
Figure 18. Simple network routing topology, including a pair of Linked connectors routing messages to an anti-spam service.
Let’s take a quick look at the setup in Figure 18: Image Source
Sendconnector:25 and Receiveconnector:25 are the two connecters configured to send and receive all email between the internal network and the Internet. When we want our email to be scanned by anti-spam servers, we need to create and configure the connectors between our internal network and those external servers, and then create an appropriate link to our existing connectors to allow for that.
First, we need to create the new Sendconnector:26, and link it with the receiveconnector:25, and configure the Send connector to deliver incoming email (from step 1 in the image) to the anti-spam solution (step 2 in the image). Next, we need to create the new Receiveconnector:27 to receiving email back from the anti-spam solution (step 3), and deliver that email to the internal Exchange server, which will then distribute the email to the appropriate users (step 4).
That sounds simple enough, so let’s create the new sendconnector:26 and Receiveconnector:27 connectors, and configure the link between receiveconnector:25 and Sendconnector:26
Creating and Configuring Linked Connectors
In the command below, we are creating a new Send connector and using the linkedreceiveconnect command to link the new connector with the existing Receiver. The -SmartHosts parameter allows you to enter the details if the anti-spam server. DNS routing needs to be disabled. Normal send connectors are configured with DNS for delivering emails to the remote domains. This Send connector is linked with receive connector to forward email to specific server and there is no need for DNS routing, hence DNS routing is set to $false. Smart host authentication is set to Externalauthoratative. Extenalauthorative authentication is used when the connection is fully secured between exchange server and Smart Host (Anti Spam Server). Once Enternalauthorative is set then any client can connect to Exchange sever as Authorized Server. Below is the Powershell command to create new Send connector:26 and link with receive connector:25 to deliver all the incoming emails from the internet to smart host.
New-SendConnector -Name "Sendconnector:26" -LinkedReceiveConnector "Edge01\Receiveconnector:25" -SmartHosts antispam -SmartHostAuthMechanism Externalauthoratative -DNSRoutingEnabled $False -MaxMessageSize unlimited
Now let’s create the new Receive connector for receiving email back from the anti-spam server. The new-receiveconnector cmdlet below creates a new connector with externalauthoratative authentication and the remoteIPrange set to the anti-spam server.
New-Receiveconnector -name "Receiveconnector:27" -AuthMechanism externalAuthoritative -RemoteIPRanges antispam
Routing Group Connectors
Routing Group connectors are connecters between Exchange 2010/2007 servers and Legacy Exchange 2003 servers for internal mail-flow between them. A RGC does not need to be created between Exchange 2010 and 2007, communication happens automatically. Bidirectional instances of these connectors are installed by default when you introduce a new Exchange 2010 Hub Server into the Exchange Organization. Or rather, are created during the installation; one each for mail flow between Exchange 2003 and Exchange 2010, and between Exchange 2010 and Exchange 2003.
Exchange 2003 uses a link state routing table to maintain routing information on how email is routed in organization, and this table is updated when the routing group master effects a change in the mail routes.
However, Link State routing isn’t used at all in Exchange 2010, which instead communicates with the Hub server directly and uses AD site cost to determine the shortest routing path. We can create multiple Routing Group connectors between Exchange 2003 and Exchange 2010, but if we do, we will need to make sure that Link state updates are suppressed so that message looping does not occur when route is recalculated.
Let’s take a look at how to create new Routing Group connectors, and also how to modify them to add additional source and target servers for redundancy in the event of a server failure.
The New-Routinggroupconnector cmdlet below creates a new Routing Group connector. In terms of settings, the Sourcetransportserver and TargetTransportservers need to be specified, and the Bidirectional setting controls whether this connector to allow for two-way or one-way mail flow. If bidirectional is set to $true, then two connecters will be created, as a reciprocal connector is created in the target routing group.
New-RoutingGroupConnector -Name "RGCBidirection" -SourceTransportServers "Hub2010a.domain.com" -TargetTransportServers "Bridgehead2003.domain.com" -Cost 100 -Bidirectional $true
For redundancy, we can add multiple source and target transport servers into the existing “RGCBedirection” connector using the Set-RoutingGroupConnector cmdlet:
set-RoutingGroupConnector -Identity "RGCBidirection" -SourceTransportServers “Hub2010a.domain.com”, “Hub2010b.domain.com” -TargetTransportServers " Bridgehead2003a.domain.com”,” Bridgehead2003b.domain.com"
And lastly, if you want to get the complete status on the newly created and configured routing group connectors, the you just need to use the Get-RoutingGroupConnector cmdlet like so:
Get-Routinggroupconnector -identity "RGCBidirection" | format-list
If you want a deeper understanding of the New-RoutingGroupConnector cmdlet, extensive details are once again available from Microsoft TechNet. Likewise, there is a huge amount of information available on the Set-RoutingGroupConnector and Get-RoutingGroupConnector cmdlets.
Conclusion
With this I would like to conclude my article. I hope this article is informative for the administrators to understand all the Exchange 2010 connectors, configuration and their applications.
In this article I have tried to create and configure connector using both Exchange management console and Exchange management shell. Creating and configuring using Powershell is always easy but we need to make sure that all the required parameters are used correctly. Some connecters like linked connectors cannot be created using Management Console, it always needs to created and managed only using Powershell. Creating and managing using management console provides with limited option. Powershell Set-* and Get-* cmdlets allows exploring various advanced option which cannot be done using management console. Set-* Powershell cmdlets allows connectors to be configured at a granular level.


