Exchange 2013 CAS Configuration In-detail

Exchange 2013 has brought major architecture changes and now there are just two roles – Client Access Server (CAS) role and Mailbox Server role, whereas the previous version of Exchange had five server roles.

Mailbox Server role: It includes traditional features like Mailbox Database, transaction logs, but now it also hosts Client Access protocol, Transport service and Unified messaging server.

Client Access Server role: It is an office client access protocol like HTTP, POP and IMAP and SMTP. Outlook no longer uses RPC to connect to the Client Access Server, it uses RPC over HTTPS (also known as Outlook Anywhere) and Outlook client doesn’t connect using fully qualified domain name (FQDN) or CAS Array as it was done in all previous versions of Exchange. It uses user’s mailbox GUID + @ + the domain portion of the user’s primary SMTP address to connect to the mailbox. This is a huge benefit to overcome limitations and complexity of Exchange 2010 RPC Client Access service on the Client Access Server.

To read about more on this topic, please use the below link at blog.netwrix.com

Exchange 2013 CAS Configuration – PART 1

Exchange 2013 CAS Configuration – PART 2

Netwrix Active Directory Change Reporter

Auditing is one of the most complex activities of the Windows Active Directory. Monitoring the changes and reporting immediately makes it very challenging for administrators. I would say that Netwrix Active Directory Change Reporter is one of the best tools available in the market with comprehensive collection of features to audit changes in Active Directory and report on them. It has a very robust way of checking, if any modification/change was done to Active Directory objects. It uses both Active Directory event logs and also takes the Active Directory snapshot to compare the data and get a consolidated report on who made the changes, what was changed, when and where exactly. These changes are logged into a local database and are stored in the SQL server for reporting purposes. It is a unified solution for a complete Active Directory auditing, reporting and monitoring.

The Latest version of Netwrix Active Directory Change Reporter is 7.2.721 and it is available in two flavors, Freeware and the fully loaded Enterprise Edition. Free version has limited functionality features and can be used for an unlimited time period. Enterprise version has lots of auditing and reporting options which will make the life of an Active Directory administrator easier and allow him to get necessary data right in the finger tips. It can be evaluated free of charge for 20 days.

Netwrix Active Directory Change Reporter tool supports Active Directory starting from Windows 2000, Windows 2003, Windows 2008 and even the latest Windows 2012 Active Directory environment.

Requirements:

It has other basic technical requirements to function.

1. Intel or AMD Processor with Minimum of 2 GHz for 32 bit processor or 3 GHz for 64 bit    processor is recommended

2. Memory 2 GB and above

3. Minimum of 50 GB disk for installation and an addition space for user, event and other necessary logs.

4. Active Directory permission to query an Active Directory

5. SQL server – SQL server 2005 Express Edition or above with an advanced service of SQL server, SQL server reporting tool and permission to generate reports.

6. Group policy management console to audit Active Directory Group Policy.

Required details of the tool can be found below link.

http://www.Netwrix.com/download/QuickStart/Active_Directory_Change_Reporter_Quick_Start.pdf

Native Active Directory tools do not provide a great flexibility to audit Active Directory changes and to report immediately. Raw data generated by the Windows native tools are always difficult to understand, analyze and it is an extremely time consuming process to analyze tons of logs. Most the times it is too late to analyze the logs as they would be overwritten. Netwrix solution for Active Directory Auditing overcomes these problems by saving the data in the SQL server.

There are also agents available for installing on the domain controller and these agents are optional. It helps to compress the data across the network and it is necessary if a change reporting tool is collecting data over the slow network but it should not make much of a difference if you are on a high speed network. Definitely it would be recommended to have agents installed in order to make the best utilization of all available networks.

Netwrix Active Directory Change Reporter also has some supporting tools like Group Policy Change reporter and Exchange Change Reporter. These two go very well with the Active Directory Change Reporter. Group Policy changes are critical and must be executed very carefully. Any mistake in Group Policy changes can have a big impact and not everyone in the organization has permission to modify the Group Policy. Netwrix Group Policy Change Reporter comes in handy to get complete details of the GPO with the details like who made the change, when was it made and also has details about “before and after” values more modified settings.

Exchange Change Reporter is another additional great component. Exchange is one of the business critical application and any downtime will have a major impact on an organization. Exchange Change Reporter keeps track of any addition, deletion, modification of the exchange attributes and generates reports on the changes. It also provides details about “before and after” values. The tool supports the earlier version of an exchange like the Exchange 2003, 2007 and 2010. The latest version of the Exchange Change Reporter supports Microsoft Exchange Server 2013 environment, which is one of the latest promising product of Microsoft.

­­­­­­Let’s understand some of the features of Netwrix Active Directory Change Reporter and what it can do for us.

It provides in-depth change details about every Active Directory object, its attributes and also includes security changes. Changes can be addition, deletion or modification of Active Directory objects and It includes complete details like, who made the changed, what was changed and where.

It provides a real time reporting where an administrator or the security team can be notified with an email or SMS immediately after the change is detected. It also integrates with Microsoft SCOM using SCOM Management pack which captures Active Directory data and feeds into the SCOM for reporting and alerting. It also provides flexibility to integrate with other third party reporting tools available in your organization.

All reporting information is stored in SQL Server, where an administrator can manually query, generate custom and automated reports. Reporting is one of the key features and it can generate some predefined reports for the purpose of compliance regulations like SOX, HIPAA, GLBA, and FISMA. As these regulations require storing the data for later review the tool provides the long-term storage option. These long-term storages can be also at different servers other than the SQL server. By default, the long-term audit archiving is done for 24 months and these settings can be changed, if required. It can also generate daily reports with all the change details performed during the previous day. The product provides an administrator with a console view and gives a great flexibility to query and generate reports with ease.

Any kinds of accidental changes have to be rolled back immediately and this tool provides option to roll back all accidental or unwanted changes using roll back wizard. Performing this kind of roll back/restore operation using native windows tool is cumbersome and has many limitations. This tool performs a smooth, quick and an easy roll back from all kinds of accidental or unwanted changes. This overcomes any downtime, security risk or ill effects caused due to accidental changes.

It can be easily installed on any workstation with latest Windows OS like Windows 8 or on a server OS like windows 2012. It just has to be setup once and it runs forever. It can query and manage multiple domains from a single installed machine and can even manage multiple domains with its own unique settings. This gives lot of flexibility to manage and modify the settings based on the business requirement.

It provides an easy option to query and generate default and custom reports from the management console. It has got all necessary filters like timelines (from-date and to-date), types/kind of changes, where the changes were made and it also provides an option to specify an individual domain and individual forest. It has a great flexibility, which helps to get any data from any domain and any forest within no time. Finally, once you have all the data in the report then it can be easily exported into CSV, Excel, PDF, Word or even a Tiff format.

Reports come in an easy understandable format with color coding. Actions like adding, removing, modifying all highlighted with different colors. Most importantly, it gives clear information on who made these changes, when they were made and what was done. With this you can find all the necessary data/reports from one location and you really don’t have to depend on multiple logs or have in-depth knowledge to analyses and understand the logs from different locations.

Active Directory snapshot is one of the best features of this tool. It takes Active Directory snapshot at multiple points and keeps it in the database. It helps to look back at a specific AD object and what settings were in the past. These details can be viewed through reporting custom queries and these come under an advance reporting tool that requires some configuration before using it.

Real-time altering is one of the key components for any reporting tool to notify on any critical changes. By default Netwrix Active Directory Change Reporter provides the real-time alerts option for the below mentioned groups and you can also add more users or groups, if necessary.

· Changes to Admin Group

· Changes to Domain Configuration

· Changes to any Active Directory Object

These real-time alerts can be sent via email or a text message right to the mobile device.

Netwrix Active Directory Change Reporter is very easy to install and configure. It needs some necessary configurations to function as required and these configurations can be made easily using wizards. Supported by other tools like Group Policy Change Reporter and Exchange Change Reporter it provides a great management option for IT administrators and security team. It will save a lot of time and energy of the administrator helping to avoid writing custom scripts or manual/LDAP queries to get the data for auditing or management purposes.

With this, I would like to finish my article saying that “Netwrix Active Directory Change Reporter is a great tool which is helpful for IT administrators and security teams”.

Use this link download Netwrix Active Directory Change Reporter: http://www.netwrix.com/active_directory_change_reporting_freeware.html

Exchange Autodiscover in a multi- forest environment

Most of the organization have Exchange multi-forest environment. Organization could be in multi forest environment because of the merger and acquisition or it could be because of security reason. Auto discover is the new feature introduced in Exchange 2007 and its been carried forward in all the subsequent version of exchange like Exchange 2010 and Exchange 2013.

Below link should give you good understanding on the information about

Exchange Autodiscover in a multi-forest environment  1

Exchange Autodiscover in a multi-forest environment 2


Hope you got some good understanding on Autodiscover in Exchange 🙂

Exchange Jetstress – Determine maximum disk subsystem throughput

JetStress is a tool for Architects and administrator to test the storage if it can suites your requirement. Through understanding of the Jetstress is important. Proper desiging and right testing with Jetstress make your design a robust solution.


Link: Determine throughput of disk subsystem using Jetstress

Exchange 2010 Load balancer Preferred persistence Method

In Exchange 2010 load balancer are used to load balance Client Access traffic. Client Access server play a major role now and all types of clients connect to it. It is important to configure load balancer with correct preferred persistence method for different user traffic. So I thought we should have some quick reference guide so we can refer any time. I got this form one of the MS tech.ed presentations


Active Directory Cross Forest Migration from Active Directory 2003 to Active Directory 2008 – Part 2

This is continuation of Part 1. Please continue with part two

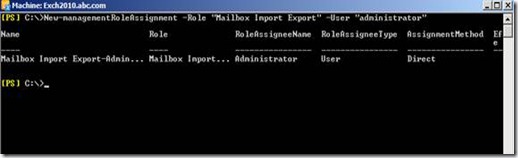
Creating and configuring ADMTAdmin Service account

Now we need to create and configure ADMT service account to make sure ADMT service account (admtadmin) account has appropriate rights to perform the migration tasks

1. Create a Server account admtadmin in green.com and add the green\admtadmin to the local domain admin group of green.com

2. Connect Red.com active directory users and computers and add green\admtadmin as member of built in Administrators group

Figure 17. Adding “green\admtadmin’ as the member of built-in administrators group in red.com

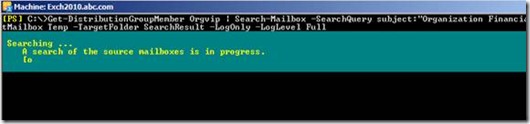
Preparing and configuration PES (Password Export Server)

1. Login to the domain member server in green.com where the ADMT tool is installed and run the below command. This is to generate the encryption key for importing in to import it the source domain controller. This command will generate the encryption key file at C:\Pes.pes and it will prompt for the password and confirm password.

admt key /option:create /sourcedomain:red /keyfile:”c:\PES.pes” /keypassword:*

Figure 18. Exporting Encryption key from ADMT server

2. Copy the file C:\pes.pes to the root Directory (c:\) source(red.com) domain controller

3. login to source domain controller (red.com) and install the PES tool.

4. During the installation it will prompt for the location of the encryption key. Click on browse and point to the encryption file which was copied recently (C:\pes.pes) and click on Next

Figure 19. Importing Encryption key file into the Password export server

5. Enter and confirm with the same password with used to which exporting the encryption key at point 1 above and click on next

Figure 20. Confirming with password for importing encryption key

6. It will prompt to PES Service account. Specify the account green\admtadmin account with the password and click on ok to continue. Once configuration is completed, server will prompt for the reboot and confirm to reboot the server.

Figure 21. providing green\admtadmin service account to run the PES serve service

7. Password Export server will not start automatically. It has to be start manually. Only start when ever required or when ever migration is performed.

Figure 22. Password Export server service is disabled by default

8. Right click on the service and select start. you should be able to see the started status on the services console

Figure 23. Password export server service status after manually starting the service

configuring source domain controller(red.com)

Once PES service is configured then we have to configure registry to allow password export. Below is the steps to perform the same.

1. Login to the domain controller and start registry editor (regedit)

2. Navigate to HKEY_LOCAL_MACHINE\SYSTEM\CurrentControlSet\Control\Lsa

3. Access Allowpasswordexport and change the value form  0 to 1

Figure 24. Enabling password export settings from the registry

Disable SID Filtering

if we need SID history on the target domain, then we have to disable SID filtering. Run the below command on the target domain to disable SID filtering

netdom trust source.com /domain:target /quarantine:No /usero: source_admin_act   /passwordo: source_administrator_pwd

Figure 25. Disabling SID filtering


Migrating User from red.com and green.com

1. We will be migration user krishna.kumar from red.com to green.com. We can verify and make a note of user objectsid from the source domain with the help ldp tool or simple ldap query.

Figure 26. ObjectSid details of user krishna.kumar

2. login to the target domain member server with the green\admtadmin where ADMT tool is installed

3. Start Active directory migration tool from administrative tools

4. right click on the Active Directory Migration tool and select User Account migration wizard and click on Next

Figure 27. Starting the User Account Migration Wizard

5. Select source domain,source domain controller and Target domain and target domain controller and click on next

Figure 28. Source and Target domain details for migration

6. Select users from the domain under User Selection option and click on next

Figure 29. Manual user selection

7. Add the user krisha.kumar and click on next

Figure 30. Adding krishna.kumar for user migration

8. Create a Target OU in Target domain and point to the same to create the migrated user account

Figure 31. Select the target OU where the migrated used should be created

9. Select the option Migrate passwords

Figure 32. Selection migrate Password option and select the source domain controller

10. Select the option Target same as source and also enable to the option Migrate user SIDs to target domain and click on Next

Figure 33. option to selected on how to handle migrating accounts

11. Type account from the source domain which has administrative rights and click on next

Figure 34. Admin account for adding SID History on migrated account

12. Select some of the import option likes update user rights, Migrate associated user group, fix users group membership and click on next

Figure 35. Option to migrate associated user groups, profiles and settings

13. Entire AD properties will be migrated to the target account. Just in case if you need any kind of properties execution then figure 36 shows the option to exclude the same.

Figure 36. Option to execute ad properties on the migrating objects.

14. keep the default option do not migrate source object if the conflict is detected it the target domain and click on Next

Figure 37. Conflict management option

15. Click on Finish to kick start the user migration

Figure 38. Finishing the user migration

16. Once the migration is completed, you should be able to see the details on the screen. To get some advance or log detail, click on view log

Figure 39. Migration progress status

17. log file has some very good amount of information on what exactly happened during the migration. Details like Account been replicated, created, SID history added, password copied and other group membership details etc.

Figure 40. Migration log details

18. On the target domain we can see the Krishna.Kumar is create with all the group membership and also see that associated groups is also been migrated to the destination. You can also verify the entire user properties.

Figure 41. krishna.kumar user property after migration with group membership details

19. We can also verify the object Sid and Sid history been crated on the new object in the target domain. Sid history is the same source objectsid.

Figure 42. Objectsid and SidHistory details of krishna.kumar after migration

20. To check if the password is been copied, login to one of the client computer with the same password as the source domain. Below figure 43. shows the details of the login account with the domain name.

Figure 43. login details on krishna.kumar on the green.com workstation

Active Directory Cross Forest Migration from Active Directory 2003 to Active Directory 2008 – Part 1

When we say cross forest ad migration then the first thing which comes to the mind is Active Directory Migration Tool. It’s a free and very easy and powerful tool from Microsoft. Doesn’t look very fancy but does its task. There are various tools available in the market to perform cross forest migration but at we will talk about ADMT and its features and how we can use it. Before you work on ADMT in the production, you need to perform through understanding of the ADMT, test it in the lab and then it to the production.

Note: Not performing through testing can be distractive for the users. Users may lose password, lose share access and you will be in trouble.

ADMT features

1. It provide various wizards to migrate User accounts, computers accounts, service accounts, Group

2. Migrate Sid History which helps user to maintain the access to network share, application and other services even after the user been migrated to different forest

3. Migrate password form source forest to target forest.


Red.com Green.com

Current Lab Setup

Red.com DomainGreen.com Domain
Domain controller (windows 2003) Domain controller(windows 2008)
following Software installed in Source domain controller
PES 3.1(Password Export Server)  
Domain member Server(windows 2003)
following Software installed
ADMT 3.0(Active directory migration tool)
.net Framework version 2.0
SQL 2005 with latest service pack

Installation of ADMT tool on the Domain member Server

Please follow the below process order to install prerequisites and ADMT. If you have domain member server is windows 2008 or Windows 2008 R2 then you can install the latest version of the ADMT 3.1 or 3.2 respectively. In my lab I have the domain member server as widows 2003 so I am forced to install ADMT 3.0

  1. Install Microsoft .NET Framework Version 2.0 Redistributable Package (x86)
  2. Install SQL 2005
  3. Install Latest SQL service pack
  4. Install ADMT tool and accept the default database selection (If SQL 2005 is not installed prior to installing ADMT tool then it will automatically install Microsoft SQL Server Desktop Edition)

DNS Configuration between forests

DNS Configuration is a one of the primary requirement to communicate between two forests

DNS can be configured in two ways, either by creating secondary zone or forwarders. Configuring forwarders is much easier then creating secondary zone. Secondary zone has a read-only copy of the particular domain but forwarders are just forward the request to the target domain. Response to the DNS request is much faster in secondary zone than forwarders

Let me show you show to create secondary zone.

  1. Login to Green.com Domain controller
  2. Access DNS Manager
  3. Right click on the forward lookup zone and select New zone and click on Next

Figure 1. Creating new Zone

   4. Select Secondary zone and click on Next

Figure 2. Creating new Secondary Zone

   5. Provide the target domain name and click on Next

Figure 3. Providing DNS Zone name

6. Provide red.com DNS server IP address and click on Next and click on finish to complete the configuration

Figure 4. Configuring with Master DNS server of red.com

7. Need to follow the above same process (1 to 6) on the red.com DNS server to create the secondary zone for green.com domain

Cross forest trust configuration

1. Connect to the Target domain controller (green.com) and access Active directory domain and trusts from the Administrative tools

2. Right click on Active directory Domain and trusts and click on properties.

Figure 5. Starting with Trust configuration

3. Select the Trust Tab and click on new Trust and select next on welcome screen

Figure 6. Trusts tab to start the new trust configuration between forests

4. Provide the trust name with the source domain red.com and click on next

Figure 7. Domain name which you wanted to trust

5. Select external trust, as you cannot create cross forest trust between AD 2003 and AD 2008 and click on next

Figure 8. Configuring External trust

6. Select “two way” trust and click on next

Figure 9. Selecting Two-way trust option

7. Select the option “both this domain and the specified domain”

Figure 10. Option to select trust on both from red.com and green.com

8. Input the source (red.com) account which has administrative privileges and click on next

Figure 11. Passing account having administrative privileges on red.com

9. Select “Domain-Wide authentication” for red.com and click on next

Figure 12. Selecting Domain-wide authentication on outgoing trust for local domain

10. Domain wide authentication for the local domain and click on next

Figure 13. Selecting Domain-wide authentication on outgoing trust for specified remote domain

11. Select “yes, confirm the outgoing trust”

Figure 14. Confirmation to create outgoing trust

12. Select “Yes, confirm the incoming trust” and next and click on finish the configuration.

Figure 15. Confirmation to create incoming trust

13. Successfully created outgoing and incoming external trust between both the forest

Figure 16. Successful status of external trust creation.


I hope you like this part of the article will soon come up the other parts of the articles.

Exchange 2010 SP1/SP2 – Deleting email sent to Wrong DL

As an Exchange Admin, how many times have you got a request to delete email, from your senior management, for deleting specific emails from specific mailboxes? I am sure most of you would say, ”Its Crazy Man”. I personally have seen very important emails being sent to a wrong DL and management coming to us for help. Users may even try to recall the message, with only some being successful. This would add a new set of emails in the mailbox. There can also be situations like, where Spam emails are sent to the DL users’ mailbox, or there is a requirement to delete emails between specific dates. These are the various possible requirements from users, and it does not come as a surprise to me.

In Exchange 2000 and 2003, this can be achieved by using Exmerge.

In Exchange 2007, this can be achieved by using export-mailbox and this cmdlet has enhanced in Exchange 2010 to New-MailboxExportrequest. The cmdlet does not comes with the option to delete the contents. MS also have added couple new cmdlets to export and import the content of the mailbox

In Exchange 2010, this can be achieved using search-Mailbox

Here are simple steps for the Exchange Admins, who can get this task done real quick in Exchange 2010 SP1/SP2 using search-mailbox. But, keep in mind that, these steps suggest permanent deletion, which removes emails from dumpster as well. So only option to recover is go back to backup.

  1. In Exchange 2010, if you want to Import and Export mailbox content and delete unwanted email from the mailbox then, you need to have Mailbox Import Export management role assigned.
  2. Below Powershell cmdlet, New-ManagmentRoleAssignment helps us to assign the right management role “mailbox Import Export” to a particular user.
New-managementRoleAssignment –Role “Mailbox Import Export” –User administrator

Figure 1.  Assigning a new Management role for a user Administrator

3. Similarly if you want to have the permission assigned to a group of users, then you can use the below cmdlet. Make sure you assign the permission to the universal security group.

New-ManagementRoleAssignment -Name "Import-Export Admins" -SecurityGroup "Security group name" -Role "Mailbox Import Export"

4. Once you have the necessary permission to run the search-mailbox then, we are good to start. Lets start with search and on logging mode, so that we have the search result logged in the target mailbox

5.  Below is the Powershell cmdlet search-mailbox, which goes through each mailbox in distribution group OrgVIP, in log only mode. It will generate the report on the log, in the Target mailbox temp, under the folder the Search result. Figure 2. shows the details of the execution.

get-DistributiongroupMember Orgvip | Search-Mailbox -SearchQuery subject:"Organization Financial Report" -TargetMailbox Temp -TargetFolder SearchResult -LogLevel Full

Figure 2. Execution details of the Search-mailbox cmdlet with logonly mode

6. With loglevel Full option the cmdlet will generate the CSV in the target mailbox. Figure 3. shows the details of the CSV result file.

Figure 3. Details after execution of search-mailbox in log only mode.

6. It’s always recommended to have a copy of these emails, which are being searched for, as a back-up reference. To get a copy of all the reference email, just remove the -logonly option

get-DistributiongroupMember Orgvip | Search-Mailbox -SearchQuery subject:"Organization Financial Report" -TargetMailbox Temp -TargetFolder SearchResult -LogLevel Full

7. Figure 4. Shows the details of the searched emails in the target mailbox. It has the copy of the emails with the detail location. If an email is deleted/moved, it will show the current location folder, and if it is moved to the dumpster, then the result would also show the dumpster folder details.

Figure 4. Copy the searched email to the target mailbox.

8. Finally we have the copy of the emails. Now, It is time to delete the emails. Below is the Powershell cmdlet, which searches each mailbox from the DL and deletes the contents. To delete the content we need to use the option Deletecontent. You really don’t have to provide the target mailbox parameter for deleting the emails.

get-DistributiongroupMember Orgvip | Search-Mailbox -SearchQuery subject:"Organization Financial Report" -DeleteContent

9. The search query is the important attribute of the cmdlet. It can be passed with various options, to get more accurate search results. TechNet Reference

PropertyExample
Attachmentsattachment:annualreport.pptx
Cccc:paul shencc:paulscc:pauls@contoso.com
Fromfrom:bharat sunejafrom:bsunejafrom:bsuneja@contoso.com
Sentsent:yesterday
SubjectSubject:”patent filing”
Toto:”ben Smith” “to:bsmithto:besmith@contoso.com”
BodyFinancial Report

10. Couples of various situation to use search-mailbox with delete content

A. Searching and deleting email containing attachment spam.csv in all the mailbox in the organization

get-mailbox -resultsize unlimited | Search-Mailbox -SearchQuery attachment:"spam.csv" -DeleteContent

D. Searching and deleting emails containing attachment spam.csv and subject is hi against all the mailbox in the organization

get-mailbox -resultsize unlimited | Search-Mailbox -SearchQuery 'attachment:"spam.csv" and subject:Hi' -DeleteContent

C. If you wanted to display the details of the search result on the shell then you need to use the option Estimateresultonly

get-mailbox -server <Servername> | Search-Mailbox -SearchQuery 'attachment:"spam.csv" and subject:Hi' -Estimateresultonly

D. Delete all the email from all the mailbox of a before the specific date. In the below example I am deleting all the email before the date 18th Sep 2011(“dd/mm/yyy’)

get-mailbox -database <Databasename> -resultsize unlimited | Search-Mailbox -SearchQuery Received:<$("09/18/201") -deletecontent

E. Delete all the email from all the mailbox of a database between the specific dates. In the below example I am deleting all the email before the date 18th Sep 2011(“dd/mm/yyy’) – 1st Jan 2012

get-mailbox -database <Databasename> -resultsize unlimited | Search-Mailbox -SearchQuery Received:<$("09/18/2011") –deletecontent

F. Delete all the email from the mailbox between the specific date

Search-Mailbox -Identity <mailboxname> -SearchQuery 'Received:>$("09/18/2011") and Received:<$("01/27/2012")` -deletecontent

G. Delete all the email from yesterday against the member of the distribution group.

get-DistributiongroupMember Orgvip | Search-Mailbox -SearchQuery Received:today -deletecontent -confirm:false   

H. Delete all the email on a specific date from a specific mailbox.

Search-Mailbox <usermailbox> -SearchQuery Received:01/27/2012 -deletecontent

Search-mailbox is a cool and nice cmdlet with some good options to get the required result. I think this is make life of the exchange administrator easier on a tough situations. Hope this helps you to face a real time scenarios