Powershell script to send mail

Below Powershell script can be used to send mail using SMTP server. It reads every line from the text file and adds to the body of the email and sent it.

  $emailFrom = “Fromaddress”
 $emailTo = “Toaddress”
 $sub = Date
 $subject = “Subject ” + $sub
 $UserList = Get-Content “C:\Details.txt”
 $body = “”
 foreach($user in $UserList)
  {
     $body = $body + $user + “`n” # ‘n represents the new line escape sequence
  }
 $smtpServer = “SMTPServer”
 $smtp = new-object Net.Mail.SmtpClient($smtpServer)
 $smtp.Send($emailFrom, $emailTo, $subject, $body)

Setting Mailbox Quota Limits in Exchange 2007 throught Powershell

Command to set MailBox Quota limits on all the stores in Exchange 2007  environment.

Get-Mailboxdatabase | Set-mailboxdatabase -ProhibitSendReceiveQuota 2GB -ProhibitSendQuota 1GB -IssueWarningQuota 900MB


Command to set Mailbox Quota limits on all the stores on the specific exchange server

Get-Mailboxdatabase -server $Server | Set-mailboxdatabase -ProhibitSendReceiveQuota 2GB -ProhibitSendQuota 1GB -IssueWarningQuota 900MB


Command to set Mailbox Quota limits on all the stores on the specific exchange server except on the specific store

$Server =<ExchagneServername>
$DB =<Databasename>
Get-mailboxdatabase -server $Server | Where {$_.Name -ne $DB} | Set-mailboxdatabase -ProhibitSendReceiveQuota 2GB -ProhibitSendQuota 1GB -IssueWarningQuota 900M


Powershell Command to set Mailbox Quota limits on a specific store in a given Exchagne 2007 server

$Server =<ExchagneServername>
$DB =<Databasename>
Get-mailboxdatabase -server $Server | Where {$_.Name -eq $DB} | Set-mailboxdatabase -ProhibitSendReceiveQuota 2GB -ProhibitSendQuota 1GB -IssueWarningQuota 900M

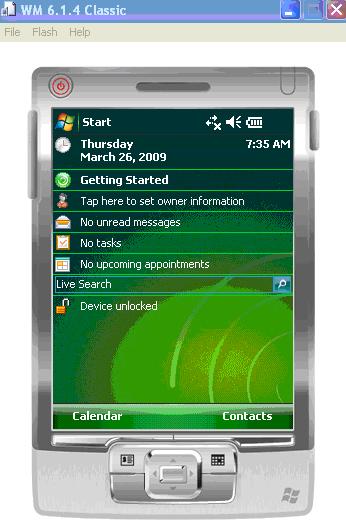
Configure Windows Mobile 6.1 Emulator Images on windows machine to browse Internet and setup email

1. Download Windows Mobile 6.1.4 Professional or standard version from the Microsoft site and perform the default Installation and also install Microsoft device Emulator V3 and start the classic Emulator from the Start program to get the below one

2. Click on Emulator File -> General -> Point any folder at the shared folder
3. Click on File -> configuration -> Network and check “Enable NE2000 PCMCIA..”
4. Click on Peripherals tab and set serial port 0: to COM3
4. Click on Windows(device) -> Settings -> connections(Tab) -> connections(Icon)-> Advanced(tab) -> click on “Select Network” -> “My Work Network”  in Programs automatically connect to Internet…”  -> click on Edit -> Proxy Settings(tab) -> Check “This network connects to Internet” -> ok ok ok to reach main screen of the mobile device.
5. Do a rest of the device once
6. Open Internet explorer to browse Internet 
7. To Setup Exchange Active sync through auto discovery then perform Click on “Setup Email “ and enter the email address and password to click next to configure the same.

Configuring Autodiscovery in Exchange 2007 to autoconfigure Activesync in Windows Mobile Devices

The Autodiscover service simplifies the provisioning of your mobile device by returning the required system settings after you enter your e-mail address and password. By default, the Autodiscover service is enabled in Exchange Server 2007. Cellular telephones that have Windows Mobile® 5.0 and the Messaging & Security Feature Pack (MSFP) and later versions of Windows Mobile software  is supported. Active sync works on the Exchange Direct Push technology.

Understanding DirectPush
http://technet.microsoft.com/en-us/library/aa997252.aspx
You should set this in Exchange Client access Servers(CAS)

Set-ActiveSyncVirtualDirectory -Identity “COMPUTERNAME\Microsoft-Server-ActiveSync (Default Web Site)” -ExternalURL “https://servername.com/

OR

New-AutodiscoverVirtualDirectory [-Server ‘ServerIdentity’]
[-WebSiteName ‘WebSiteName’]
[-BasicAuthentication <$true | $false>]
[-DigestAuthentication <$true | $false>]
[-WindowsAuthentication <$true | $false>]

http://technet.microsoft.com/en-us/library/aa997473.aspx

Need to make sure thatAutodiscover SRV record is added to the Internet DNS

 Service: _autodiscover
Protocol: _tcp
Port Number: 443
Host: mail.domain.com

VBScript to find LDAP Path of the user

on Error resume Next

username = Inputbox(“Whats the username”)

 set objRoot = getobject(“LDAP://RootDSE“)
 domainname = objRoot.get(“defaultNamingContext”)
 wscript.echo  finduser(username,domainname)

 
Function FindUser(Byval UserName, Byval Domain)
 on error resume next

 set cn = createobject(“ADODB.Connection”)
 set cmd = createobject(“ADODB.Command”)
 set rs = createobject(“ADODB.Recordset”)

 cn.open “Provider=ADsDSOObject;”
 
 cmd.activeconnection=cn
 cmd.commandtext=”SELECT ADsPath FROM ‘LDAP://” & Domain & _
    “‘ WHERE sAMAccountName = ‘” & UserName & “‘”
 
 set rs = cmd.execute

 if err<>0 then
  FindUser=”Error connecting to Active Directory Database:” & err.description
 else
  if not rs.BOF and not rs.EOF then
        rs.MoveFirst
        FindUser = rs(0)
  else
   FindUser = “Not Found”
  end if
 end if
 cn.close
end function

Statically pointing Exchange 2007 servers to dedicated Domain controllers and Global catalogs and excluding other domain controllers

If you have build a new Domain controller for the exchange environment and you wanted your exchange servers to user this domain controllers then below command can help is setting the same. You can also statically exclude not to use specific domain controller with the command


$Exchserver = “ExchagneServerName”

set-exchangeserver $exchserver -StaticDomainControllers:New_DC1,New_DC2

set-exchangeserver $exchserver -StaticGlobalCatalogs:New_Gc1,New_GC2

set-exchangeserver $exchserver -StaticExcludedDomainControllers:Old_Dc1,OldDC2


This can also be clubbed in a single line


Get-ExchagneServer $ExchServer -status | FL


Will get the details which are statically applied in above line. Some result may come in blank but using -status will get the results to display

Renewing the Certificate in Client Access Servers

To Renew new certificate in Exchange servers we need to remove the existing the certificate and import new certificate.

1.      Open Exchange Management Shell buy doing run as administrator

2.      Type Get-ExchangeCertificate |fl| out-file –filepath c:\certs.txt

3.      C:\certs.txt will have the details of the current certificate, need to make a note of “Thumprint” of mail.domain.com

4.      Type Remove-ExchangeCertificate  –thumprint <thumbprint>

5.      Confirm to remove the certificate

6.      Import-ExchangeCertificate –path “Certificatepath” –FriendlyName “mail.domain.com”

7.      Enable-Exchange Certificate –Thumbprint  <thumbprint> -Service IIS

8.      Enable-Exchange Certificate –Thumbprint  <thumbprint> -Service pop

9.      Enable-Exchange Certificate –Thumbprint  <thumbprint> -Service imap

10.  Get-ExchangeCertificate  | fl to display new certificate details

Powershell command to set Exchange WarningMailbox, ProhibitSendMailbox, ProhibitSendReceiveMailbox Warning Messages for Exchange 2007

Please find the below commands to set Custom Quota Messages for Warning, ProhibitSendMailbox and ProhibitSendReceiveMailBox, Just change the require custom message and apply the same.

New-SystemMessage -QuotaMessageType WarningMailbox -Language EN -Text “Your Custom Message”

New-SystemMessage -QuotaMessageType ProhibitSendMailbox -Language EN -Text “Your Custom Message”

New-SystemMessage -QuotaMessageType ProhibitSendReceiveMailBox -Language EN -Text “Your Custom Message”

Send AS in OWA 2007

For sending a mail on belhalf of some one throught OWA , you need to have full access on the mailbox.  There is no option to just add from: and add email address and send it. You have to open the required mailbox and send the email. 

1. You can select the drop-down box next to your name in the main menu bar, then enter the name of another mailbox to open. This will open the mailbox on the new window.