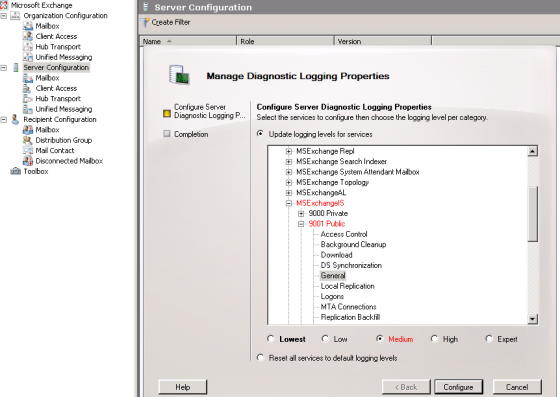
Diagnostic Logging to find Deletion of Public folder in Exchange 2007 and Exchange 2010


Many users will have access to the Public Folder and Many are the owner of Public folder and have full access to it. Chances are that use accidently deletes the folder or some times intentional. To identify this we have to Enable logging on Public folder.  Below has the steps to enabled the same

1. Open Exchagne Management Console
2. Expand and select Server Configuration
3. On the right you will find all the servers
4. Select the Exchange Server where public Folder Database is residing
5. Right click on the Server and select Manage Diagnostic Logging
5. Expand to reach MSexchangeIS-> 9001 public and click on General and  
6. Select Medium and configure to enable this settings

7. When a Public Folder is deleted Event ID 9682 is logged in the Application log. You can search for the evet Id in the application logs.

New Features of Exchange 2010


When you Talk about Exchange 2010 we feel Fresh, Yes it has really new fresh Interesting features which you will definitely like to explore. Below has some brief details on new features on Exchange 2010 with new Logo

1. Database Availability Groups :  In short its known as DAG it simple concept which uses windows failover clustering services and new component called Active Manager. This uses Continues replication to keep multiple copies of the database. Each Database copy can be on up to Maximum of 16 servers.  On Failure Exchange 2010 prompts on one of the database to active and once it is active it will service the mailbox in the database

2. Client Access Server New Role : Outlook Clients connects to Mailbox server directory for accessing emails. When There is a mailbox moves and failover then user outlook will be disconnected and connected back. To provide seem less access of email for users now outlook will connect to CAS servers which will be betwen Exchange mailbox Server and outlook 

3. Outlook live Earlier Outlook Web Access: In Earlier verion of Exchange when you access OWA in legacy browsers like Firefox, safari etc it goes into OWA Light mode. Light Mode provides you limited look and feel with limited option. Outlook live provide you the full functionality when accessed throught Legacy browsers

4. Database Changes :  No More Storage Groups, Database page file reduced from 8 KB to 32 KB which will drastically reduce the IOPS may be upto 70%. SIS has also need removed because of this.

5. Powershell: Powershell V2 provide Hundreds of new cmdlets. V2 allows connects to the remote machine shell and manage it. No need to login locall to manage.

6. Role Based Access Control(RBAC): This allows you to give more granular permion to the required users and groups. With this users will be able to see only the required options which they are given throught permission. This applied to Exchange Management also. This provide only limited cmdlets which user has the permission to execute

7. Exchange Control Panel: This allows Adminsitrators to managed Exchange throught browser. Still Exchange Managment Shell and Console is available

8. Archiving: New Welcoming features is Mailbox Archiving. This helps to avoid PST if users wants to archive older emails..

9. Others:
No upgrade option, only fresh installation.
No more LCR, SCR, CCR
Send email to user from Exchange Management console
Certificates options on Exchagne management console no need to use powershell
New Federation Trust Options to share free busy information betwen Exchange orginization

Setting Exchange Mailbox Server to Use specific Hub Transport for mail submission – SubmissionServerOverrideList

Exchange Hub transport Server will be automatically load balanced with in the Active Directory Site. Hub Transport Servers are load balanced in Round robin fashion with in the Site. If you want to Force Exchange Mailbox server to use specific Hub Server you need to make use of SUBMISSIONSERVEROVERRIDELIST.

Set-MailboxServer -Id:MailboxServer1 -SubmissionServerOverrideList: htserver1,htserver2

Above commands will set MailboxServer to  use htserver1 and htserver2 for mailsubmission. It is normally used for troubleshooting.

Implementing SCOM Monitoring on DMZ servers using Scom Gateway Server in DMZ

Every Orginization has Production Network and DMZ Network.  DMZ Network will have lots of servers. This servers also needs to be monitored and it can be monitored with the help of SCOM server in production. We need make use of certificate for this purpose

  1. Export Root Certificate domain.com from CA and install on all the SCOM RMS and MS into Computer Account
  2. Create Custom Certificate from the Certificate Authority OpsManagerCert by Duplicating IPSec(Offline Request) Certificate with all the Required parameter and with Setting key as exportable
  3. From RMS open CA Web enrollment Request Page and Request the Certificate           with the Custom Created Template OpsManagerCert and RMSservername.domain.com and install the same
  4. Export the newly Installed Certicate from “Current User –Personal Certificate” and import into to Certicate – Local computer – Personal store
  5.  Access All Management Servers in the production domain and  and follow step 3 and 4 to install OpsManagerCert
  6. Loging to GateWay server in DMZ and request the certificate for OpsManagercert using webenrollment gatewayserver.efsecure.com
  7. Export the newly Installed Certicate from “Current User –Personal Certificate”  in PFX form with password and import into to Certicate – Local computer – Personal store
  8. Import PFX file using MoMCertimport.exe  C:\cert.pfx  Cert which is exported on all the DMZ servers
  9. Loging to Servers in DMZ and and open Certificate webenrollment page in domain and request OpsMansgerCert Custom certificate with DMZ server name
  10. Follow Step 7 and export and import to the personal Store
  11. Install Root Certificate on all the Serves in DMZ
  12. Running Gateway approval tool on the RMS Server
  13. Running MomGateway.msi on the Gateway server
  14. Install the Agent on Servers
  15. Loging to the Scom Server and Approve

Note : TCP ports 5723 and 5724 Must be open between DMZ and Interal Network

Below Article helps to Request certificate for all the DMZ servers in the given input text file

http://blogs.technet.com/momteam/archive/2008/08/22/obtaining-certificates-for-non-domain-joined-agents-made-easy.aspx

Implementing SCOM Monitoring on DMZ servers

Every Orginization has Production Network and DMZ Network.  DMZ Network will have lots of servers. This servers also needs to be monitored and it can be monitored with the help of SCOM server in production. We need make use of certificate for this purpose

  1. Export Root Certificate domain.com from CA and install on all the SCOM RMS and MS into Computer Account
  2. Create Custom Certificate from the Certificate Authority OpsManagerCert by Duplicating IPSec(Offline Request) Certificate with all the Required parameter and with Setting key as exportable
  3. From RMS open CA Web enrollment Request Page and Request the Certificate with the Custom Created Template OpsManagerCert and RMSservername.domain.com and install the same
  4. Export the newly Installed Certicate from “Current User –Personal Certificate”  in PFX form with password and import into to Certificate – Local computer – Personal store
  5. Access Web Enrollment page from All Management Servers in the production domain and  and follow step 3 and 4 to install OpsManagerCert
  6. Loging to Servers in DMZ and and open Certificate webenrollment page in domain and request OpsMansgerCert Custom certificate with DMZ server name
  7. Follow Step 4 and export and import to the personal Store
  8. Install Root Certificate on all the Serves in DMZ
  9. Install the Agent on Servers
  10. Import PFX file using MoMCertimport.exe  C:\cert.pfx  Cert which is exported on all the DMZ servers
  11. Loging to the Scom Server and Approve

Note : TCP ports 5723 and 5724 Must be open between DMZ and Interal Network

Below Article helps to Request certificate for all the DMZ servers in the given input text file

http://blogs.technet.com/momteam/archive/2008/08/22/obtaining-certificates-for-non-domain-joined-agents-made-easy.aspx

Migrating Windows Certificate Authority Server from Windows 2003 Standard to windows 2008 Enterprise Server

Migrating Windows Certificate Authority Server from Windows 2003 Standalone on DC to windows 2008 Enterprise Server. Dude to Various advantages on Installing CA on Windows 2008 Server like windows 2008 server supports v1, v2 and v3 certificate templates, R2 windows 2008 Enterprise CA server also supports Cross Forest Certificates. Below article helps to you migrate CA From windows 2003 Standard Edition to windows 2008 Enterprise Edition

Moving Certificate Server in Simple Steps

  1. Perform System State backup on Source CA Server
  2. Backup CA from CA Console
  3. Backup CA registry Configuration
  4. Uninstall CA from the Source Server using Add remove programs
  5. Install the CA as Role on the target Windows 2008 computer using existing certificate key
  6. Restore the CA database on the target CA
  7. Import the CA Registry configuration on the target CA
  8. Complete post-migration tasks

Perform  System State backup on Source CA

  1. Log in to Source server and Take System State backup using Ntbackup to C:\CertBackup

Backup CA from CA Console

  1. Open the Certification Authority snap-in
  2. Right-click the node with the CA name, point to All Tasks, and then click Back Up CA.
  3. On the Welcome page of the CA Backup wizard, click Next. On the Items to Back Up page, select the Private key and CA certificate and Certificate database and certificate database log check boxes, enter the backup location, and then click Next
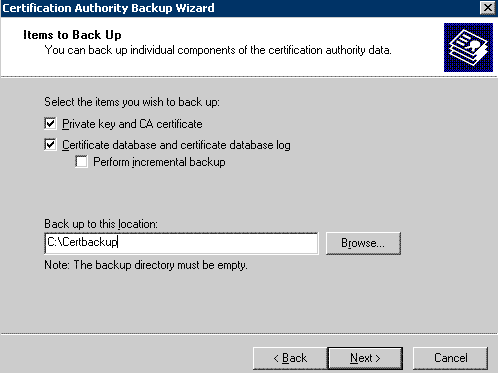
4. On the Select a Password page, enter a password to protect the CA private key and click Next.

5. On Completing the Backup Wizard page, click Finish.

6. This will create Files in C:\Certbackup

  • certbackup.p12
  • Database

Backup CA registery Configuration

1.   Click Start, point to Run, and type regedit to open the Registry Editor.

2.   In HKEY_LOCAL_MACHINE\SYSTEM\CurrentControlSet\Services\CertSvc, right-click Configuration, and then click Export.

3.   Enter a location and file name, and then click Save. This creates a .reg file with the registry configuration information for your CA.

UnInstall CA from the Server using Add remove programs

1. Go To Add remove programs -> Add remove Windows components -> click on Certificate Services and uncheck on Certificate Services CA and Certificate Services Web Enrollment Support
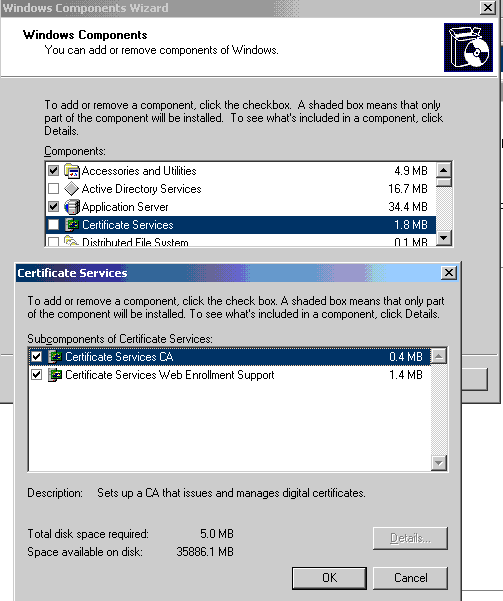
Install the CA as Role on the target computer using exisintg certificate key

  1. Install New Widows 2008 Enterprise Edition Sever
  2. Open Server Manager and Add New Role
  3. Select Active Directory Certificate Services
  4. Select Certificate Authority and Next
  5. Select Enterprise CA  and Next
  6. Use Existing Private Key as show below and select selct a certificate and user its associated private key and Next
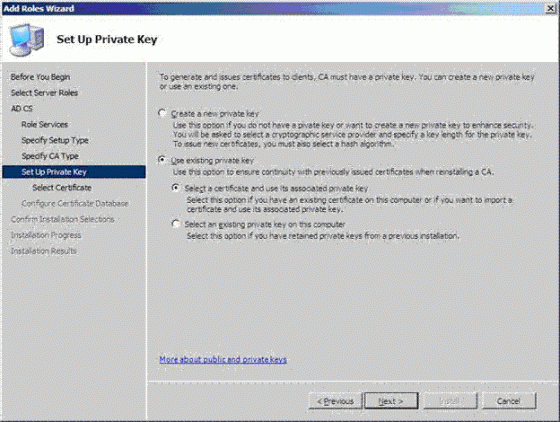
7. Click on Browse buttong to Search folder containing certificate and private key which you exported from Source computer

8. Enter the password which was used to export

9. Next , Next and click on Install

Restore the CA database on the target CA

  1. Open the Certification Authority snap-in.
  2. Right-click the node with the CA name, point to All Tasks, and then click Restore CA. Click OK to confirm stopping the CA service.
  3. In the CA Restore wizard, on the Welcome page, click Next.
  4. On the Items to Restore page, select Certificate database and certificate database log. Click Browse, and navigate to the location of the Database folder that contains the CA database export files created when you previously exported the CA database.
  5. Enter the password you used to export the CA database from the source CA, if a password is requested.
  6. Click Finish, and then click Yes to confirm restarting the CA.

Import the CA Registery configuration on the target CA.

  1. Double click on registery file which you exported from the source server to import the same into the server and Yes to confirm the same

Complete post-migration tasks

Updating CRL Distribution Point and Authority Information Access Extensions

  1. Loging to Windows 2008 New CA Server
  2. Open Certificate MMC
  3. Right click on the CA and click on Extenstion and click on ADD and add the below line by changing SourceServername.

ldap:///CN=<CATruncatedName><CRLNameSuffix>,CN=SourceServername,CN=CDP,CN=Public Key Services,CN=Services,<ConfigurationContainer><CDPObjectClass>
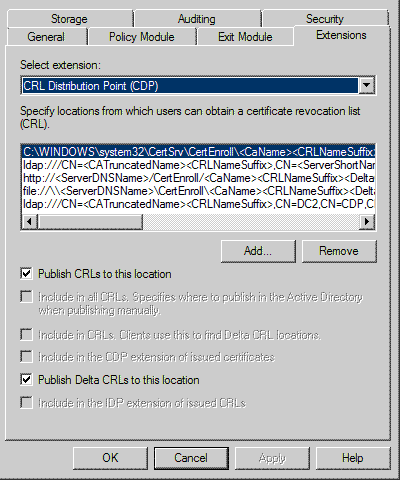
4. Check Publish CRLs to this location

5. Publish Delta CRLs to this location

6. Apply and OK

7. Verify the CA can publish CRLs to the new location.

8. Open the Certification Authority snap-in.

9. Right-click Revoked Certificates, point to All Tasks, and click Publish.

10. Click either New CRL or Delta CRL only, and click OK.

To verify ACLs on the AIA and CDP containers

  1. Loging to DC and open Active Direcotry Sites in Services
  2. On the Console click on Top Node
  3. Click View and Show Services node
  4. you will find Services folder on the Left and expand to reach Public key Services as shown below
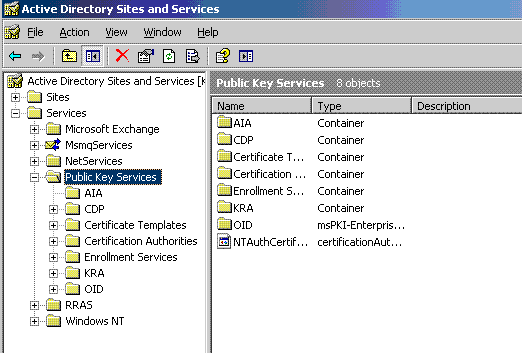
5. Expand Public Key Services

6. click AIA folder and In the details pane, select the name of the source CA.

7.  On the Action menu, click Properties.

8.  Click the Security tab, and then click Add.

9.  Click Object Types, click Computers, and then click OK.

10. Type the host name of the target CA, and click OK.

11. In the Allow column, select Full Control, and click OK.

12. In the left pane, select CDP and the host name of the source CA.

13. In the details pane, select the first CRL object.

14. On the Action menu, click Properties, and then click the Security tab.

15. In the list of permitted group or user names, select the name of the source CA, click Remove, and then click Add.

16. Click Object Types, select Computers, and then click OK.

17. Type the host name of the target CA, and click OK.

18. In the Allow column, select Full Control, and then click OK.

19.     In the details pane, select the next CRL object, and repeat steps 14 through 18 until you have reached the last object.

Verifying ReGistery

1. Verify that CAServerName is a registry string value located under the HKEY_LOCAL_MACHINE\SYSTEM\CurrentControlSet\Services\CertSvc\Configuration\CAName\ registry key. It should be updated to represent the DNS or the host of the new CA host.

2. Verify that CACertPublicationURLs and CRLPublicationURLs are both registry multi-string values located under the same key as CAServerName.

3.  Check the remaining registry values under the HKEY_LOCAL_MACHINE\SYSTEM\CurrentControlSet\Services\CertSvc registry key, with emphasis on any values that have been customized to ensure that they are free of data containing the old CA host name or other invalid CA settings. For example:

  • Configuration\ConfigurationDirectory
  • Configuration\CAName\CACertFilename

Exchange 2007 SP2 Prepare Schema Error because an override is set in the registry.

[ERROR] Setup cannot use domain controller ‘because an override is set in the registry. Run Setup again, and specify ‘/DomainController:.

When you are running /prepareschema or /PrepareAd from the Exchange 2007 SP1 server some times you may land in Above error message.  This error can occur when you are set the restriction on Exchange 2007 to use specific DC by using Set-ExchangeServer command. Below link has some example on how to point Exchange 2007 to user specific GCs and DCs  and also to restrict pointing to required GCs and DCs

/2009/03/20/statically-pointing-exchange-2007-servers-to-dedicated-domain-controllers-and-global-catalogs-and-excluding-other-domain-controllers/

Solution :

1. You can add Schema Master domain controller to the list of Staticdomaincontrollers and StaticGlobalcatalogserver and run the setup

2. Run PrepareSchema and PrepareAd on the Server where you have not installed any Exchange server using below command

Setup.com /PrepareSchema /DomainController:SchemaMasterServer

Setup.com /PrepareAD /DomainController:SchemaMasterServer